Enhancing the Security of Scanned Data
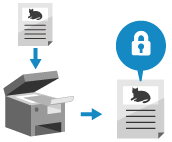
When scanning important documents, you can encrypt the scanned data or add a digital signature to enhance the security of the scanned data.
You can only encrypt PDF files.
A digital signature can only be added to PDF files and XPS files.
You can both encrypt and add a digital signature to a PDF file.
You can only encrypt PDF files.
A digital signature can only be added to PDF files and XPS files.
You can both encrypt and add a digital signature to a PDF file.
* You cannot enhance the security of scanned data when you use Easy Scan and Send/Easy Scan.
* You cannot encrypt or add a digital signature when saving scanned data to Mail Box.
* You cannot encrypt or add a digital signature when saving scanned data to Mail Box.
NOTE
Enhancing the Security of an E-mail or I-Fax
You can set S/MIME to encrypt or add a digital signature to an outgoing e-mail or I-Fax. Encrypting E-mail with S/MIME
Encrypting Scanned Data and Creating a PDF File
You can set a password to encrypt a PDF file to restrict viewing and editing. You must enter the set password to open and edit the PDF file.
* A PDF file cannot be encrypted in the following cases:
When [Auto (OCR)] is selected in the file name setting Setting the File Name
When sending scanned data to a fax or I-Fax destination
* For the basic scanning operations, see the following:
1
On the scan screen, press the file format setting button. Scan Screen
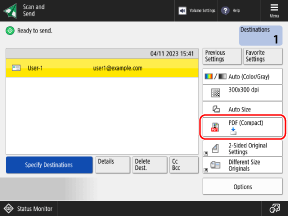
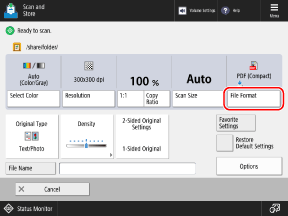
The [File Format] screen is displayed.
2
Press [PDF].
3
Press [Encrypt].
If [Format to PDF/A] is selected, disable [Format to PDF/A], and then press [Encrypt].
* Additional functions other than [Format to PDF/A] can be set in combination with [Encrypt].
Set the operation to be restricted and the password, and press [OK].
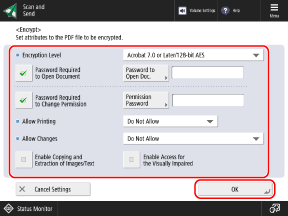
[Encryption Level]
Select the encryption level.
When using 256-bit AES, you can set whether to display [Acrobat 10.0 or Equivalent/256-bit AES] or [Acrobat 9.0 or Equivalent/256-bit AES]. [256-bit AES Settings for Encrypted PDF]
[Password Required to Open Document]
The PDF file is restricted so that only users who know the password can open the file.
To set a password, select the checkbox, press [Password to Open Doc.], and enter the password.
To set a password, select the checkbox, press [Password to Open Doc.], and enter the password.
* You cannot set the same password as [Permission Password].
[Password Required to Change Permission]
The PDF file is restricted so that only users who know the password can print or change the file.
To set a password, select the checkbox, press [Permission Password], and enter the password. Use the following items to set the restrictions:
To set a password, select the checkbox, press [Permission Password], and enter the password. Use the following items to set the restrictions:
* You cannot set the same password as [Password to Open Doc.].
[Allow Printing]
To restrict printing of the PDF file, select [Do Not Allow] or [Allow (Low Resolution Only)].
* If [Acrobat 3.0 or Later/40-bit RC4] is selected in [Encryption Level], [Allow (Low Resolution Only)] is not displayed.
[Allow Changes]
To restrict changes to the PDF file, select [Do Not Allow]. To allow changes, select the items that can be changed.
* When both encrypting and adding a digital signature to the file, select [Changes but Extract Pages].
[Enable Copying and Extraction of Images/Text]
To restrict copying and extracting of images and text of the PDF file, clear the checkbox.
* If [Acrobat 3.0 or Later/40-bit RC4] is selected in [Encryption Level], this option is not displayed.
[Enable Access for the Visually Impaired]
To restrict the text-to-speech function, clear the checkbox.
* If [Acrobat 3.0 or Later/40-bit RC4] is selected in [Encryption Level], this option is not displayed.
[Enable Accessibility, Copy, Extraction of Image/Text]
To restrict copying and extracting of images and text of the PDF file or the text-to-speech function, clear the checkbox.
* This option is only displayed when [Acrobat 3.0 or Later/40-bit RC4] is selected in [Encryption Level].
5
Press [OK].
The scan screen is displayed again.
IMPORTANT
Even if [Password Required to Change Permission] is set to restrict printing or changes to the PDF file, some restrictions may be ignored depending on the application to be used.
NOTE
Saving a Set Password
When you log in to operate the machine, [Store Password] is displayed on the screen in Step 4. If you press [Store Password], the [Password to Open Doc.] and [Permission Password] settings are saved to the machine, and you do not have to enter the password the next time you configure the settings.
Each login user can save only one password to each [Password to Open Doc.] and [Permission Password].
To change the saved password, enter a new password into [Password to Open Doc.] and [Permission Password], and press [Store Password] to save the new password.
To delete the saved password, clear the contents of [Password to Open Doc.] and [Permission Password], and press [Store Password] with the fields left blank.
When a password is saved and you call up the settings of the encrypted PDF from "Favorite Settings," a message is displayed prompting you to select either the saved password or the password registered in "Favorite Settings."
Adding a Digital Signature to Scanned Data
Adding a digital signature to a PDF file or XPS file can guarantee the author of the file and prove that the document has not been tampered with.
* For the basic scanning operations, see the following:
Required Preparations
Prepare the key and certificate for the digital signature. Adding a Digital Signature to Scanned Data
1
On the scan screen, press the file format setting button. Scan Screen
The [File Format] screen is displayed.
Press [PDF] or [XPS].
3
Press [Add Digital Signatures] or [Add Device Signature].
Additional functions such as [Compact] can be set in combination with adding a digital signature.
4
Specify the digital signature to add to the file, and press [OK].

If you are not logged into the machine and you selected [XPS] in Step 2, you can skip this step. Proceed to Step 5.
[Device Signature]
Adds the name of the machine as the signature. Use this to prove that the file was scanned using the machine.
To add a device signature, press the button to select it.
To add a device signature, press the button to select it.
[User Signature]
Adds the login user name as the signature. Use this to prove that the file was scanned by the user.
To add a user signature, press the button to select it.
To add a user signature, press the button to select it.
[Visible Signatures] (PDF files only)
Displays the signature information on the first page so that it is easy to see that a digital signature has been added to the file.
To add a visible signature, press the button and select the display position of the signature.
To add a visible signature, press the button and select the display position of the signature.
Press [OK].
The scan screen is displayed again.
NOTE
Encrypting and Digitally Signing a PDF File
To encrypt a PDF file, configure the following settings: Encrypting Scanned Data and Creating a PDF File
When setting [Password Required to Change Permission], select [Changes but Extract Pages] in [Allow Changes].