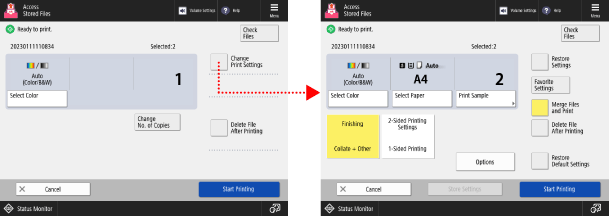
[Mail Box] Print Settings Screen
On the file selection screen of Mail Box, select a file and press [Print] to display the print settings screen.
Use this screen to set the number of prints and printing color.
To configure more detailed print settings, press [Change Print Settings]. Configure 2-sided printing and adjust the image quality and other settings to suit your document and purpose.
After checking or changing the print settings, press [Start Printing] to perform printing.
* The items that appear on the screen vary depending on the model and options.
* Depending on the setting, the reference for the description here is the description when copying. Replace "copy" with "print" when referring to it. The description may also include settings that cannot be configured for printing.
Checking and Changing the Print Settings
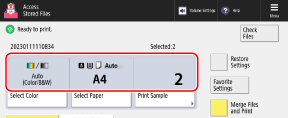
The currently set printing color, paper to be used, and number of prints are displayed in the center of the screen. Check these settings to ensure correct printing.
To change the number of prints, enter the value directly using the numeric keys.
When multiple files are selected, press [Change No. of Copies] and enter the number of prints.
When multiple files are selected, press [Change No. of Copies] and enter the number of prints.
* The number of selected files is displayed above the number of prints.
To change the printing color, press [Select Color]. Selecting Color Copying or Black & White Copying
To change the paper to be used, press [Change Paper].
When multiple prints are specified and the finishing function and booklet printing settings are configured, you can press [Print Sample] to check the print finishing.
Configuring the Various Print Settings
Press [Change Print Settings] at the top right of the screen to configure the following settings:
[Finishing]
You can set sorting, stapling, and other finishing functions. Configuring the Finishing Functions
[2-Sided Printing]
When printing on both sides of the paper, select [Book Type] or [Calendar Type].
[Book Type]: Prints on both sides of the paper with the same top and bottom orientation on the front and back sides.
[Calendar Type]: Prints on both sides of the paper with the reverse top and bottom orientation on the front and back sides.
* When [Merge Files and Print] is set, select one of the following:
[Always Print 2-Sided]: Performs 2-sided printing continuing from the previous file.
[Always Print 1st Pg. on Front Sd.]: Always prints the first page of a file on the front side.
[Merge Files and Print] (Only when multiple files are selected)
Specify whether to merge multiple selected files to one file and print it.
* When files are merged, the print settings saved to the files are disabled and the default setting are applied. [Change Default Settings]
[Options]
Configure booklet printing, adjust the image quality, and configure the other print settings. [Options] Screen
Saving the Print Settings
Press [Store Settings] at the bottom of the screen to save the file with the changed print settings.
If the file already has saved print settings, it is overwritten.
If the file already has saved print settings, it is overwritten.
* When multiple files are selected, the print settings cannot be saved.
Clearing the Print Settings
To clear changed print settings, press [Restore Default Settings] at the bottom right of the screen.
To clear changed print settings and return to the previous screen, press [Restore Settings] at the top right of the screen.
Printing a File
Press [Start Printing] at the bottom right of the screen to perform printing.
If you select [Delete File After Printing] before you press [Start Printing], the printed file is automatically deleted from the machine.
If you select [Delete File After Printing] before you press [Start Printing], the printed file is automatically deleted from the machine.
NOTE
Registering Frequently Used Settings from [ Menu]
Menu]
Menu]You can register the current settings as "Favorite Settings" to easily call up these settings from the print settings screen, as needed. Registering and Recalling Favorite Settings
By registering the current settings as buttons on the [Home] screen, you can call up these settings from the [Home] screen with a single click of a button. Adding Buttons to the [Home] Screen (Personal and Shared Buttons)
You can also register the current settings as default settings. Changing the Default Settings
Checking the File Information and Details
Press [Check Files] at the top right of the screen to check the information of the selected file.
On the [Check Files] screen, select a file and press [Details], to check the file resolution, color mode (RGB or CMYK), and other details.
On the [Check Files] screen, select a file and press [Display Image] to display a preview screen and check the file details.
When the Print Settings Have Not Been Changed
When the print settings have not been changed, the following settings are applied:
When the print settings are not saved in the file, the default settings are applied. [Change Default Settings]
When the print settings are saved in the file, those settings are applied.
When the Number of Pages That Can Be Printed during Department ID Management Is Restricted
The number of pages that can be printed by the logged-in Department ID is displayed at the top of the screen.

[Options] Screen
On the print settings screen, press [Change Print Settings]  [Options] to display the [Options]screen.
Press the buttons on this screen to configure the detailed print settings. After configuring the print settings, press [Close] to return to the print settings screen.
Press the buttons on this screen to configure the detailed print settings. After configuring the print settings, press [Close] to return to the print settings screen.
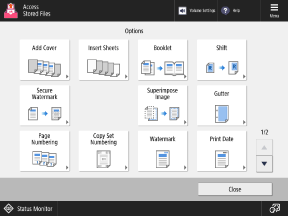
* The items that appear on the screen vary depending on the model and options.
[Add Cover]
Prints with a front cover and back cover. Adding a Front Cover and Back Cover
[Insert Sheets] / [Job Separator]
Prints after inserting paper at the specified page.
* When multiple files are selected, you can set [Job Separator] to insert paper for each file.
[Booklet]
Prints by assigning pages to form a booklet. Making Booklets (Booklet Copying)
[Shift]
Adjusts the printing position. Adjusting the Position of the Original (Shift)
[Secure Watermark]
Prints while embedding invisible background text (a watermark) such as "TOP SECRET" or "CONFIDENTIAL." Embedding a Watermark When Copying (Secure Watermark)
[Superimpose Image] (for C7100 Series and C5100 Series)
Prints while superimposing a registered form image, such as a logo or frame. Superimposing Images of Logos and Frames When Copying (For C7100 Series and C5100 Series)
[Gutter]
Prints while creating a margin (gutter) for stapling or hole punching. Adding a Gutter
[Page Numbering] / [Copy Set Numbering] / [Watermark] / [Print Date]
Prints while adding information such as page numbers and the date. You can also add a watermark such as "CONFIDENTIAL." Adding Page Numbers and Watermarks When Copying
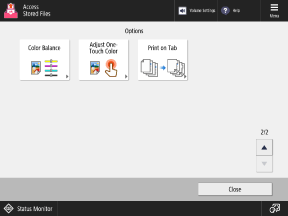
[Color Balance]
Adjusts the levels of yellow, magenta, cyan, and black. Adjusting the Color
[Adjust OneTouch Color]
Adjusts the printing color automatically just by selecting a sensory color, such as to "lighten the tint" or "create a retro black-and-white look with sepia tones." Setting the Desired Color Tone with One-Touch Buttons
[Print on Tab] (for C7100 Series and C5100 Series)