Preventing Documents from Being Printed Immediately from a Computer (Forced Hold)
Documents (print data) sent from a computer to the machine can be temporarily held in the machine and prevented from being printed immediately.
You can configure the settings so that login users can view and print only their own documents. This reduces the risk of other people viewing or inadvertently picking up important documents.
You can configure the settings so that login users can view and print only their own documents. This reduces the risk of other people viewing or inadvertently picking up important documents.
If a document held in the machine is not printed within the set period of time, it is automatically deleted and can no longer be printed. You can change the storage time for held documents, as needed.
NOTE
For details on how to print held documents, see the following:
For details on the number of users that can use the Hold function and the documents that are supported, see the specifications of the Hold Print function. Printing with the Hold Print Function*1
If you want to hold data to be printed using JDF, the settings need to be configured separately from the Forced Hold settings. [Use JDF] (C7100 Series Only)
Configuring the Forced Hold Settings
This section describes how to configure the settings using Remote UI from a computer.
On the control panel, select [ Settings/Registration] in the [Home] screen or other screen, and then select [Function Settings] to configure the settings. [Forced Hold]
Administrator privileges are required.
On the control panel, select [
Settings/Registration] in the [Home] screen or other screen, and then select [Function Settings] to configure the settings. [Forced Hold]Administrator privileges are required.
1
Log in to Remote UI as an administrator. Starting Remote UI
2
On the Portal page of Remote UI, click [Settings/Registration]. Remote UI Portal Page
3
Click [Printer]  [Print].
The [Print] screen is displayed.
4
In [Forced Hold Settings], select the [Force Hold] checkbox.
5
Register the conditions for holding documents, as needed.
Register the conditions for printing documents without holding them or for canceling printing, based on the user name and IP address. If you register multiple conditions, set the order of priority.
If Forced Hold is enabled without registering a condition, documents from a computer are handled as follows:
Documents of all users are held.
Documents of unknown users are deleted.
Registering Conditions
1
In [Registered Condition], click [Register New].
The [Register New Condition] screen is displayed.
2
Enter the condition name.
3
Select the [Enable Condition] checkbox.
4
Set the condition type and details.
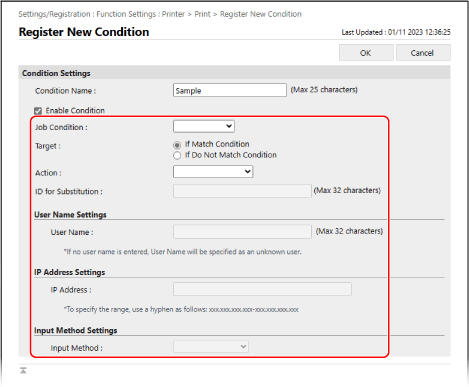
When Setting a User Name As a Condition
Select [User Name] in [Type], and enter the user name to set as the condition in [User Name Settings].
When Setting Documents of Unknown Users As a Condition
Select [User Name] in [Type], and leave [User Name Settings] blank.
When Setting an IP Address As a Condition
Select [IP Address] in [Type], and enter the IP address to set as the condition in [IP Address Settings].
You can also specify a range of IP addresses by using a hyphen (-).
Input example: When specifying a range of IP addresses
192.168.0.10-192.168.0.20
When Setting a Document Protocol As a Condition
Select [Input Method] in [Type], and select the protocol to set as the condition in [Input Method Settings].
5
In [Target], specify the target.
To specify the document that meets the conditions as the target, select [If Match Condition].
To specify the document that does not meet the conditions as the target, select [If Do Not Match Condition].
6
In [Action], select how to handle the document.
To delete without holding the document, select [Cancel].
To print without holding the document, select [Print]. However, when using Secure Print or Encrypted Secure Print, the print data is held as a shared document.
To hold the document, select [Hold as Shared Job]. In [ID for Substitution], you can specify the user name when holding the document.
7
Click [OK].
The registered condition is added to [Registered Condition] on the [Print] screen.
Setting the Priority of a Condition
In [Registered Condition], click [Up] or [Down] for [Change Priority].
6
In [Other], configure the detailed Forced Hold settings, as needed.
Select the checkboxes of the items to be enabled.
[Delete Job After Printing]
Deletes held documents after printing.
[Only Allow Encrypted Secure Print Jobs]
Restricts printing from a computer to Encrypted Secure Print only. Restricting Printing from a Computer to Encrypted Secure Print
[Require Domain Name to Determine My Job]
Includes the domain name in determining the documents of the login user.
If the document of the login user cannot be determined correctly, clear the checkbox and use only the user name for determination.
If the document of the login user cannot be determined correctly, clear the checkbox and use only the user name for determination.
[Display Other User Jobs]
Displays documents for users other than the login user.
[Restrict Deletion of Other User Jobs]
Prevents login users from deleting documents of other users.
[Match Case for User Name]
Enables case sensitivity when determining users for documents.
* It is recommended to configure this setting together with the setting for determining users with user authentication. [Match Case for User Name]
[Display Same Group User Jobs]
Displays documents of the Department ID to which the login user belongs.
[Enable Auto Print Function When Logging In]
Enables automatic printing of held documents.
When you select this checkbox, the login user can set [Auto Print User Jobs When Logging In]. [Auto Print User Jobs When Logging In]
When you select this checkbox, the login user can set [Auto Print User Jobs When Logging In]. [Auto Print User Jobs When Logging In]
* This setting is disabled in the following cases:
When user authentication is disabled [Use User Authentication]
When the personalization function is disabled [Enable Use of Personal Settings]
When ACCESS MANAGEMENT SYSTEM is enabled [Use ACCESS MANAGEMENT SYSTEM]
When the setting is configured not to display the documents for the login user on the print screen of the machine [Job List Display Settings]
When the [Only Allow Encrypted Secure Print Jobs] checkbox is selected in the detailed Forced Hold setting
When the [Display Warning When Starting to Print] checkbox is selected in [Held Jobs Warning Settings] in the detailed Forced Hold setting
[Held Jobs Warning Settings]
Specify whether to display a warning when displaying or printing held documents.
When displaying a warning, set the conditions.
When displaying a warning, set the conditions.
[PIN Settings for Secure Print Jobs]
Specify whether to prompt the user to enter a PIN when operating Secure Print documents.
* Regardless of this setting, the user must enter a PIN when using Encrypted Secure Print documents.
[Require PIN for Job Deletion]
Requires users to enter a PIN when they delete print data held in the machine.
7
Click [OK].
The settings are applied.
8
Log out from Remote UI.
NOTE
Editing Registered Conditions
To edit the registered information, click the name of the condition you want to edit in [Registered Condition] on the [Print] screen.
Changing the Storage Period for Held Documents
You can change the amount of time until documents held in the machine are deleted.
Use the control panel to change the storage period. You cannot change the storage period using Remote UI from a computer.
Administrator privileges are required.
Administrator privileges are required.
1
Log in as an administrator. Logging In to the Machine
2
On the control panel, press [ Settings/Registration] in the [Home] screen or other screen. [Home] Screen
Settings/Registration] in the [Home] screen or other screen. [Home] ScreenThe [Settings/Registration] screen is displayed.
3
Press [Function Settings] [Print] [Job Storage Period].
The [Job Storage Period] screen is displayed.
4
Change the document storage period (amount of time until held documents are deleted).
5
Press [OK].
The change is applied.