Color Setting
You can configure the color settings when copying.
You can also configure the settings to adjust the color tone or invert the color and gradation of the entire original.
You can also configure the settings to adjust the color tone or invert the color and gradation of the entire original.
Selecting Color Copying or Black & White Copying
Select the color when copying. You can configure the setting according to your needs, such as when you want to save toner by making black and white copies of color originals.
1
On the copy screen, press [Select Color]. Copy Screen
The [Select Color] screen is displayed.
2
Select the copy color.
[Auto (Color/Black & White)]
Detects the color of the original automatically. Color originals are copied in color, and black and white originals are copied in black and white.
Black and white originals may be detected as color originals, depending on the condition or background of the original. In this case, select [Black & White].
Color originals may be detected as black and white depending on the condition of the original and the size, such as when only the edges of the original are in color. In this case, select [Full Color].
* When [Auto (Color/B&W)] is selected on a model that performs color copying and black and white copying at different speeds, black and white originals are copied at the same speed as color originals.
* The color of the original may not be detected correctly if you copy multiple originals of different sizes without configuring the Different Size Originals setting. Copying Originals of Different Sizes (Different Size Originals)
* The color of the original may not be detected correctly if you copy multiple originals of different sizes without configuring the Different Size Originals setting. Copying Originals of Different Sizes (Different Size Originals)
[Full Color]
Copies in full color, regardless of the color of the original.
* When [Full Color] is selected, copies of black and white originals are also counted as color copies.
[Black & White]
Copies in black and white, regardless of the color of the original.
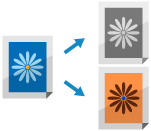
[Single Color]
Copies in one specified color only.
Example: When copying with [Red] specified as the color
* When [Single Color] is selected, copies of black and white originals are also counted as color copies.
[Two Colors]
Copies in black and a specified color.
* You can set whether all colors other than black are copied in the specified color, or only colors close to the specified color (approximate colors) are copied in the specified color. [Conversion Color by Specific Color for Two Colors Print]
* When [Two Colors] is selected, copies of black and white originals are also counted as color copies.
3
Press [OK].
The copy screen is displayed again.
NOTE
Copy Speed
If you select [Auto (Color/Black & White)] when copying a black and white original, it will be copied at the same speed as a color original.
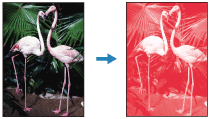
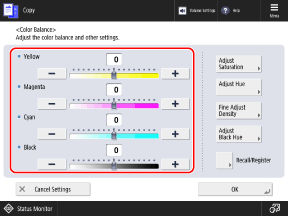
Adjusting the Color
You can adjust the levels of yellow, magenta, cyan, and black to copy with colors more faithful to the original or more vivid than the original.
1
On the copy screen, press [Options]  [Color Balance]. Copy Screen
The [Color Balance] screen is displayed.
2
Move the slider to the left or right for each color to adjust the color levels.
Adjustment example:

3
Adjust the color details, as needed.
* [Adjust Saturation], [Adjust Hue], and [Adjust Black Hue] may not be displayed depending on the model.
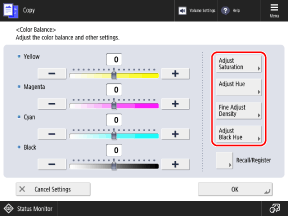
Adjusting the Color Vividness (Adjust Saturation)
1
Press [Adjust Saturation].
The [Adjust Saturation] screen is displayed.
2
Move the slider to the left or right for each color to adjust the color vividness.
You can press [Low] or [High] for [All Colors] to move the sliders of all colors together at the same time.
3
Press [OK].
The [Color Balance] screen is displayed again.
Adjusting the Hue (Adjust Hue)
1
Press [Adjust Hue].
The [Adjust Hue] screen is displayed.
2
Move the slider to the left or right for each color to adjust the hue.
You can press [ ] or [
 ] for [All Colors] to move the sliders of all colors together at the same time.
] or [] for [All Colors] to move the sliders of all colors together at the same time.3
Press [OK].
The [Color Balance] screen is displayed again.
Adjusting the Color Level of Each Density Area Independently (Fine Adjust Density)
Adjust the levels of the three density areas for each color.
1
Press [Fine Adjust Density].
The [Fine Adjust Density] screen is displayed.
2
Select the color you want to adjust, and move the sliders to the left or right for each density area to adjust the level.
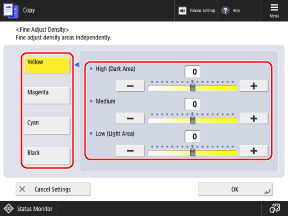
3
Press [OK].
The [Color Balance] screen is displayed again.
Adjusting the Density of Black Areas (Adjust Black Hue)
Adjust the density of black areas without affecting other colors.
1
Press [Adjust Black Hue].
The [Adjust Black Hue] screen is displayed.
2
Move the slider to the left or right to adjust the density of the black areas.
Move the slider toward [Lighter] to prevent the image from becoming over-darkened, and move it toward [Darker] to make faint text and images clearer.
3
Press [OK].
The [Color Balance] screen is displayed again.
4
Press [OK].
Registering Color Settings After Adjustment
If you often use originals with a specific color tone, you can register the adjusted color settings. You can then recall the settings on the screen for adjusting the color balance, saving you the trouble of adjusting the color balance each time.
You can register up to four color settings.
You can register up to four color settings.
1
Press [Recall/Register].
The [Recall/Register] screen is displayed.
2
Select the button to which to register the current settings, and press [Register].
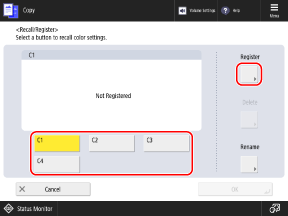
If you select a button to which settings are already registered, the registered information is overwritten.
3
Press [Yes].
The settings are registered, and the [Recall/Register] screen is displayed again.
4
Change the button name, as needed.
Select the button to which the settings are registered, and press [Rename].
5
Press [OK].
The [Color Balance] screen is displayed again.
* To recall the registered settings, press [Recall/Register] press the registered button press [OK].
5
Press [Close].
The copy screen is displayed again.
Setting the Desired Color Tone with One-Touch Buttons
You can automatically adjust the copying color simply by selecting a color setting to achieve the desired visual effect, such as "lightening the hue" or "creating a retro black-and-white look with sepia tones."
1
On the copy screen, press [Options] [Adjust OneTouch Color]. Copy Screen
The [Adjust OneTouch Color] screen is displayed.
2
Select the desired color.
Adjustment example:
Original

[Vivid Colors]

[Tranquil Colors]

[Lighten Image]

[Darken Image]

[Highlight Reproduction]

[Sepia Tone]

If you select [Highlight Reproduction], the color tone is adjusted so that the bright areas of the image (highlights) are not blown out.
You can select multiple color settings at the same time. However, you cannot select the following color settings at the same time:
[Vivid Colors] and [Tranquil Colors]
[Lighten Image], [Darken Image], and [Highlight Reproduction]
3
Press [OK] [Close].
The copy screen is displayed again.
NOTE
The [Color Balance] settings automatically change according to the selected color settings. Adjusting the Color
* If you select [Sepia Tone], [Select Color] is automatically set to [Single Color (Sepia Tone)].
Inverting the Color (Nega/Posi)
You can configure the settings to invert the color and gradation of the entire original. This is convenient when copying an original that is difficult to see.
1
On the copy screen, press [Options] [Nega/Posi]. Copy Screen
[W/Settings] is displayed at the bottom of the setting button.
2
Press [Close].
The copy screen is displayed again.