Combining Originals Scanned with Different Settings When Copying (Merge Job Blocks)

You can scan multiple originals with different copy settings, and then copy them together.
For example, you can scan one original with the setting to erase punch holes, and another original with the 2-sided copy settings, and then combine these originals and add covers and page numbers when copying.
For example, you can scan one original with the setting to erase punch holes, and another original with the 2-sided copy settings, and then combine these originals and add covers and page numbers when copying.
* You can merge up to 100 originals.
* For the basic copy operations, see the following:
1
On the copy screen, press [Options]  [Merge Job Blocks]. Copy Screen
 [Merge Job Blocks]. Copy Screen
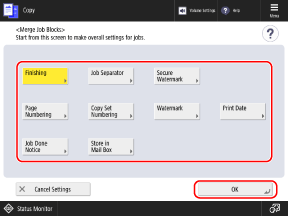
The [Merge Job Blocks] screen is displayed.
2
Configure the copy settings to be applied to all originals, and press [OK].

[Finishing]
[Job Separator]
[Secure Watermark]
[Page Numbering], [Copy Set Numbering], [Watermark], and [Print Date]
[Job Done Notice]
[Store in Mail Box]
3
Place the first original (first block). Placing Originals
4
Configure the copy settings for the first original, as needed.
5
Press [ Start].
 Start].
The machine starts scanning the first original.
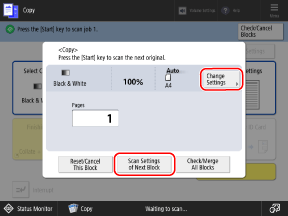
When scanning is completed, the screen for scanning the next original is displayed.
When scanning is completed, the screen for scanning the next original is displayed.
Place the second original (second block). Placing Originals
7
Configure the copy settings for the second original, as needed.

Press [Scan Settings of Next Block], and configure the copy settings for the second original.
You can also press [Change Settings] and change the following settings:
[Copy Ratio]
[2-Sided Original]
[Density]
[Original Type]
If you use the same copy settings as the first original (previous original), this step is not required. Proceed to Step 8.
Press [ Start].
 Start].
The machine scans the second original, and the screen for scanning the next original is displayed.
Repeat Step 6 to Step 8 until you finish scanning all originals.
Repeat Step 6 to Step 8 until you finish scanning all originals.
9
Press [Check/Merge All Blocks].
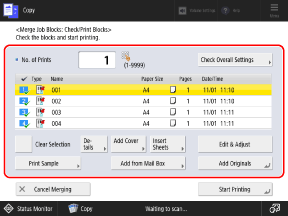
The [Merge Job Blocks: Check/Print Blocks] screen is displayed.
10
Specify the number of copies, and check the copy settings of the scanned originals.

You can also change the order in which to merge the scanned originals and add covers.

[No. of Prints]
Enter the number of copies using the numeric keys.
[Check Overall Settings]
You can check the details of the copy settings to be applied to all originals.
List of Scanned Originals
The originals are displayed in the order that they were scanned, with check marks and numbers. The originals are merged in the order of these numbers.
To change the merge order, press [Clear Selection] and select the originals again in the order that you want to merge them.
To change the merge order, press [Clear Selection] and select the originals again in the order that you want to merge them.
[Clear Selection] and [Select All]
Clear the selection of all originals, or select all displayed originals.
[Details]
You can check the details of the selected original.
[Add Cover] and [Insert Sheets]
You can add a front cover and back cover, and insert sheets or tab paper into the copies.
[Edit & Adjust]
You can display a preview screen for the selected original to check the content or delete pages and originals.
[Print Sample]
You can print a copy sample to check the finished result.
[Add from Mail Box]
You can specify a file stored in the Mail Box on the machine, and add it to the originals to be merged.
* For details on the Mail Box, see the following:
[Add Originals]
You can scan additional originals.
11
Press [Start Printing].
Copying starts.
NOTE
You cannot perform an interrupt job while originals are being scanned with the Merge Job Blocks function.
When originals are copied with the Merge Job Blocks function, you cannot call up the setting history using [Previous Settings].