82JS-005
If a Message Is Displayed on the Screen
Check the following to find out possible causes and solutions for each message.
If you cannot send a fax or the memory is full, or you encounter operation problems, a message appears on the display.
A counterfeit or non-Canon cartridge may be in use. The amount in the cartridge cannot be displayed correctly.

A genuine Canon toner cartridge may not be in use.
Use of genuine Canon toner cartridges is recommended for replacement toner cartridges.
MF746Cdw / MF745Cdw / MF743Cdw / MF741Cdw

Canon Cartridge 055 Black
Canon Cartridge 055 Yellow
Canon Cartridge 055 Magenta
Canon Cartridge 055 Cyan
Canon Cartridge 055 H Black
Canon Cartridge 055 H Yellow
Canon Cartridge 055 H Magenta
Canon Cartridge 055 H Cyan
MF656Cdw / MF654Cdw / MF653Cdw / MF652Cw

Canon Cartridge 067 Black
Canon Cartridge 067 Yellow
Canon Cartridge 067 Magenta
Canon Cartridge 067 Cyan
Canon Cartridge 067 H Black
Canon Cartridge 067 H Yellow
Canon Cartridge 067 H Magenta
Canon Cartridge 067 H Cyan
MF644Cdw / MF642Cdw / MF641Cw

Canon Cartridge 054 Black
Canon Cartridge 054 Yellow
Canon Cartridge 054 Magenta
Canon Cartridge 054 Cyan
Canon Cartridge 054 H Black
Canon Cartridge 054 H Yellow
Canon Cartridge 054 H Magenta
Canon Cartridge 054 H Cyan
MF543dw

Canon Cartridge 056 L
Canon Cartridge 056
Canon Cartridge 056 H
MF455dw / MF453dw / MF452dw / MF451dw / MF449dw / MF448dw / MF445dw

Canon Cartridge 057
Canon Cartridge 057 H
An error occurred during certificate verification.

The certificate has expired or the information is incorrect.
Install the right CA certificate.
Start the Remote UI and log in to Administrator Mode  [Settings/Registration] [Settings/Registration]  [Device Management] [Device Management]  [CA Certificate Settings] [CA Certificate Settings]  [Register CA Certificate] [Register CA Certificate]  [Install] [Install]  [Browse] [Browse]  Specify the file to install Specify the file to install  [Start Installation] [Start Installation]  [Register] at the right of the CA certificate file to register. [Register] at the right of the CA certificate file to register. |
Check the validity period of the certificate and the domain name of the DNS setting.
Black & White copying is restricted. Only Color copying is available.

The machine set so that black-and-white copying cannot be performed with Department ID Management.
To copy in black and white, log in with a Department ID for which black-and-white copying is not restricted. Contact your administrator for the Department ID and PIN.
Black & White printing is restricted. Only Color printing is available.

The machine is set so that black-and-white printing cannot be performed with Department ID Management.
To print in black and white, log in with a Department ID for which black and white printing is not restricted. Contact your administrator for the Department ID and PIN.
Cannot analyze the authentication server certificate.

The certificate of the authentication server is invalid or may be in a certificate format that is not supported by the machine.
Check the certificate of the authentication server.
Start the Remote UI and log in to Administrator Mode  [Settings/Registration] [Settings/Registration]  [Network Settings] [Network Settings]  [IEEE 802.1X Settings] [IEEE 802.1X Settings]  Check the settings. Check the settings. |
Cannot change the destination type of destinations registered to a group.

The selected address is stored in group dialing, so editing was not possible.
To change the type of an address registered in group dialing, first delete the address from group dialing, change the type, and then register it again to group dialing. Sending to Multiple Destinations Easily by Registering Them as a Group (Group)
Cannot find the access point.

Tried automatic setting with WPS, but the wireless LAN router or access point was not detected within the predetermined time.
Note the time limit and connect again.
Connecting to a Wireless LAN Using WPS (Using the Router's Push Button) (MF746Cdw / MF745Cdw / MF743Cdw / MF741Cdw / MF644Cdw / MF642Cdw / MF641Cw / MF543dw / MF449dw / MF448dw / MF445dw)
Connecting to a Wireless LAN Using WPS (Using the Router's Push Button) (MF656Cdw / MF654Cdw / MF653Cdw / MF652Cw / MF455dw / MF453dw / MF452dw / MF451dw)
Selected the wrong connection method.
Select the right method and connect again.
Connecting to a Wireless LAN Using WPS (Using the Router's Push Button) (MF746Cdw / MF745Cdw / MF743Cdw / MF741Cdw / MF644Cdw / MF642Cdw / MF641Cw / MF543dw / MF449dw / MF448dw / MF445dw)
Connecting to a Wireless LAN Using WPS (Using the Router's Push Button) (MF656Cdw / MF654Cdw / MF653Cdw / MF652Cw / MF455dw / MF453dw / MF452dw / MF451dw)
Entered the SSID or network key for the wireless LAN router or access point manually, but entered information is wrong.
Re-enter the SSID and network key correctly.
Checking the network key (WEP key or encryption key)
It may be indicated on the wireless LAN router. Check/write it down beforehand. For details, refer to the instruction manual of each device or contact the manufacturer.
Setting with the network key (WEP key or encryption key) you checked
Setting a Wireless LAN Manually (MF746Cdw / MF745Cdw / MF743Cdw / MF741Cdw / MF644Cdw / MF642Cdw / MF641Cw / MF543dw / MF449dw / MF448dw / MF445dw)
Setting a Wireless LAN Manually (MF656Cdw / MF654Cdw / MF653Cdw / MF652Cw / MF455dw / MF453dw / MF452dw / MF451dw)
Setting a Wireless LAN Manually (MF746Cdw / MF745Cdw / MF743Cdw / MF741Cdw / MF644Cdw / MF642Cdw / MF641Cw / MF543dw / MF449dw / MF448dw / MF445dw)
Setting a Wireless LAN Manually (MF656Cdw / MF654Cdw / MF653Cdw / MF652Cw / MF455dw / MF453dw / MF452dw / MF451dw)
The wireless LAN router or access point could not be detected because of a problem with the network settings.
Check that the machine can connect to the network. Connecting to a Wireless LAN
If the problem persists, check the security settings of the wireless LAN router or access point.
Cannot print. A non-Canon or counterfeit cartridge may be inserted.

A toner cartridge whose print quality cannot be guaranteed may be installed.
It is recommended to replace the toner cartridge with a new one. Replacing the Toner Cartridges
A genuine Canon toner cartridge may not be in use.
Use of genuine Canon toner cartridges is recommended for replacement toner cartridges.
MF746Cdw / MF745Cdw / MF743Cdw / MF741Cdw

Canon Cartridge 055 Black
Canon Cartridge 055 Yellow
Canon Cartridge 055 Magenta
Canon Cartridge 055 Cyan
Canon Cartridge 055 H Black
Canon Cartridge 055 H Yellow
Canon Cartridge 055 H Magenta
Canon Cartridge 055 H Cyan
MF656Cdw / MF654Cdw / MF653Cdw / MF652Cw

Canon Cartridge 067 Black
Canon Cartridge 067 Yellow
Canon Cartridge 067 Magenta
Canon Cartridge 067 Cyan
Canon Cartridge 067 H Black
Canon Cartridge 067 H Yellow
Canon Cartridge 067 H Magenta
Canon Cartridge 067 H Cyan
MF644Cdw / MF642Cdw / MF641Cw

Canon Cartridge 054 Black
Canon Cartridge 054 Yellow
Canon Cartridge 054 Magenta
Canon Cartridge 054 Cyan
Canon Cartridge 054 H Black
Canon Cartridge 054 H Yellow
Canon Cartridge 054 H Magenta
Canon Cartridge 054 H Cyan
MF543dw

Canon Cartridge 056 L
Canon Cartridge 056
Canon Cartridge 056 H
MF455dw / MF453dw / MF452dw / MF451dw / MF449dw / MF448dw / MF445dw

Canon Cartridge 057
Canon Cartridge 057 H
IMPORTANT
If this message is displayed, you cannot continue printing.
Cannot print RX data.

The received document cannot be printed for some reason.
Check if any of the following apply. Also, if a cause and solution are displayed, check the details.
A cover is open.
Paper is not loaded.
Paper is jammed.
The toner cartridge is empty. Checking the Amount Remaining in the Toner Cartridges
An error has occurred.
Cannot receive the fax. Make sure the fax was sent correctly by the sender.

Faxing timed out because there was no operation for 35 seconds.
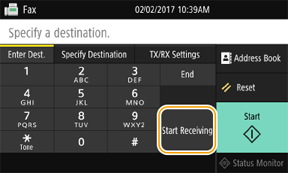
Ask the sender to send the fax again, and then select <Start Receiving> as soon as you hear the beep.
Cannot recognize the image.

You have selected an image that cannot be previewed by using Memory Media Print.
A preview cannot be displayed if the memory of the machine is insufficient. Even images in JPEG or TIFF format may not be displayed.
Cannot send because more than one destination is specified.

The machine is set to not allow faxing to multiple destinations.
To specify more than one destination, you must set <Restrict Sequential Broadcast> to <Off>. Contact your administrator for details.
<Menu>  <Function Settings> <Function Settings>  <Send> <Send>  <Fax Settings> <Fax Settings>  <Restrict Sequential Broadcast> <Restrict Sequential Broadcast>  <Off> <Off>   |
Cannot specify group destinations, or multiple destinations at the same time.

Multiple destinations or group dialing was specified when the handset was off the hook.
If the handset is off the hook, you cannot specify multiple destinations or group dialing. Place the handset on the hook, and then specify the destinations for faxing.
Cannot specify group destinations when on-hook.

After selecting <Hook>, group dialing was specified as the destination.
If you select <Hook>, you cannot specify a group dialing destination. Specify a destination without selecting <Hook> to send a fax.
Cannot use these settings. Sending to the specified destination is restricted.

The logged-in user is prohibited from sending to the destination registered in the selected <Favorite Settings>.
Change the sending restriction of the logged-in user. If you cannot change the setting, contact your administrator.
Start the Remote UI and log in to Administrator Mode  [Settings/Registration] [Settings/Registration]  [User Management] [User Management]  [Department ID Management] [Department ID Management]  Select the Department ID to edit Select the Department ID to edit  In [Restrict Functions], deselect [Restrict Scan] and [Restrict Fax] In [Restrict Functions], deselect [Restrict Scan] and [Restrict Fax]  [OK] [OK] |
Cartridge Communication Error A counterfeit or non-Canon cartridge may be in use.

The toner cartridge is not set correctly or the toner cartridge may be malfunctioning.
Install the toner cartridge again. Replacing the Toner Cartridges
If the message continues to be displayed after reinstalling the toner cartridge several times, the toner cartridge may be malfunctioning. Contact your dealer or service representative. Information to Have Ready When Contacting Us
A genuine Canon toner cartridge may not be in use.
Use of genuine Canon toner cartridges is recommended for replacement toner cartridges.
MF746Cdw / MF745Cdw / MF743Cdw / MF741Cdw

Canon Cartridge 055 Black
Canon Cartridge 055 Yellow
Canon Cartridge 055 Magenta
Canon Cartridge 055 Cyan
Canon Cartridge 055 H Black
Canon Cartridge 055 H Yellow
Canon Cartridge 055 H Magenta
Canon Cartridge 055 H Cyan
MF656Cdw / MF654Cdw / MF653Cdw / MF652Cw

Canon Cartridge 067 Black
Canon Cartridge 067 Yellow
Canon Cartridge 067 Magenta
Canon Cartridge 067 Cyan
Canon Cartridge 067 H Black
Canon Cartridge 067 H Yellow
Canon Cartridge 067 H Magenta
Canon Cartridge 067 H Cyan
MF644Cdw / MF642Cdw / MF641Cw

Canon Cartridge 054 Black
Canon Cartridge 054 Yellow
Canon Cartridge 054 Magenta
Canon Cartridge 054 Cyan
Canon Cartridge 054 H Black
Canon Cartridge 054 H Yellow
Canon Cartridge 054 H Magenta
Canon Cartridge 054 H Cyan
MF543dw

Canon Cartridge 056 L
Canon Cartridge 056
Canon Cartridge 056 H
MF455dw / MF453dw / MF452dw / MF451dw / MF449dw / MF448dw / MF445dw

Canon Cartridge 057
Canon Cartridge 057 H
Cartridge communication error. Cannot print. A non-Canon or counterfeit cartridge may be inserted.

The toner cartridge is not set correctly or the toner cartridge may be malfunctioning.
Install the toner cartridge again. Replacing the Toner Cartridges
If the message continues to be displayed after installing the toner cartridge several times, the toner cartridge may be malfunctioning. Contact your dealer or service representative. Information to Have Ready When Contacting Us
A toner cartridge whose print quality cannot be guaranteed may be installed.
It is recommended to replace the toner cartridge with a new one. Replacing the Toner Cartridges
A genuine Canon toner cartridge may not be in use.
Use of genuine Canon toner cartridges is recommended for replacement toner cartridges.
MF746Cdw / MF745Cdw / MF743Cdw / MF741Cdw

Canon Cartridge 055 Black
Canon Cartridge 055 Yellow
Canon Cartridge 055 Magenta
Canon Cartridge 055 Cyan
Canon Cartridge 055 H Black
Canon Cartridge 055 H Yellow
Canon Cartridge 055 H Magenta
Canon Cartridge 055 H Cyan
MF656Cdw / MF654Cdw / MF653Cdw / MF652Cw

Canon Cartridge 067 Black
Canon Cartridge 067 Yellow
Canon Cartridge 067 Magenta
Canon Cartridge 067 Cyan
Canon Cartridge 067 H Black
Canon Cartridge 067 H Yellow
Canon Cartridge 067 H Magenta
Canon Cartridge 067 H Cyan
MF644Cdw / MF642Cdw / MF641Cw

Canon Cartridge 054 Black
Canon Cartridge 054 Yellow
Canon Cartridge 054 Magenta
Canon Cartridge 054 Cyan
Canon Cartridge 054 H Black
Canon Cartridge 054 H Yellow
Canon Cartridge 054 H Magenta
Canon Cartridge 054 H Cyan
MF543dw

Canon Cartridge 056 L
Canon Cartridge 056
Canon Cartridge 056 H
MF455dw / MF453dw / MF452dw / MF451dw / MF449dw / MF448dw / MF445dw

Canon Cartridge 057
Canon Cartridge 057 H
IMPORTANT
If this message is displayed, you cannot continue printing.
Change the authentication password.

The password has expired.
Set a new password.
Check the authentication settings.

The authentication method set on the machine does not match the authentication method set on the RADIUS server.
Check that the authentication method set on the machine matches the authentication method set on the RADIUS server, and then set the correct authentication method.
Start the Remote UI and log in to Administrator Mode  [Settings/Registration] [Settings/Registration]  [Network Settings] [Network Settings]  [IEEE 802.1X Settings] [IEEE 802.1X Settings]  [Edit] [Edit]  Make the necessary settings according to the authentication method to be used Make the necessary settings according to the authentication method to be used  [OK] [OK]  Turn off the machine, and then turn on the machine after 10 seconds. Turn off the machine, and then turn on the machine after 10 seconds. |
Color copying is restricted. Only Black & White copying is available.

The machine is set so that color copying cannot be performed with Department ID Management.
To make color copies, log in with a Department ID for which color copying is not restricted. Contact your administrator for the Department ID and PIN.
Color printing is restricted. Only Black & White printing is available.

The machine is set so that color printing cannot be performed with Department ID Management.
To print in color, log in with a Department ID for which color printing is not restricted. Contact your administrator for the Department ID and PIN.
Copying is restricted.

The machine is set so that copying cannot be performed with Department ID Management.
Log in with a Department ID for which copying is not restricted. Contact your administrator for the Department ID and PIN.
Could not connect.

Connection in Access Point Mode failed due to an error.
Wait for a while, and then make the settings again. If connection still fails, turn off the machine, and then turn on the machine after 10 seconds.
An error occurred when connecting in Access Point Mode.
In <Config. IP Address For Direct Conn.>, set the IP address to a value other than "192.168.22.xx".
<Menu>  <Preferences> <Preferences>  <Network> <Network>  <Direct Connection Settings> <Direct Connection Settings>  <Config. IP Address For Direct Conn.> <Config. IP Address For Direct Conn.>  Enter an IP address other than "192.168.22.xx" Enter an IP address other than "192.168.22.xx"  <Apply> <Apply>  <Apply> <Apply>  <OK> <OK>  Turn off the machine, and then turn on the machine after 10 seconds. Turn off the machine, and then turn on the machine after 10 seconds. |
If connection still fails, check the subnet mask setting. For details, contact your network administrator.
<Menu>  <Preferences> <Preferences>  <Network> <Network>  <TCP/IP Settings> <TCP/IP Settings>  <IPv4 Settings> <IPv4 Settings>  <IP Address Settings> <IP Address Settings>  <Check Settings> <Check Settings> |
Could not connect. Check the encryption key.

The encryption key of the wireless LAN router or access point that you want to connect to is not set correctly.
Check the encryption key of the wireless LAN router or access point, and set it again.
Checking the encryption key
It may be indicated on the wireless LAN router. Check/write it down beforehand. For details, refer to the instruction manual of each device or contact the manufacturer.
Setting with the encryption key that you checked Setting a Wireless LAN Manually (MF656Cdw / MF654Cdw / MF653Cdw / MF652Cw / MF455dw / MF453dw / MF452dw / MF451dw)
If checking the encryption key does not solve the problem, check whether the machine can connect to the network. Connecting to a Wireless LAN
Could not connect. Check the PSK settings.

The network key (PSK) of the wireless LAN router or access point that you want to connect to is not set correctly.
Check the network key (PSK) of the wireless LAN router or access point, and set it again.
Checking the network key (PSK)
It may be indicated on the wireless LAN router. Check/write it down beforehand. For details, refer to the instruction manual of each device or contact the manufacturer.
Setting with the network key (WEP key) that you checked Setting a Wireless LAN Manually (MF746Cdw / MF745Cdw / MF743Cdw / MF741Cdw / MF644Cdw / MF642Cdw / MF641Cw / MF543dw / MF449dw / MF448dw / MF445dw)
If checking the network key does not solve the problem, check whether the machine can connect to the network. Connecting to a Wireless LAN
Could not connect. The maximum number of devices that can connect to the access point has been reached.

Tried to connect to a wireless LAN router or access point that has already reached its maximum number of connections.
Reduce the number of devices (clients) connected to the wireless LAN router or access point. For the maximum number of connections, refer to the instruction manual for the wireless LAN router or access point, or contact the manufacturer.
Could not connect using Easy Connection via PC. The device will restart.

Connection in Access Point Mode failed due to an error.
Turn off the machine, and then turn on the machine after 10 seconds. Then run <Easy Connection via PC> again.
<Menu>  <Preferences> <Preferences>  <Network> <Network>  <Easy Connection via PC> <Easy Connection via PC>  <Yes> <Yes>  Connection starts. Connection starts. |
An error occurred while starting Easy Connection via PC (cableless setup mode).
Turn off the machine, and then turn on the machine after 10 seconds. Then run <Easy Connection via PC> again.
<Menu>  <Preferences> <Preferences>  <Network> <Network>  <Easy Connection via PC> <Easy Connection via PC>  <Yes> <Yes>  Connection starts. Connection starts. |
Could not connect using the wireless LAN. Turn the main power OFF and ON, then configure the settings again.

An error occurred while configuring the wireless LAN connection.
Turn off the machine, and then turn on the machine after 10 seconds. Then make settings again.
If restarting the machine does not solve the problem, check whether connecting to the network is possible. Connecting to a Wireless LAN
If checking the wireless LAN connection does not solve the problem, check the security settings of the wireless LAN router or access point.
Could not connect using WPS. Wait a moment, then configure the settings again.

Tried automatic setting with WPS, but an error occurred and connection failed.
Wait for a while, and then make the settings again. If connection still fails, check that the wireless LAN router or access point is WPS-compliant.
If WPS is supported:
Check that the machine can connect to the network. Connecting to a Wireless LAN
If WPS is not supported:
Set by another connection method.
Could not detect any connections from wireless devices.

The mobile device could not be detected within the specified time.
Note the time limit, then connect again.
IMPORTANT
If you do not connect wirelessly from the mobile device within 5 minutes while the SSID and network key are displayed, connection standby ends.
Could not perform cleaning.

A paper jam occurred during cleaning.
Remove the jammed paper, load the paper correctly, and then perform cleaning again.
The amount remaining in the toner cartridge required for cleaning the fixing assembly is insufficient.
Sufficient toner cartridge level is required to clean the fixing assembly. Replace the toner cartridge before performing cleaning. Replacing the Toner Cartridges
Could not perform correction.

Appropriate paper is not loaded in the drawer.
Load the paper indicated on the screen displayed during correction in the paper drawer.
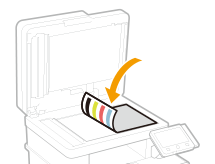
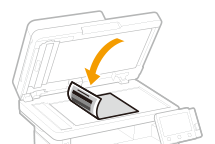
The adjustment image is not loaded correctly on the platen glass.
Place with the side having the adjustment image printed on it facing down and the black thin line facing to the left.
MF746Cdw / MF745Cdw / MF743Cdw / MF741Cdw / MF656Cdw / MF654Cdw / MF653Cdw / MF652Cw / MF644Cdw / MF642Cdw / MF641Cw
MF543dw / MF455dw / MF453dw / MF452dw / MF451dw / MF449dw / MF448dw / MF445dw
A paper jam occurred during correction.
Remove the jammed paper and perform the correction again.
The amount remaining in the toner cartridge required to perform correction became insufficient.
A sufficient amount remaining in the toner cartridge is required before performing correction. Replace the toner cartridge before performing correction. Replacing the Toner Cartridges
The transfer belt in the machine is dirty. (MF746Cdw / MF745Cdw / MF743Cdw / MF741Cdw / MF656Cdw / MF654Cdw / MF653Cdw / MF652Cw / MF644Cdw / MF642Cdw / MF641Cw)
Perform transfer belt cleaning (automatic).
<Menu>  <Adjustment/Maintenance> <Adjustment/Maintenance>  <Maintenance> <Maintenance>  <Clean ITB> <Clean ITB>  <Start> <Start>  Wait until a message appears stating that cleaning has finished Wait until a message appears stating that cleaning has finished   |
Could not perform Open System authentication. Check the encryption key settings.

The authentication method of the machine is set to <Open System>, but the authentication method of the wireless LAN router or access point is set to "Shared Key".
Change the WEP authentication method to <Shared Key> using the manual input method, and then connect again. Setting a Wireless LAN Manually (MF656Cdw / MF654Cdw / MF653Cdw / MF652Cw / MF455dw / MF453dw / MF452dw / MF451dw)
The MAC address of the machine is rejected because MAC address filtering is set on the wireless LAN router or access point.
Change the MAC address setting of the wireless LAN router or access point to allow both the machine and the computer. For how to set, refer to the instruction manual for the wireless LAN router or access point, or contact the manufacturer. To check the MAC address of the machine, refer to Checking the MAC Address Set on the Machine
Could not perform Open System authentication. Check the WEP settings.

The authentication method of the machine is set to <Open System>, but the authentication method of the wireless LAN router or access point is set to "Shared Key".
Change the WEP authentication method to <Shared Key> using the manual input method, and then connect again. Setting a Wireless LAN Manually (MF746Cdw / MF745Cdw / MF743Cdw / MF741Cdw / MF644Cdw / MF642Cdw / MF641Cw / MF543dw / MF449dw / MF448dw / MF445dw)
The MAC address of the machine is rejected because MAC address filtering is set on the wireless LAN router or access point.
Change the MAC address setting of the wireless LAN router or access point to allow both the machine and the computer. For how to set, refer to the instruction manual for the wireless LAN router or access point, or contact the manufacturer. To check the MAC address of the machine, refer to Checking the MAC Address Set on the Machine
Could not perform Shared Key authentication. Check the encryption key settings.

The encryption key of the wireless LAN router or access point that you want to connect to is not set correctly.
Check the encryption key of the wireless LAN router or access point, and set it again.
Checking the encryption key
It may be indicated on the wireless LAN router. Check/write it down beforehand. For details, refer to the instruction manual of each device or contact the manufacturer.
Setting with the encryption key that you checked Setting a Wireless LAN Manually (MF656Cdw / MF654Cdw / MF653Cdw / MF652Cw / MF455dw / MF453dw / MF452dw / MF451dw)
Either connect using the method to select the access point, or change the WEP authentication method to <Open System> using the manual input method and reconnect. Setting a Wireless LAN Manually (MF656Cdw / MF654Cdw / MF653Cdw / MF652Cw / MF455dw / MF453dw / MF452dw / MF451dw)
The authentication method of the machine is set to <Shared Key>, but the authentication method of the wireless LAN router or access point is set to "Open System".
Change the WEP authentication method to "Shared Key" on the wireless LAN router or access point, and then reconnect. For details on how to change the method, refer to the instruction manual of the wireless LAN router or access point, or contact the manufacturer.
Could not perform Shared Key authentication. Check the WEP settings.

The network key (WEP key) of the wireless LAN router or access point that you want to connect to is not set correctly.
Check the network key (WEP key) of the wireless LAN router or access point, and set it again.
Checking the network key (WEP key)
It may be indicated on the wireless LAN router. Check/write it down beforehand. For details, refer to the instruction manual of each device or contact the manufacturer.
Setting with the network key (WEP key) that you checked Setting a Wireless LAN Manually (MF746Cdw / MF745Cdw / MF743Cdw / MF741Cdw / MF644Cdw / MF642Cdw / MF641Cw / MF543dw / MF449dw / MF448dw / MF445dw)
Either connect using the method to select the access point, or change the WEP authentication method to <Open System> using the manual input method and reconnect. Setting a Wireless LAN Manually (MF746Cdw / MF745Cdw / MF743Cdw / MF741Cdw / MF644Cdw / MF642Cdw / MF641Cw / MF543dw / MF449dw / MF448dw / MF445dw)
The authentication method of the machine is set to <Shared Key>, but the authentication method of the wireless LAN router or access point is set to "Open System".
Change the WEP authentication method to "Shared Key" on the wireless LAN router or access point, and then reconnect. For details on how to change the method, refer to the instruction manual of the wireless LAN router or access point, or contact the manufacturer.
Direct Connection terminated.

The connection to the mobile device has been disconnected.
Connect directly to the device again.
Easy Connection via PC ended due to timeout The device will restart.

30 minutes have elapsed since Easy Connection via PC (cableless setup mode) started without being able to connect to the PC.
Turn off the machine, and then turn on the machine after 10 seconds. Then run <Easy Connection via PC> again.
<Menu>  <Preferences> <Preferences>  <Network> <Network>  <Easy Connection via PC> <Easy Connection via PC>  <Yes> <Yes>  Connection starts. Connection starts. |
End of cartridge lifetime.

The toner cartridge has reached the end of its service life.
Select one of the options displayed on the screen.
Select <Display Cartridge Replacement Steps> to display how to replace the toner cartridge.
Selecting <Continue Printing (Quality Not Guaranteed)> allows you to continue printing, but it may cause a malfunction.
Faxing is restricted.

The machine is set so that faxing cannot be performed with Department ID Management.
Log in with a Department ID for which faxing is not restricted. Contact your administrator for the Department ID and PIN.
Google Cloud Print Authentication Error

Cloud Print server authentication failed. Or, could not obtain registration information.
Check that the date and time settings on the machine are correct.
<Menu>  <Preferences> <Preferences>  <Timer/Energy Settings> <Timer/Energy Settings>  <Current Date/Time Settings> <Current Date/Time Settings>  Enter the date and time Enter the date and time  <Apply> <Apply> |
NOTE
If the machine cannot connect even after setting the current date and time correctly
After setting the time zone, set the current date and time.
<Menu>  <Preferences> <Preferences>  <Timer/Energy Settings> <Timer/Energy Settings>  <Date/Time Settings> <Date/Time Settings>  <Time Zone> <Time Zone>  Select the time zone. Select the time zone. |
Google Cloud Print Communication Error

An error occurred and Cloud Print is unavailable.
Check that the machine is properly connected to the wireless LAN or wired LAN.
If connected by wireless LAN,  <Status Monitor>  <Network Information> <Network Information>  <Network Connection Type> <Network Connection Type>  Show connectivity status. Show connectivity status.If connected by wired LAN,  Check that the LAN cable is connected properly. MF746Cdw / MF745Cdw / MF743Cdw / MF741Cdw / MF644Cdw / MF642Cdw / MF641Cw 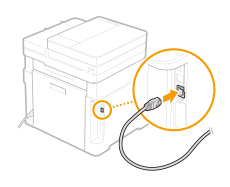 MF543dw 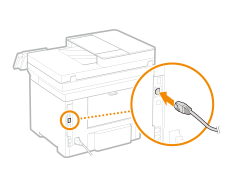 MF449dw / MF448dw / MF445dw 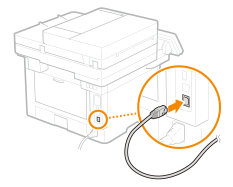 |
The port used for Cloud Print may be blocked by a firewall, etc. Check that port 5222 is available on your computer.
If a proxy server is used in the network, check that the proxy settings of the proxy server and this machine are correct. Contact your network administrator for details.
Start the Remote UI and log in to Administrator Mode  [Settings/Registration] [Settings/Registration]  [Network Settings] [Network Settings]  [Proxy Settings] [Proxy Settings]  [Edit] [Edit]  Select [Use Proxy], and then enter the required information Select [Use Proxy], and then enter the required information  [OK] [OK] |
Load paper.

Paper is not loaded in the paper drawer or the multi-purpose tray.
Load paper.
Paper for printing reports or lists is not loaded.
Load paper for printing reports and lists, and then set the paper size and type. Paper that Can Be Used
Paper for printing received documents is not loaded.
Load paper for printing received documents, and then set the paper size and type. Paper that Can Be Used
NOTE
Printing on paper other than A4 or Letter size may result in part of the image not being printed or the image being split and printed.
Tried double-sided printing when <Reduce Thin Paper Curling> is set to <On> and only <Thin 1> paper is loaded. (MF543dw / MF455dw / MF453dw / MF452dw / MF451dw / MF449dw / MF448dw / MF445dw)
Either set <Reduce Thin Paper Curling> to <Off>, or change to single-sided printing, and then print again.
<Menu>  <Adjustment/Maintenance> <Adjustment/Maintenance>  <Adjust Image Quality> <Adjust Image Quality>  <Special Processing> <Special Processing>  <Special Paper Processing> <Special Paper Processing>  <Reduce Thin Paper Curling> <Reduce Thin Paper Curling>  <Off> <Off>  <Yes> <Yes> |
Low Cartridge Level

The time is approaching to replace the toner cartridge.
Prepare a new toner cartridge. It is recommended to replace the toner cartridge before printing in a large quantity.
NOTE
If you selected <Continue Printing>
You can continue printing when copying or printing.
When receiving a fax/I-Fax or auto report output is set, data is saved in memory without being printed to prevent blurry printing. If you want to continue printing even when the amount remaining in the toner cartridge is low, set <Continue Print. When Cart. Low> to <On>. Continuing to Print Received Faxes Even When the Remaining Amount of Toner Is Low
*For these models only, when a message is displayed for a black toner cartridge: MF746Cdw / MF745Cdw / MF743Cdw / MF741Cdw / MF656Cdw / MF654Cdw / MF653Cdw / MF652Cw / MF644Cdw / MF642Cdw / MF641Cw
Memory Full (Secure Print)

Memory is full with secured documents that have not been printed.
Print secured documents saved in memory.
If several users' secured documents are saved in memory, a user selection screen appears before the file selection screen. Select your own user name.
<Secure Print>  Checkmark the secure document to print Checkmark the secure document to print  <Start> <Start>  Enter the PIN Enter the PIN  <Apply> <Apply> |
Memory Full (Skip Error)

Memory became full with data that could not be printed due to an error.
Either cancel printing the document in which the error occurred, or select <Skip Error> in the screen for checking printing and perform printing. Canceling a Fax Send or a Copy Job
Memory Media Print is restricted.

The machine is set so that files on USB memory device cannot be printed.
Set <Use Print Function> in <Memory Media Settings> to <On>.
<Menu>  <Function Settings> <Function Settings>  <Store/Access Files> <Store/Access Files>  <Memory Media Settings> <Memory Media Settings>  In <Use Print Function>, select <On> In <Use Print Function>, select <On>  <Apply> <Apply>  <OK> <OK>  Turn off the machine, and then turn on the machine after 10 seconds. Turn off the machine, and then turn on the machine after 10 seconds. |
No reply from the destination.

The LAN cable may be disconnected or there may be a problem with the switch.
Check the condition of the LAN cable and switch.
No response from the host.

This machine is not connected to the network properly.
Check the settings of this machine and the network again, and then reconnect the machine.
When connecting via a wired LAN
Connect the LAN cable and wait a few minutes.
MF746Cdw / MF745Cdw / MF743Cdw / MF741Cdw / MF656Cdw / MF654Cdw / MF653Cdw / MF652Cw / MF644Cdw / MF642Cdw / MF641Cw

MF543dw

MF455dw / MF453dw / MF452dw / MF451dw / MF449dw / MF448dw / MF445dw

When connecting by wireless LAN
Make settings according to your environment.
Paper jammed.

The paper has jammed.
Remove the jammed paper and print again (printing may resume automatically).
Paper Settings and Loaded Size Mismatch

The paper size set on the control panel does not match the paper size of the actually loaded paper.
Match the paper size set in <Paper Settings> with the paper size that is actually loaded.
To use paper that has already been loaded
Change the <Paper Settings> setting to match the size of the loaded paper.
Paper drawer: <Paper Settings>  Select the paper drawer to set Select the paper drawer to set  Select the paper size Select the paper size  Select the paper type Select the paper typeMulti-purpose tray: Load paper in the tray  Select the paper size Select the paper size  Select the paper type. Select the paper type. |
To use the same setting and load paper again
Load paper of the size specified in <Paper Settings>.
NOTE
When printing from a computer, also check that the paper size in the printer driver matches the paper size of the actually loaded paper.
Check that the paper guide in the paper drawer is set to the correct position. "Paper Settings and Loaded Size Mismatch" Is Displayed
Prepare cartridge.

The time is approaching to replace the toner cartridge.
Prepare a new toner cartridge. It is recommended to replace the toner cartridge before printing in a large quantity.
MF746Cdw / MF745Cdw / MF743Cdw / MF741Cdw

Canon Cartridge 055 Black
Canon Cartridge 055 Yellow
Canon Cartridge 055 Magenta
Canon Cartridge 055 Cyan
Canon Cartridge 055 H Black
Canon Cartridge 055 H Yellow
Canon Cartridge 055 H Magenta
Canon Cartridge 055 H Cyan
MF656Cdw / MF654Cdw / MF653Cdw / MF652Cw

Canon Cartridge 067 Black
Canon Cartridge 067 Yellow
Canon Cartridge 067 Magenta
Canon Cartridge 067 Cyan
Canon Cartridge 067 H Black
Canon Cartridge 067 H Yellow
Canon Cartridge 067 H Magenta
Canon Cartridge 067 H Cyan
MF644Cdw / MF642Cdw / MF641Cw

Canon Cartridge 054 Black
Canon Cartridge 054 Yellow
Canon Cartridge 054 Magenta
Canon Cartridge 054 Cyan
Canon Cartridge 054 H Black
Canon Cartridge 054 H Yellow
Canon Cartridge 054 H Magenta
Canon Cartridge 054 H Cyan
MF543dw

Canon Cartridge 056 L
Canon Cartridge 056
Canon Cartridge 056 H
MF455dw / MF453dw / MF452dw / MF451dw / MF449dw / MF448dw / MF445dw

Canon Cartridge 057
Canon Cartridge 057 H
NOTE
You can continue printing when copying or printing.
When receiving a fax/I-Fax or auto report output is set, data is saved in memory without being printed to prevent blurry printing. If you want to continue printing even when the amount remaining in the toner cartridge is low, set <Continue Print. When Cart. Low> to <On>. Continuing to Print Received Faxes Even When the Remaining Amount of Toner Is Low
*For these models only, when a message is displayed for a black toner cartridge: MF746Cdw / MF745Cdw / MF743Cdw / MF741Cdw / MF656Cdw / MF654Cdw / MF653Cdw / MF652Cw / MF644Cdw / MF642Cdw / MF641Cw
Printing is restricted.

The machine is set so that printing cannot be performed with Department ID Management.
Log in with a Department ID for which printing is not restricted. Contact your administrator for the Department ID and PIN.
Remote scanning is restricted.

The machine is set so that scanning cannot be performed by operation from a computer with Department ID Management.
In Administrator Mode for the Remote UI, display the edit screen for Department ID Management, and then select [Allow Scan Jobs with Unknown IDs]. If you cannot change the settings, contact your administrator.
Start the Remote UI and log in to Administrator Mode  [Settings/Registration] [Settings/Registration]  [User Management] [User Management]  [Department ID Management] [Department ID Management]  [Edit] [Edit]  Select [Allow Scan Jobs with Unknown IDs] Select [Allow Scan Jobs with Unknown IDs]  [OK] [OK]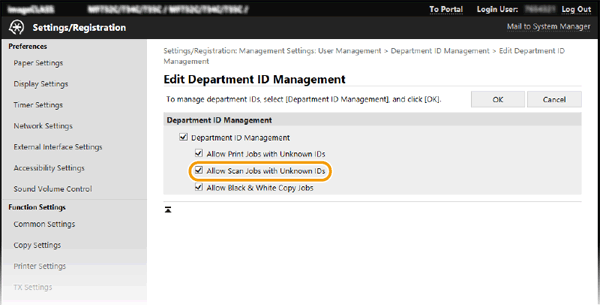 |
Scanning is restricted.

The machine is set so that scanning cannot be performed with Department ID Management.
Log in with a Department ID for which scanning is not restricted. Contact your administrator for the Department ID and PIN.
Set the correct authentication information.

Client credentials (key and certificate, user name and password, and CA certificate) are not configured correctly.
Check the authentication method and credentials (key and certificate, user name and password, and CA certificate) that were set.
Start the Remote UI and log in to Administrator Mode  [Settings/Registration] [Settings/Registration]  [Network Settings] [Network Settings]  [IEEE 802.1X Settings] [IEEE 802.1X Settings]  Check the settings. Check the settings. |
Set the information necessary for authentication.

IEEE 802.1X authentication setting is not correct.
Make the correct IEEE 802.1X setting from the Remote UI.
Start the Remote UI and log in to Administrator Mode  [Settings/Registration] [Settings/Registration]  [Network Settings] [Network Settings]  [IEEE 802.1X Settings] [IEEE 802.1X Settings]  [Edit] [Edit]  Make the necessary settings for the authentication method being used Make the necessary settings for the authentication method being used  [OK] [OK]  Turn off the machine, and then turn on the machine after 10 seconds. Turn off the machine, and then turn on the machine after 10 seconds. |
Specifying and registering new destinations is restricted.

Destinations are limited to only the address book when sending.
<Restrict New Destinations> must be set to <Off> to specify destinations other than an the address book. Contact your administrator for details.
<Menu>  <Function Settings> <Function Settings>  <Send> <Send>  <Common Settings> <Common Settings>  <Restrict New Destinations> <Restrict New Destinations>  <Off> <Off>   |
The authentication server certificate has expired.

The server certificate sent from the RADIUS server has expired.
Check the expiration date of the server certificate for the RADIUS server.
Start the Remote UI and log in to Administrator Mode  [Settings/Registration] [Settings/Registration]  [Network Settings] [Network Settings]  [IEEE 802.1X Settings] [IEEE 802.1X Settings]  Check the setting. Check the setting. |
The authentication server certificate is incorrect.

The CA certificate corresponding to the certificate of the authentication server is not registered on the machine.
Check that the CA certificate corresponding to the certificate of the authentication server is registered on the machine.
Start the Remote UI and log in to Administrator Mode  [Settings/Registration] [Settings/Registration]  [Network Settings] [Network Settings]  [IEEE 802.1X Settings] [IEEE 802.1X Settings]  Check the settings. Check the settings. |
The computer is restricted.

The machine is set so that scanning cannot be performed from the operation panel with Department ID Management.
In Administrator Mode in the Remote UI, open the edit screen of the applicable Department ID and select [Allow Scan Jobs with Unknown IDs]. If the setting cannot be changed, contact the administrator.
Start the Remote UI and log in to Administrator Mode  [Settings/Registration] [Settings/Registration]  [User Management] [User Management]  [Department ID Management] [Department ID Management]  [Edit] [Edit]  Select [Allow Scan Jobs with Unknown IDs] Select [Allow Scan Jobs with Unknown IDs]  [OK] [OK] |
The encryption key is not set correctly. Check the encryption key settings.

The encryption key for the wireless LAN router or access point that you want to connect to is not set correctly.
Check the encryption key of the wireless LAN router or access point, and set it again.
Check the encryption key
It may be indicated on the wireless LAN router. Check/write it down beforehand. For details, refer to the instruction manual of each device or contact the manufacturer.
Setting with the encryption key you checked Setting a Wireless LAN Manually (MF656Cdw / MF654Cdw / MF653Cdw / MF652Cw / MF455dw / MF453dw / MF452dw / MF451dw)
The wireless LAN router or access point is set to "Open System" even though the authentication method of the machine is set to <Shared Key>.
Either connect using the method to select the access point, or change the WEP authentication method to <Open System> using the manual input method and reconnect. Setting a Wireless LAN Manually (MF656Cdw / MF654Cdw / MF653Cdw / MF652Cw / MF455dw / MF453dw / MF452dw / MF451dw)
Change the WEP authentication method to "Shared Key" on the wireless LAN router or access point, and then reconnect. For details on how to change the method, refer to the instruction manual of your wireless LAN router or access point, or contact the manufacturer.
The fax number has too many digits.

The specified number of digits for dialing was too long, so the fax could not be sent.
When <Use Addr. Book When On-Hook> is set to <Always Allow>, you may not be able to send a fax with an entered number and an address book number together. Specify a number that does not exceed the maximum number of dial digits for sending a fax.
The memory is full.

A fax could not be sent or scanned due to insufficient memory capacity.
If there is a document waiting to be sent or printed, wait until the machine finishes processing.
If there are received documents stored in memory, print or delete them.
To send a document with a large number of pages, split the original before sending it.
When sending a fax, lower the resolution for scanning the original.
When sending a fax, select <TX/RX Settings> in the <TX/RX Settings> tab, and then select a resolution lower than the specified resolution. Resolutions that can be set  <200 x 100 dpi (Normal)> (setting at time of purchase) <200 x 200 dpi (Fine)> <200 x 200 dpi (Photo)> <200 x 400 dpi (Superfine)> <400 x 400 dpi (Ultrafine)> |
When scanning, change the file format to a smaller file size.
Tried to save an original to a USB memory device, but there was insufficient capacity to save it.
Delete unnecessary data on the USB memory device to free up space, or connect a different USB memory device.
How to remove a USB memory device  <Status Monitor>  <Rmv. Mem. Media> <Rmv. Mem. Media>  Wait for <The memory media can be safely removed.> to be displayed Wait for <The memory media can be safely removed.> to be displayed  Remove the USB memory device. Remove the USB memory device.Installing USB Memory  MF746Cdw / MF745Cdw / MF743Cdw / MF741Cdw / MF656Cdw / MF654Cdw / MF653Cdw / MF652Cw / MF644Cdw / MF642Cdw / MF641Cw / MF543dw 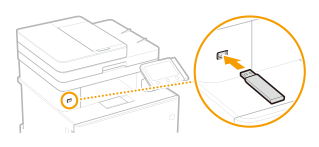 MF455dw / MF453dw / MF452dw / MF451dw / MF449dw / MF448dw / MF445dw 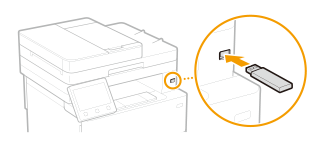 |
The memory is full. Enter the original type settings again.

The memory became full during copying, so the original could not be read in.
Set the <Original Type> setting to <Text/Photo/Map (Speed)>* before copying.
<Copy>  <Other Settings> <Other Settings>  <Original Type> <Original Type>  <Text/Photo/Map (Speed)>* <Text/Photo/Map (Speed)>* |
*If you are using MF543dw / MF455dw / MF453dw / MF452dw / MF451dw / MF449dw / MF448dw / MF445dw, <Text/Photo> is displayed.
The memory is full. Scanning will be canceled. Do you want to print? 

The original could not be scanned due to insufficient memory capacity.
Select whether to print up to the scanned page or to cancel the job.
Separate and then copy the original.
When sorting and copying, not all pages could be scanned.
Select whether to print up to the scanned page or to cancel the job.
Either separate and copy the original, or set the <Original Type> setting to <Text/Photo/Map (Speed)>*.
<Copy>  <Other Settings> <Other Settings>  <Original Type> <Original Type>  <Text/Photo/Map (Speed)>* <Text/Photo/Map (Speed)>* |
*If you are using MF543dw / MF455dw / MF453dw / MF452dw / MF451dw / MF449dw / MF448dw / MF445dw, <Text/Photo> is displayed.
The number of entered characters is incorrect or invalid characters are used.

The network key (WPA/WPA2-PSK, WEP key or encryption key) of the wireless LAN router or access point is entered incorrectly.
Check the network key (WPA/WPA2-PSK, WEP key or encryption key) of the wireless LAN router or access point, and set it again. For details on how to check the network key, refer to the instruction manual of the wireless LAN router or access point, or contact the manufacturer.
Checking the network key
It may be indicated on the wireless LAN router. Check/write it down beforehand. For details, refer to the instruction manual of each device or contact the manufacturer.
Configuring settings with the network key that you checked
Setting a Wireless LAN Manually (MF746Cdw / MF745Cdw / MF743Cdw / MF741Cdw / MF644Cdw / MF642Cdw / MF641Cw / MF543dw / MF449dw / MF448dw / MF445dw)
Setting a Wireless LAN Manually (MF656Cdw / MF654Cdw / MF653Cdw / MF652Cw / MF455dw / MF453dw / MF452dw / MF451dw)
Setting a Wireless LAN Manually (MF746Cdw / MF745Cdw / MF743Cdw / MF741Cdw / MF644Cdw / MF642Cdw / MF641Cw / MF543dw / MF449dw / MF448dw / MF445dw)
Setting a Wireless LAN Manually (MF656Cdw / MF654Cdw / MF653Cdw / MF652Cw / MF455dw / MF453dw / MF452dw / MF451dw)
The USB memory is restricted.

The machine is set not to save scanned originals to USB memory device.
Set <Use Scan Function> to <On>. If you cannot change the setting, contact your administrator.
<Menu>  <Function Settings> <Function Settings>  <Store/Access Files> <Store/Access Files>  <Memory Media Settings> <Memory Media Settings>  Set <Use Scan Function> to <On> Set <Use Scan Function> to <On>  <Apply> <Apply>  <OK> <OK>  Turn off the machine, and then turn on the machine after 10 seconds. Turn off the machine, and then turn on the machine after 10 seconds. |
The WEP key is not set correctly. Check the WEP settings.

The network key (WEP key) for the wireless LAN router or access point that you want to connect to is not set correctly.
Check the network key (WEP key) of the wireless LAN router or access point, and set it again.
Check the network key (WEP key)
It may be indicated on the wireless LAN router. Check/write it down beforehand. For details, refer to the instruction manual of each device or contact the manufacturer.
Setting with the network key (WEP key) you checked Setting a Wireless LAN Manually (MF746Cdw / MF745Cdw / MF743Cdw / MF741Cdw / MF644Cdw / MF642Cdw / MF641Cw / MF543dw / MF449dw / MF448dw / MF445dw)
The wireless LAN router or access point is set to "Open System" even though the authentication method of the machine is set to <Shared Key>.
Either connect using the method to select the access point, or change the WEP authentication method to <Open System> using the manual input method and reconnect. Setting a Wireless LAN Manually (MF746Cdw / MF745Cdw / MF743Cdw / MF741Cdw / MF644Cdw / MF642Cdw / MF641Cw / MF543dw / MF449dw / MF448dw / MF445dw)
Change the WEP authentication method to "Shared Key" on the wireless LAN router or access point, and then reconnect. For details on how to change the method, refer to the instruction manual of your wireless LAN router or access point, or contact the manufacturer.
Use Remote UI to set the information necessary for authentication.

There is an incorrect [IEEE 802.1X Settings] setting.
Check the [IEEE 802.1X Settings] settings.
Check whether [Login Name] is set correctly.
Check whether [Use TLS], [Use TTLS], or [Use PEAP] is selected.
If using TLS, check whether a "key and certificate" is registered.
If using TTLS or PEAP, check whether a user name and password are set correctly.
Start the Remote UI and log in to Administrator Mode  [Settings/Registration] [Settings/Registration]  [Network Settings] [Network Settings]  [IEEE 802.1X Settings] [IEEE 802.1X Settings]  Check the settings. Check the settings. |