Printing from the Document Binder Screen
You can print binder documents from Document Binder.
|
Note
|
|
For more information on how to print a document from the Desktop Browser screen, see the following.
For more information on variable printing, see the following.
If you are using a binder document, the print settings stored in the binder document are used when printing. For details on the print settings, see the following.
|
In addition, refer to the following as necessary.
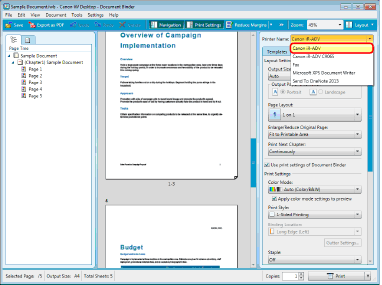
1.
In the Document Binder screen, select the printer to use from [Printer Name] in the Print Settings Pane.
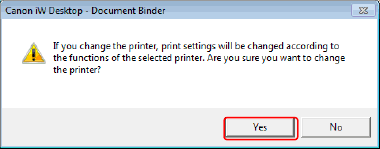
2.
If a confirmation message appears, click [Yes].
|
Note
|
|
For details on the confirmation message, see the following.
|
3.
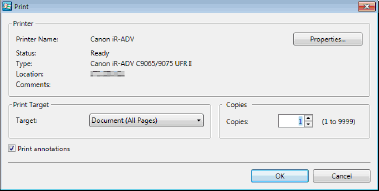
Select the [File] menu > [Print].
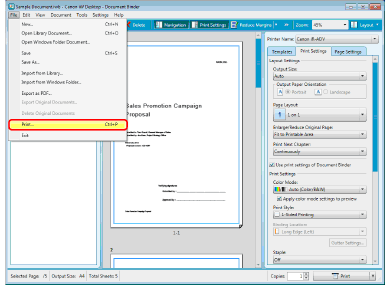
The [Print] dialog box is displayed.
|
Note
|
|
You can also print the document by setting the number of print sets in
 , and pressing , and pressing  . You can also specify the following printing methods from the pull-down menu. . You can also specify the following printing methods from the pull-down menu.Print All Pages
Print Selected Pages
Print
Select [Confirm before printing annotations] in [System Settings] to select whether to print annotations when printing by pressing
.However, annotations added with something other than Annotation Editor may be printed regardless of the selected settings, depending on the type of annotation. [Settings] > [System Settings] > [Common Settings] > [Print/Fax] > [Confirm before printing annotations]
|
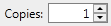
4.
To specify the number of copies to print, enter the number in [Copies].
5.
To specify the pages to print, select [Print Pages] in [Target] and specify the page number in the displayed [Range].
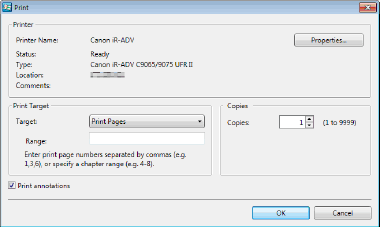
You can use the following formats to specify the page numbers using up to 255 characters.
When printing from page a to the last page: a-
("a" indicates the page number to start printing)
When printing from the first page to page n: -b
("b" indicates the page number to end printing)
When printing continuous pages: a-b
("a" and "b" indicate the page numbers to start and end printing respectively)
When printing discontinuous pages: c,d
("c" and "d" indicate the individual page numbers to print, separated by commas)
The entry order of page numbers is not the order of printing. Even when you enter "1,2" or "2,1", pages are printed in the order "1,2."
|
Note
|
|
If you specify [Range], the document will be printed up to the sheet to which the specified page range is assigned, instead of the specified page range itself. For 2-sided printing, both sides are printed even if only the front side is specified in the page range.
|
6.
Select [Print annotations] if you want to also print annotations.
|
Note
|
|
However, annotations added with something other than Annotation Editor may be printed regardless of whether you select the [Print annotations] check box, depending on the type of annotation.
|
7.
Click [OK].
The printing starts.
|
Note
|
|
For more information on the operations when you specify a fax driver in [Printer Name], see the following.
When you print a document with a text stamp annotation attached, the color concentration between the stamp characters and frame may differ in the print results. Change the settings of the printer driver to make sure they are printed with the same color.
Select the [Quality] sheet > [Details] or [Process Options] > [Mode Details] and change the setting to any value other than 1BPP
For more information, see troubleshooting for the printer driver.
If the Document Binder preview quality is not good, selecting [High quality] in [System Settings] may resolve this.
[Settings] > [System Settings] > [Common Settings] > [Display Settings] > [High quality]
For more information on the print job status, see the following.
|