
Configuring Basic E-Mail Settings
This section describes how to configure the e-mail settings by using the Send Function Setting Tool. With the Send Function Setting Tool, you can also register e-mail addresses to the Address Book.
|
The Send Function Setting Tool helps you configure the basic settings for sending e-mails. Instead of the Send Function Setting Tool, you can use the Remote UI to configure more detailed settings such as the settings for POP authentication before sending or for encrypted communication. Configuring E-Mail/I-Fax Communication Settings |
1
Start the Send Function Setting Tool.
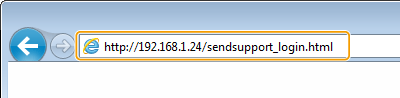
 Using a Web browser
Enter "http://<the IP address of the machine>/sendsupport_login.html" in the address field of a Web browser, and press the [ENTER] key.
Using the CD-ROM/DVD-ROM
1 | Insert the provided CD-ROM/DVD-ROM into the drive on the computer. Select a language and click [OK] if you are prompted to do so. |
2 | Click [Start Software Programs].  If the [Software Programs/Manuals Setup] screen is not displayed, see Displaying the [Software Programs/Manuals Setup] Screen. If [AutoPlay] is displayed, click [Run MInst.exe]. |
3 | Click [Start] for [Send Function Setting Tool]. |
4 | Click [Next]. If you want to view "Send Setting Guide," click [How to Set]. If the screen that cancels the Windows firewall is displayed, click [Yes]. |
5 | Select the machine from [Device List] and click [Next]. 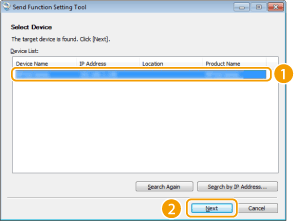 If the machine is not displayed in [Device List] Click [Search Again]. If the problem persists, click [Search by IP Address], enter the IP address of the machine, and then click [OK]. |
6 | Confirm the settings and click [OK]. |
2
Click [Start].
If the login screen is displayed, enter the appropriate ID and PIN in the corresponding text boxes, and then click [Logon].
3
Click [Send to E-mail Settings].
If the screen prompting you to enter the Address Book PIN is displayed, enter the PIN for the Address Book, and click [OK]. Restricting Use of the Address Book
4
Specify the required settings.

 [Registration]
[Favorites Number]
With the Send Function Setting Tool, you can register an e-mail address into <Favorites> in the Address Book. Select a number from the drop-down list.
With the Send Function Setting Tool, you can register an e-mail address into <Favorites> in the Address Book. Select a number from the drop-down list.
[Name for Favorites Number]
Enter the name for identifying the destination to be registered. Set a name that will be easy for you to find later in the Address Book.
Enter the name for identifying the destination to be registered. Set a name that will be easy for you to find later in the Address Book.
 [Send Destination Settings]
[Destination E-mail Address]
Enter the e-mail address that you want to send your scanned originals to.
Enter the e-mail address that you want to send your scanned originals to.
 [SMTP Server Settings]
[SMTP Server]
Enter the SMTP server name.
Enter the SMTP server name.
[SMTP Authentication]
Click the [Not Set] or [Set] radio button to match the authentication settings of the SMTP server. When [Set] is selected, enter the user name in the [User Name] text box and password in the [Password] text box.
Click the [Not Set] or [Set] radio button to match the authentication settings of the SMTP server. When [Set] is selected, enter the user name in the [User Name] text box and password in the [Password] text box.
Authentication methods for sending e-mails
To prevent e-mail transmissions by unauthorized users, the machine supports SMTP authentication (SMTP AUTH) and POP before SMTP. For more information about the required authentication method, contact your Internet service provider or Network Administrator.
POP before SMTP authentication can only be configured by using the Remote UI. Configuring E-Mail/I-Fax Communication Settings
5
Click [Next].
6
Confirm the settings and click [Register].
7
Restart the machine. Restarting the Machine
 |
Additional settings may be required depending on the network you are using. For more information, contact your Internet service provider or Network Administrator. To enable TLS for e-mailing, see Configuring E-Mail/I-Fax Communication Settings. To change port numbers, see Changing Port Numbers. |