Managing Device Setting Values for Monitoring
This section describes the procedure for managing the device setting values to use as the monitoring standard when monitoring the device setting values of printers.
Creating the Device Setting Value Data for Monitoring
Create the device setting value data to use as the standard for monitoring the device setting values of printers.
The following data can be used as the standard for monitoring the device setting values of this software.
New data created using Device Settings Configurator version 2.0.7 or later
IMPORTANT |
The device setting value monitoring function of this software does not support data older than version 2.0.7 of Device Settings Configurator. Do not include the following settings in the device setting value data to use as the standard for monitoring. Device setting value data including these items cannot be uploaded to this software. [Settings/Registration] > [Management Settings] > [User Management] > [Authentication Management] > [Authentication User Management] > [Administrator Password] [Settings/Registration] > [Management Settings] > [User Management] > [Authentication Management] > [Authentication User Management] > [User Setting Information File] [Settings/Registration] > [Management Settings] > [User Management] > [System Manager Information Settings] > [System Manager Information Settings] [Settings/Registration] > [Management Settings] > [User Management] > [System Manager Information Settings] > [System Manager ID] [Settings/Registration] > [Management Settings] > [User Management] > [System Manager Information Settings] > [System Manager PIN] Several precautions apply when handling device setting values. Check the following in advance. |
NOTE |
For details on using Device Settings Configurator, see the following. User's Guide for Device Settings Configurator |
Uploading Device Setting Values
The new device setting value data created with Device Settings Configurator is used as the device setting value data of the printers monitored with this software.
1.
Select the [Data Management] menu > [Device Setting Values].
2.
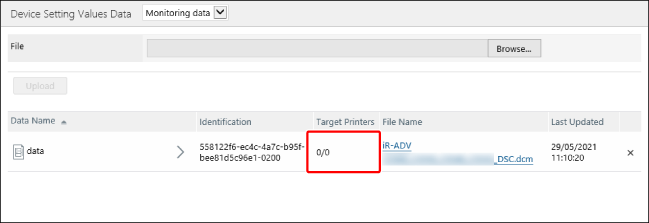
Select [Monitoring data] from the drop-down list on the top of the [Device Setting Values Data] page.

3.
Specify the data to upload on the [Device Setting Values Data] page.
IMPORTANT |
Only new device setting value data created in Device Settings Configurator can be used. |
In [File], select the file to upload.
In [Data Name], enter a name indicating the setting values to upload.
In [Password], enter the password set when backing up the data.
4.
Click [Upload].
Information on the uploaded data is added to the list when the upload is complete.
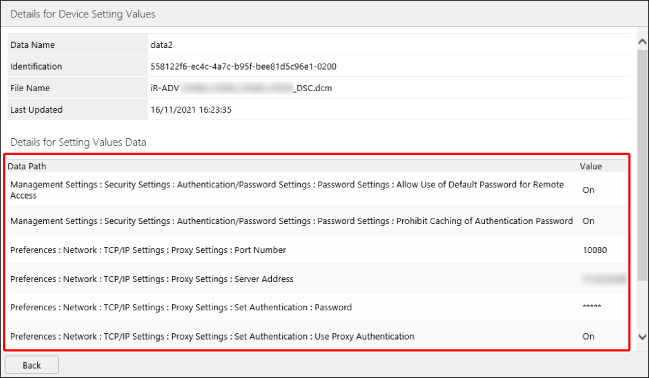
Click [Data Name] to check the data on the [Details for Device Setting Values] page.
NOTE |
By default, the path format is not used for displaying the [Data Path] field displayed on the [Details for Device Setting Values] page. To display it in the path format, it is necessary to register the settings file of Device Settings Configurator to this software. For details, see the following. The display format of setting values may differ from the screen of the printer or Device Settings Configurator, depending on the item. |
Associating Printers with the Device Setting Value Data for Monitoring
1.
Select the [Data Management] menu > [Device Setting Values].
2.
Select [Monitoring data] from the drop-down list on the top of the [Device Setting Values Data] page.
3.
In the list on the [Device Setting Values Data] page, click [Target Printers] for the device setting value data.

4.
On the [Printers Associated with Monitoring Data] page, select the printers to associate with the device setting value data.
In [Filter Devices], select the method for filtering the printers to associate.
[By Product] | Select this to associate printers with an ID compatible with the ID of the device setting value data. |
[By Device Type] | Select this to associate printers with the same platform as the device setting value data. |
Click [Devices] or [Groups], and select the printers or groups.
When [Devices] is clicked, you can apply a filter to filter the printers displayed in the list.
A maximum of 5,000 items can be selected in the device or device group list at once.
NOTE |
If a device group is selected in [By Product], the printers in the device group that meet the conditions are set as the target for the task. |
Making the Path of Device Setting Value Data Readable
By default, the path format is not used for displaying the [Data Path] field in the list displayed on the [Details for Device Setting Values] page.
To display it in the path format, it is necessary to register the settings file of Device Settings Configurator to this software. By registering the settings file of Device Settings Configurator to this software, the setting values are also displayed.

NOTE |
For details on using Device Settings Configurator, see the following. User's Guide for Device Settings Configurator |
1.
Compress the settings file of Device Settings Configurator version 2.0.7 or later in the ZIP format.
Compress the [ssdb] folder in the following folder of the computer where Device Settings Configurator version 2.0.7 or later is installed in the ZIP format. Next, compress the [resourcedb] folder in the ZIP format.
%ProgramFiles%\Canon\DeviceSettingsConfigurator2
NOTE |
If the compressed file exceeds 2 GB, create multiple compressed files so that each file is 2 GB or smaller. Example: If there are 50 folders in the [ssdb] folder, create a compressed file for the first 25 files and another compressed file for the other 25 files. Do not divide the [resourcedb] folder into multiple compressed files. |
2.
If you cannot access this software from the computer where Device Settings Configurator is installed,
copy the following files to a computer that can access this software.
copy the following files to a computer that can access this software.
Files compressed in step 1
%ProgramFiles%\Canon\DeviceSettingsConfigurator2\SettingFiles\DscStandAloneConfig.xml
3.
Upload the settings file of Device Settings Configurator to this software.
Select the [System] menu > [System Configuration].
Click [Device Setting Values Management].
Click the [Upload Files for Device Setting Values Database] tab.
Select the following file in [Settings File].
%ProgramFiles%\Canon\DeviceSettingsConfigurator2\SettingFiles\DscStandAloneConfig.xml
Click [Upload].
In [Device Setting Values Database (ssdb)], select the file with the [ssdb] folder compressed in the ZIP format.
Click [Upload].
If there are multiple compressed files, upload all the compressed files.
In [Device Setting Values Database (resourcedb)], select the file with the [resourcedb] folder compressed in the ZIP format.
Click [Upload].
When Installing New Printers
To make the setting value data of an installed printer readable, it is necessary to register a settings file for Device Settings Configurator that supports the new model to this software.
1.
Add the data for the new model to Device Settings Configurator. Or, upgrade Device Settings Configurator to a version that supports the new model.
2.
Select the [System] menu > [System Configuration] > [Device Setting Values Management].
3.
In the [Upload Files for Device Setting Values Database] tab, click [Reset].
4.
Upload the settings file for Device Settings Configurator to this software.
For details, see the following.
Managing Device Setting Value Data
1.
Select [Data Management] menu > [Device Setting Values].
2.
Select [Monitoring data] from the drop-down list on the top of the [Device Setting Values Data] page.
3.
In the list on the [Device Setting Values Data] page, perform the required operations.

Checking the details of setting value data
Click the data name of the data to check the details of.
Uploading setting value data
Click the name of the file to download.
Deleting setting value data
Click [ ] for the data to delete.
 ] for the data to delete.