<Common>
All the items related to settings common to each function are listed with descriptions. Default settings are marked with a dagger ( ).
).
 ).
). |
Asterisks (*)Settings marked with "*1" may not be displayed depending on the model you are using, options, or other setting items. Settings marked with "*2" cannot be imported or exported. |
<Paper Feed Settings>
Configure paper feed settings.
<Paper Source Auto Selection>
Enable or disable the automatic drawer selection feature for the paper sources. If automatic drawer selection is set to <On> when printing documents, the machine automatically selects a paper source that is loaded with the appropriate paper size. Also, when the paper runs out, this setting enables continuous printing by switching from one paper source to another that is loaded with the same paper size. Automatically Selecting an Appropriate Paper Source for Each Function
<Copy> <Multi-Purpose Tray> <Off>  <On> <Drawer 1> <Off> <On>  <Drawer 2>*1 <Off> <On>  <Printer> <Multi-Purpose Tray> <Off> <On>  <Drawer 1> <Off> <On>  <Drawer 2>*1 <Off> <On>  <Receive/Fax>/<Receive> <Multi-Purpose Tray> <Off>  <On> <Drawer 1> <Off> <On>  <Drawer 2>*1 <Off> <On>  <Other> <Multi-Purpose Tray> <Off>  <On> <Drawer 1> <Off> <On>  <Drawer 2>*1 <Off> <On>  |
<Switch Paper Feed Method> *1
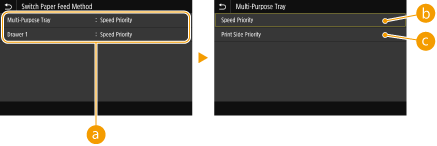
Specify this setting when you print a document on paper with logos. In general use, to print on paper with logos, you need to change how the paper loaded in the paper source is facing depending on whether you are performing 1- or 2-sided printing. However, if you change the setting to <Print Side Priority>, you can just load the paper with the logo side facing down for 1-sided printing in the same way as for 2-sided printing. For more information, see Loading Preprinted Paper.
<Multi-Purpose Tray> <Speed Priority>  <Print Side Priority> <Drawer 1> <Speed Priority>  <Print Side Priority> <Drawer 2>*1 <Speed Priority>  <Print Side Priority> |
<Menu>  <Function Settings>
  <Common>
  <Paper Feed Settings>
  <Switch Paper Feed Method>
  Select the paper source
  Select <Speed Priority> or <Print Side Priority>

 <Function Settings>
  <Common>
  <Paper Feed Settings>
  <Switch Paper Feed Method>
  Select the paper source
  Select <Speed Priority> or <Print Side Priority>


 Paper Sources
Select the paper source that you want to change the setting for.
 <Speed Priority>
When using paper that has been preprinted with a logo, you need to change how it is facing when you perform 1-sided and 2-sided printing.

We recommend selecting <Speed Priority> if you do not need to consider which side to print on.
 <Print Side Priority>
To print on a specific side of paper, you do not need to flip over paper in the paper source whether 1- or 2-sided printing is selected.

If <Print Side Priority> is set for a paper source that is loaded with paper you cannot use for 2-sided printing (Available Paper), <Speed Priority> is applied to the paper source instead. In this case, you need to load the paper in the same way as when <Speed Priority> is selected (Loading Preprinted Paper).
1-sided printing speed may be slower when <Print Side Priority> is selected.
<Print Settings>
Configure printing operation settings.
<Auto Delete Suspended Jobs>
You can configure so that if the machine stops printing a job due to an error, the job will be automatically deleted after a specified period of time.
<Set This Function> <Off>  <On> <Set Time> 0 to 5  to 240 (min.) to 240 (min.) |
<Menu>  <Function Settings>
  <Common>
  <Print Settings>
  <Auto Delete Suspended Jobs>
  Select <On> in <Set This Function>
  Enter the time in <Set Time>
  <Apply>
  <OK>
<OK>  Restart the machine
 <Function Settings>
  <Common>
  <Print Settings>
  <Auto Delete Suspended Jobs>
  Select <On> in <Set This Function>
  Enter the time in <Set Time>
  <Apply>
  <OK>
<OK>  Restart the machine
<Scan Settings>
Configure scan settings.
<Auto Online>
When scanning from the computer, use this to specify whether to automatically go online for remote scanning (scan standby mode) without using the operation panel.
<Off> <On>  |
<Menu>  <Function Settings>
  <Common>
  <Scan Settings>
  <Auto Online>
  Select <Off> or <On>

 <Function Settings>
  <Common>
  <Scan Settings>
  <Auto Online>
  Select <Off> or <On>

<Auto Offline> 
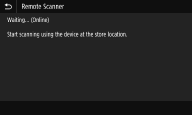
If scan is not performed within a specified period of time after the screen below is displayed (the machine is set online for scanning), the machine automatically becomes offline. Specify the time period at which the machine becomes offline.  |
<Set This Function> <Off> <On>  <Set Time> 1 to 5  to 60 (min.) to 60 (min.) |
<Menu>  <Function Settings>
  <Common>
  <Scan Settings>
  <Auto Offline>
  Select <On> in <Set This Function>
  Enter the time in <Set Time>
  <Apply>

 <Function Settings>
  <Common>
  <Scan Settings>
  <Auto Offline>
  Select <On> in <Set This Function>
  Enter the time in <Set Time>
  <Apply>

<Generate File>
Configure file generation settings.
<Output File Image Settings>
Specify settings for the gamma value for converting scanned originals into files.
<YCbCr TX Gamma Value> 
Select the gamma value used when converting scanned color originals into the specified file format. You can specify the same gamma value as that of the monitor which is to be used for viewing the converted files. The files are displayed with brightness that is true to the original documents.
<Gamma 1.0> <Gamma 1.4> <Gamma 1.8>  <Gamma 2.2> |
<Menu>  <Function Settings>
  <Common>
  <Generate File>
  <Output File Image Settings>
  <YCbCr TX Gamma Value>
  Select the gamma value

 <Function Settings>
  <Common>
  <Generate File>
  <Output File Image Settings>
  <YCbCr TX Gamma Value>
  Select the gamma value


For the gamma value of a monitor display, see the instruction manual included with the display.
<OCR (Text Searchable) Settings> 
To run OCR (Optical Character Recognition) on a text original to create a "searchable PDF," specify whether the machine determines the original's text direction and detects the original direction.
<Smart Scan> <Off> <On>  |
<Menu>  <Function Settings>
  <Common>
  <Generate File>
  <OCR (Text Searchable) Settings>
  Select <Off> or <On> in <Smart Scan>
  <Apply>

 <Function Settings>
  <Common>
  <Generate File>
  <OCR (Text Searchable) Settings>
  Select <Off> or <On> in <Smart Scan>
  <Apply>

<256-bit AES Set. (Encrypt. PDF)> *1
When generating an encrypted PDF, the PDF encryption level can be set to "128-bit" or "256-bit." If "256-bit" is selected, the version compatible with Acrobat can be changed.
<Acrobat 9.0 or Equivalent> <Acrobat 10.0 or Equivalent>  |
<Menu>  <Function Settings>
  <Common>
  <Generate File>
  <256-bit AES Set. (Encrypt. PDF)>
  Select <Acrobat 9.0 or Equivalent> or <Acrobat 10.0 or Equivalent>

 <Function Settings>
  <Common>
  <Generate File>
  <256-bit AES Set. (Encrypt. PDF)>
  Select <Acrobat 9.0 or Equivalent> or <Acrobat 10.0 or Equivalent>

<Fax Setup Guide> *1*2
Select to display on-screen instructions for specifying settings, including the fax number and the RX mode. Configuring Initial Settings for Fax Functions