
Adjusting Gradation
0UUY-0J6 0UW1-0HR 0YRY-0HL 0X7F-0L6 0X7H-0KR 1100-0HU 0X6E-0L6 0X6W-0KR 10XJ-0HU 0X7C-0L6 0X7A-0KR 1106-0HU 0WXY-0L7 0X7E-0KR 10YY-0HU 10H3-0HR 0WR6-0LC 0WR7-0KY 108A-0HS 1116-0HS 10H4-0HR 0WR5-0LC 0WR8-0KY 0YWJ-0JK 0YWH-0KR 0YWR-0JC 0YWK-0KR 0YWE-0L6 0YWF-0KR 0YAS-0HU
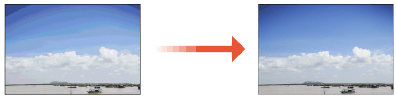
If color gradation reproducibility has become so poor that the gradation in the printed or copied image differs markedly from the print data or original document, gradation adjustment may improve the problem. There are two types of adjustments: Full Adjustment and Quick Adjustment.
|
Adjustments may not be performed effectively if there is not sufficient toner. |
Full Adjustment
Correct the gradation of an image accurately and optimize reproducibility during printing. Optimized information will be retained until the next accurate correction.
 |
You can use the following paper sizes/types. Size: A3, A4, 11" x 17", LTR Type: Plain 1, Heavy 1 to 9 |
1
Press  (Settings/Registration)
  <Adjustment/Maintenance> <Adjust Image Quality> <Auto Adjust Gradation>.
(Settings/Registration) 2
Select the paper to adjust, and press <Full Adjust>.

Changing the Settings for Adjustment
You can change the settings for adjustment, such as whether the feeder is used during full adjustment. Changing the Settings for Adjustment
If you selected <Simple> in <Adjustment Level>, it is not necessary to select the paper. Adjustment is applied to all paper types.
3
Select the paper source in which the paper you selected in step 2 is loaded, and press <OK>.
4
Press <Start Printing>.
A test page is printed.
5
Scan the test page.
If the paper source selected in step 3 contains one of the paper types listed below, use the platen glass for scanning even when <Use Feeder When Performing Full Adjust> is set to On.
Heavy 6 to 9
 Scanning Using the Feeder
1 | Place the test pages in the feeder. Place the test pages in the feeder. |
2 | Press <Start Scanning>. The test pages are scanned and full adjustment is completed. |
Scanning Using the Platen Glass
1 | Place the test page on the platen glass. Place the test page as indicated by the on-screen instructions. |
2 | Close the feeder and press <Start Scanning>. The machine starts scanning the test page. |
3 | Open the feeder, and remove the test page. |
4 | Repeat steps 4 (Press <Start Printing>) and 5 (Scan the test page) above for full adjustment. To complete adjustment, follow the on-screen instructions to print and then scan the test page multiple times. |
Quick Adjustment
This adjustment maintains the optimized status that was acquired by <Full Adjust>. If the result of this adjustment is not satisfactory, perform <Full Adjust>.
1
Press (Settings/Registration) <Adjustment/Maintenance> <Adjust Image Quality> <Auto Adjust Gradation>.
(Settings/Registration) 2
Select the paper to adjust, and press <Quick Adjust>.
If you selected <Simple> in <Adjustment Level>, it is not necessary to select the paper. Adjustment is applied to all paper types.
3
Press <Start>.
Registering Paper for Calibration
If you perform automatic gradation adjustment for a custom paper type, registering a custom paper type for calibration is required beforehand.
In this procedure, you need to scan the printed test pages 2 times, 1 time for base paper and 1 time for a custom paper type. The number of sheets required for the registration is 2 sheets of paper.
| ||||
Make sure to register paper to adjust in the stable room environment (i.e. temperature and humidity). If the rapid changes in room environment occur after the registration of paper to adjust, accurate recalibrations of the gradation, density, and color settings of the machine cannot be made for paper already registered to adjust. In this case, register again that paper to adjust. Make sure to register paper whose finish and whiteness are equivalent to the International Paper Hammermill Premium Color Copy (28lb. (105 g/m2)) as paper to adjust. Accurate recalibrations of the gradation, density, and color settings of the machine may not be made if you register and use paper other than that condition as paper to adjust. To perform the procedure described in this section, you must log in to the machine as an administrator. Logging in as an Administrator Confirm that both paper to use as a basis and a custom paper type to register to adjust, described in the following table, are set in paper sources correctly before starting this procedure.
* The name of the paper is subject to change without notice. For more information, contact your dealer or service representative. |
|
<Custom Type> registered in <Paper Information> of <Paper to Adjust 1>, <Paper to Adjust 2>, and <Paper to Adjust 3> becomes unable to be changed or deleted. If you want to delete or change <Custom Type>, first register another <Custom Type> as the paper to adjust. Paper Type Management Settings |
1
Press (Settings/Registration) <Adjustment/Maintenance> <Adjust Image Quality> <Auto Adjust Gradation>.
(Settings/Registration) 2
Press <Register Paper to Adjust>.
3
Select the destination for registering new paper to adjust, and press <Next>.
|
You can register up to three type of paper to adjust and you can overwrite them. When overwriting, you cannot restore the paper settings previously registered. |
4
Select the type for the paper to use as a basis, and press <Next>.
5
Select the paper source contains the type of paper to use as a basis, and press <Next>.
|
This machine adjusts the toner and print speed according to the paper type. To make effective adjustments, select the correct paper type. |
6
Press <Start Printing>.
First test page is output.
7
Place the first test page on the platen glass, and press <Start Scanning>.
Place the first test page face down on the platen glass, with the black bar along the top back edge of the platen glass.
8
Remove the first test page from the platen glass.
9
Select the paper source that contains the custom paper type to adjust, and press <Next>.
|
This machine adjusts the toner and print speed according to the paper type. To make effective adjustments, select the correct paper type. |
10
Press <Start Printing>.
Second test page is output.
11
Place the second test page on the platen glass, and press <Start Scanning>.
Place the second test page face down on the platen glass, with the black bar along the top back edge of the platen glass.
12
Remove the second test page from the platen glass.
Selecting Paper for Calibration
You can select the type of paper for calibration.
|
To perform the procedure described in this section, you must log in to the machine as an administrator. Logging in as an Administrator |
1
Press (Settings/Registration) <Adjustment/Maintenance> <Adjust Image Quality> <Auto Adjust Gradation>.
(Settings/Registration) 2
Press <Select Paper to Adjust> select the type of paper to adjust press <OK>.
|
This machine adjusts the toner and print speed according to the paper type. To make effective adjustments, select the correct paper type. To perform the auto gradation adjustment to some custom paper type, select that custom paper type, which is registered in advance, for paper to adjust. |
Changing the Settings for Adjustment
You can change the settings for adjustment, such as whether the feeder is used during full adjustment.
(Settings/Registration) 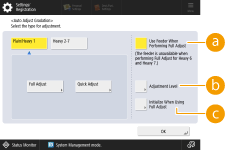
 <Use Feeder When Performing Full Adjust>
Select On to use the feeder when scanning the test page or Off to use the platen glass.
 <Adjustment Level>
Enables you to set the level for gradation adjustment.
 <Initialize When Using Full Adjust>
Enables you to set whether to use default settings for gradation adjustment.
|
Since this may cause poor color balance, make sure to perform auto gradation adjustment (full adjustment) after changing the settings. |