Starting Setting Synchronization
Use the Remote UI to specify the settings for starting synchronization and start synchronization. Administrator privileges are required for registration.
Synchronizing Custom Settings
Specify the settings for the client machine.
 |
Other settings for the server machine are required on the machine with the server function. |
1
Start the Remote UI. Starting the Remote UI
2
Click [Synchronize Custom Settings] on the portal page. Remote UI Screen
3
Click [Change Connection Destination...].
4
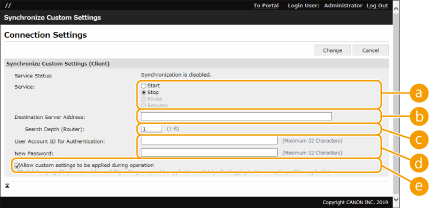
Specify the required settings.

 [Service]
Select [Start].
 [Destination Server Address:]
Enter the IP address or host name of the server machine. When specifying the port number, "8443" must be specified. The port number can be omitted. If this is left blank, the server machine is automatically discovered.
Example settings (IPv4):
Using an IP address: 192.168.18.138
Using a host name: v4.server.canon.com
Using an IP address: 192.168.18.138
Using a host name: v4.server.canon.com
Example settings (IPv6):
Using an IP address: fe80::65f0:82cb:b3d6:e6bc
Using a host name: v6.server.canon.com
When specifying the port number: [fe80::65f0:82cb:b3d6:e6bc]:8443
Using an IP address: fe80::65f0:82cb:b3d6:e6bc
Using a host name: v6.server.canon.com
When specifying the port number: [fe80::65f0:82cb:b3d6:e6bc]:8443
 [Search Depth (Router):]
Enter the number of routers to hop (the number of routers to communicate through). If this value is too small, the server machine may not be discovered with network discovery. If you do not want to communicate through routers, specify "1".
 [User Account ID for Authentication:]/[New Password:]
Enter the ID and password of a user account with Administrator privileges for the machine to use as the server machine.
 [Allow custom settings to be applied during operation]
Select the check box to reflect the <Switch Language/Keyboard>, <Accessibility>, and <Personal SSID and Network Key Settings> settings when it becomes possible if they could not be reflected immediately after logging in.
 |
In the following cases, synchronization can be set without performing step 4. When the machines to synchronize are within the same router. When <Use User Authentication> is set to <On> on the server machine (see <Use User Authentication>) and User Authentication is set as the login service (see Changing Login Services) When nothing is entered in [User Account ID for Authentication:] on the client machines (the item is null) When the service for synchronizing custom settings is started on the server machine (if the machine is a server/client machine, the setting can be changed by starting the server service and the client service at the same time) When there is only one server machine for synchronizing custom settings on the same network If the network settings of the server machine include both IPv4 and IPv6, and if IPv6 is prioritized and the client machine disables IPv6, the client machine cannot connect via search. Enter the IPv4 address for the destination server address. |
5
Click [Change].
6
Restart the machine. Turning OFF/Restarting the Machine
Continue to configure the synchronization settings on the machine with the server function.
 |
Checking the Communication Log for SynchronizationYou can check the communication log from the screen for synchronizing custom settings. The log can also be downloaded as a file. "Warning" is recorded as the level when the server machine cannot communicate temporarily. "Error" is recorded as the level when the maximum amount of data that can be registered has been exceeded or authentication with the server machine fails. Simple Synchronization SettingsSynchronization of custom settings can be started from the control panel for Canon multifunction printers within the same router. For a client machine: Press   <Management Settings> <Management Settings>  <Device Management> <Device Management>  set <Synchronize Custom Settings (Client)> to <Enable>. set <Synchronize Custom Settings (Client)> to <Enable>.User Authentication must be enabled as the authentication method. Note When Canceling SynchronizationWhen a client machine cancels synchronization of custom settings, the client machine will become unable to retrieve the settings for each user registered in the server machine. Therefore note that the personalized data of a machine that was a client machine may not have the latest data after synchronization of custom settings has been canceled. |