Configuring Scan Settings in Advanced Mode
If you click the [Advanced Mode] tab on the ScanGear MF screen, you can make more advanced adjustments in the image quality than you can in Simple Mode. You can also register adjusted settings as Favorite Settings. For more detailed information, click the  icon next to the topic.
icon next to the topic.
Operating Preview Images
If you place the document on the platen glass and click [Preview], a preview image is displayed. You can specify the area you want to scan, and check the effects of image adjustments on the preview image.


 (Clear)
Clears the preview image.

 (Crop)
Specifies the cropping area with the cropping frame. Click and drag the area you want to crop. The cropping area is indicated with a dotted line. You can move the cropping frame or change its size with your mouse.

Setting multiple scanning areas
You can specify cropping areas in the document so that each of them can be scanned as separate images. Drag the cropping frame to specify the areas you want to scan. You can specify up to ten areas. Click [Scan] to scan the areas in the cropping frames as separate images.

 (Move the Image)
Drags the image to move the visible part of the image when a preview image is enlarged.

 (Zoom)
Enlarges the entire preview image. Left-click the image to zoom in. Right-click the enlarged image to zoom out. To enlarge a part of the image to check the details, use [Zoom] ( ).
).
).
 (Left Rotate)/
 (Right Rotate)
Rotates the preview image 90 degrees to the left or right.

 (Information)
Displays the current settings of the scanned image, such as the color mode and size of the scan area.

 (Auto Crop)
Automatically sets the cropping frame that fits the scanned document. Each time you click the icon, the cropping frame is reduced.

 (Clear Crop Frame)
Clears the selected cropping frame.
 [Select All Crops]
Selects all of the cropping frames on the image.
[Zoom]
Enlarges the image in the cropping frame. The smaller the cropping frame, the larger the image is displayed. You can check the details that are difficult to see with (). To return the image to its original size, click this button again.
(). To return the image to its original size, click this button again.Specifying Settings for Documents and Color Mode
Specify the document input method (the platen glass or feeder), document size, color mode, and other settings.
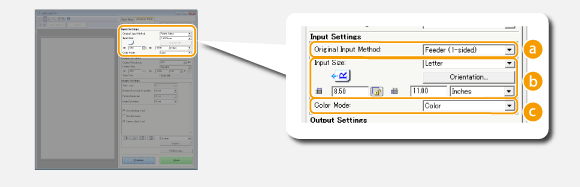
[Original Input Method]
Select a setting based on whether you place your documents on the platen glass or in the feeder.
[Platen Glass] | Select when placing documents on the platen glass. |
[Feeder (1-sided)] | Select when placing 1-sided documents in the feeder. |
[Feeder (2-sided)] | Select when placing 2-sided documents in the feeder. |
[Input Size]
Specify the size of the scanning area. For normal cases, select the same size as the document. To specify the size with values, select a unit, and enter the values for width and height. To lock the width to height ratio of the image, click  .
.
.If you select [Feeder (2-sided)] for [Original Input Method] (), you cannot specify the size by entering the values.
), you cannot specify the size by entering the values.The image size that can be scanned is limited on some applications.
If documents are placed in the feeder, set the orientation of the documents in [Orientation]. You can also set [Binding Location] if 2-sided documents are placed in the feeder.

[Color Mode]
Select the image type to scan documents.
[Black and White] | The document is scanned as a black and white image (in black and white only, with no intermediate shades of gray). You can change the threshold that separates text in the document or the image into black and white with [Threshold] (Adjusting Brightness and Color). |
[Grayscale] | The document is scanned as a grayscale image (in black and white with intermediate shades of gray, similar to a black and white photograph). |
[Color] | The document is scanned as a color image. |
[Text Enhanced] | The document is scanned as a black and white image optimized for processing by OCR (optical character recognition) software. |
Specifying Resolution and Image Size
Specify the output resolution and output size.

[Output Resolution]
Select the resolution of the scanned image that suits your intended use. If documents are placed in the feeder, the maximum resolution is 300 dpi.
About the output resolution
A resolution of 75 dpi is a rough guide for displaying the scanned image on a computer, and 300 dpi for printing or creating a searchable PDF.
If you double the output resolution, the image file size increases by a factor of 4. If the file size is too large, a memory shortage or other error may occur. Set the resolution to the minimum required for your intended use.
[Output Size]
Select the size of the scanned image when it is printed or displayed on a computer.
Click  to switch between the portrait and landscape orientation. This button is not available when [Flexible] is selected.
to switch between the portrait and landscape orientation. This button is not available when [Flexible] is selected.If you select [Add/Delete], you can add new output size settings and delete the added sizes.

Select [Flexible] to change the output size and the ratio of width to height. Drag the area you want to scan on the preview image or enter values for width and height. If you specify the magnification percentage in the [%] entry field on the right side of the width and height entry fields, the document is enlarged or reduced for scanning.
[Data Size]
Displays the data size of the image when it is scanned with the set [Output Resolution] and [Output Size].
Adjusting Image Quality
Configure settings for improving the image quality, such as correction of scratches or faded colors on a photograph. These settings are available if you select [Color] or [Grayscale] for [Color Mode] (Specifying Settings for Documents and Color Mode).

[Auto Tone]
Automatically adjusts the color tone of the image.
[Reduce Dust and Scratches]
Makes dust or scratches on the document less noticeable. [High] makes large scratches and dust less noticeable, but may ruin details on the image.
[Fading Correction]
The setting is available if you select [Color] for [Color Mode]. Corrects faded colors on the document or enhances the color saturation of dull-colored documents. [High] dramatically corrects the faded colors, but may change the color tone of the entire image.
[Grain Correction]
Reduces graininess to create a smooth color tone when scanning photographs taken with high-speed film. [High] dramatically reduces graininess, but may also reduce image sharpness or degrade image quality.
[Use Unsharp Mask]
Emphasizes the edges and lines in the image, creating a sharper appearance.
[Use Descreen]
Reduces the color unevenness and moire that occur when scanning printed images.
[Correct Black Text]
Emphasizes the outlines of black text.
Adjusting Brightness and Color
Configure color settings such as brightness, contrast, and color tone. The displayed items vary depending on the settings selected for [Color Mode] (Specifying Settings for Documents and Color Mode). When [Text Enhanced] is selected, you cannot configure these settings.

 (Brightness/Contrast)
Adjusts the brightness and contrast (the difference between the light and dark parts) of the image. To adjust while checking on a graph, click  on the upper-right of the screen.
on the upper-right of the screen.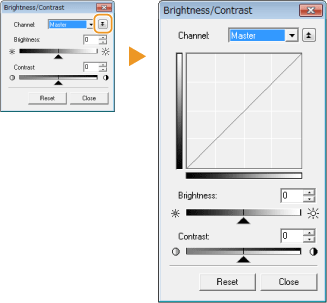
[Channel]
If you select [Color] for [Color Mode], you can adjust the [Red], [Green] and [Blue] color channels separately. To adjust all three colors at the same time, select [Master]. You can combine the adjustments made in [Master] and those made in the individual color channels.
If you select [Grayscale] for [Color Mode], only [Grayscale] is displayed.
[Brightness]
Slide or enter a value.
Slide
or enter a value.[Contrast]
Slide or enter a value. When contrast is reduced, the difference between the light and dark parts of the image is reduced to create a softer appearance. When contrast is increased, the difference between the light and dark parts is increased to create a bolder appearance.
Slide
or enter a value. When contrast is reduced, the difference between the light and dark parts of the image is reduced to create a softer appearance. When contrast is increased, the difference between the light and dark parts is increased to create a bolder appearance. (Histogram)
 | A histogram is a graph that shows the distribution of brightness in an image. You can adjust the image while checking the preview image and histogram. Specify the part of the image you want to make brightest (or darkest) in the preview image, so that the brightness balance of the original image is automatically adjusted with the specified part being the average. Likewise, you can also adjust the balance with the brightness of the medium tone being the average. |
[Channel]
If you select [Color] for [Color Mode], you can adjust the [Red], [Green] and [Blue] color channels separately. To adjust all three colors at the same time, select [Master]. You can combine the adjustments made in [Master] and those made in the individual color channels.
If you select [Grayscale] for [Color Mode], only [Grayscale] is displayed.
 (Black-point Eyedropper)/
 (Mid-point Eyedropper)/
 (White-point Eyedropper)
Click the parts on the preview image (or cropping frame) you want to specify as the darkest, the medium, and the brightest. Slide
, , or
, or  . Alternatively, you can enter a value.
 (Gray Balance Eyedropper Tool)
Click a part on the preview image (or cropping frame) you want to render as an achromatic color, which is black, grey, or white, each of which does not have color depth. Color tone on the rest of the image is adjusted with the clicked part being the average. For example, if snow on a photograph image is bluish, click this part because you essentially want to render this part as white. When you click this part, the snow is no longer bluish, and the entire image is adjusted so that it comes closer to natural colors. Click different parts little by little while checking the preview image to produce the optimum color tone.
 (Tone Curve Settings)
 | The tone curve is a curved line that indicates the brightness and contrast levels of the image before and after adjustment. Select a registered tone curve to adjust the brightness and contrast levels of the image. |
[Channel]
If you select [Color] for [Color Mode], you can adjust the [Red], [Green] and [Blue] color channels separately. To adjust all three colors at the same time, select [Master]. You can combine the adjustments made in [Master] and those made in the individual color channels.
If you select [Grayscale] for [Color Mode], only [Grayscale] is displayed.
[Select Tone Curve]
Select from the items listed below.
Select from the items listed below.
[No Correction] | Performs no correction. |
[Over Exposure] | Lightens the entire image. |
[Under Exposure] | Darkens the entire image. |
[High Contrast] | Emphasizes the difference between the light and dark parts of the image. |
[Invert the Negative/Positive Image] | Inverts the light and dark parts of the image. |
 (Final Review)
 | The results of all adjustments made to the brightness, contrast ( ), histogram (), and tone curve settings () are displayed in a tone curve and as numerical values. Perform a final check of the color settings. |
 (Threshold)
 | Adjust the threshold value* for black and white images. You can enhance the appearance of text or reduce the visibility of text or images printed on the reverse side of a semi-transparent document, such as a newspaper. The setting is available if you select [Black and White] for [Color Mode]. * The threshold value is the boundary that separates whether a color is rendered as black or white. Colors below a certain density level are rendered as white, and colors above a certain density level are rendered as black. |
[Threshold Level]
Slide or enter a value. To render more parts as black, slide to the right or enter a larger value.
Slide
or enter a value. To render more parts as black, slide to the right or enter a larger value.Registering or Calling Settings
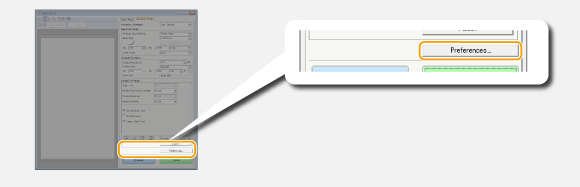
Specifying Other Settings
Click [Preferences] to configure various settings, including the operation when scanning.
[Preview] Tab
 | Configure the preview and auto crop operations. |
[Preview at the Start of ScanGear]Select the preview operation when you start ScanGear MF.
[Automatically Execute Preview]
Scanning of the preview image starts automatically when you start ScanGear MF.
Scanning of the preview image starts automatically when you start ScanGear MF.
[Display Saved Preview Image]
Preview does not start automatically, and the most recently saved preview image is displayed.
Preview does not start automatically, and the most recently saved preview image is displayed.
[None]
Preview does not start automatically, and no preview image is displayed.
Preview does not start automatically, and no preview image is displayed.
[Cropping Frame on Previewed Images]Select how the cropping frame (Operating Preview Images) is displayed on the preview image.
[Execute Auto Cropping on Previewed Images]
Auto Crop is performed based on the scanned document.
Auto Crop is performed based on the scanned document.
[Display the Last Frame on Previewed Images]
Auto Crop is not performed, and the most recently set cropping frame is displayed.
Auto Crop is not performed, and the most recently set cropping frame is displayed.
[None]
Auto Crop is not performed, and no cropping frame is displayed.
Auto Crop is not performed, and no cropping frame is displayed.
[Scan] Tab
 | Configure the settings that are applied when you scan a document by using an application, and the settings for ScanGear MF operations. |
[Scan without Using ScanGear's Window]When you scan the document by using an OCR software or other application, the ScanGear MF screen may not be displayed. In such a case, the document is scanned with the setting of the application applied. However, if the application does not have the following settings, enable them here so that these settings are applied for scanning.
[Color Mode (Text and Table)]
If the application settings are specified to scan documents in color, those settings are replaced and documents are scanned with the ScanGear MF color mode set to [Color Mode (Text and Table)].
If the application settings are specified to scan documents in color, those settings are replaced and documents are scanned with the ScanGear MF color mode set to [Color Mode (Text and Table)].
[Text Enhanced]
If the application settings are specified to scan documents in black and white, those settings are replaced and documents are scanned with the ScanGear MF color mode set to [Text Enhanced].
If the application settings are specified to scan documents in black and white, those settings are replaced and documents are scanned with the ScanGear MF color mode set to [Text Enhanced].
[Automatically Quit ScanGear after Scanning]The [ScanGear MF] screen automatically closes after scanning is complete. The screen may automatically close with some applications regardless of this setting.
[Color Settings] Tab
 | Configure advanced color and brightness settings, such as color matching and gamma correction. |
[Color Correction]Select the color correction method.
[Recommended]
Color tone is vividly reproduced on a computer display. This setting is recommended for most color corrections.
Color tone is vividly reproduced on a computer display. This setting is recommended for most color corrections.
[Color Matching]
Color is adjusted so that the color tone on the display comes closer to that on the printed result. This setting is available if you select [Color] for [Color Mode] (Specifying Settings for Documents and Color Mode).
Color is adjusted so that the color tone on the display comes closer to that on the printed result. This setting is available if you select [Color] for [Color Mode] (Specifying Settings for Documents and Color Mode).
If [Color Matching] is enabled, the [Fading Correction] (Adjusting Image Quality) setting and the buttons for brightness and color settings (Adjusting Brightness and Color) are disabled.
[Always Execute the Auto Tone]Color tone is automatically adjusted. The setting is available if you select [Color] or [Grayscale] for [Color Mode].
[Monitor Gamma]You can display the document at the proper brightness level by specifying the gamma value of the computer display that displays the scanned image. The setting is applied if you select [Color] or [Grayscale] for [Color Mode].
[Scanner] Tab
 | Configure the temporary save destination of files, the playing of audio files, and other settings. |
[Select Folder Where Temporary Files are Saved]Click [Browse] to change the folder to which an image is temporarily saved.
[Sound Settings]You can specify the music or sounds that are played while the machine is scanning or when scanning is complete. Click [Browse] to specify a file to be played. The following file formats (extensions) are supported:
MIDI files (.mid/.rmi/.midi)
Audio files (.wav/.aif/.aiff)
MP3 files (.mp3)
[Play Music During Scanning]
The specified sound file is played while scanning is being performed.
The specified sound file is played while scanning is being performed.
[Play Sound When Scanning is Completed]
The specified sound file is played when scanning is complete.
The specified sound file is played when scanning is complete.
[Test Scanner]You can check whether the scan function of the machine is working properly. When the [Scanner Diagnostics] screen opens, click [Start].
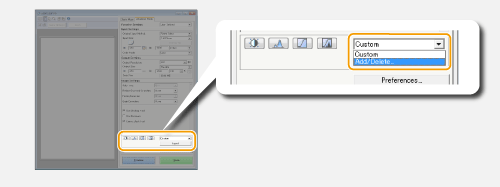
Registering Frequently Used Settings
It is troublesome to configure the color mode, image quality, or other settings each time you scan. If you register frequently used settings as Favorite Settings, you can scan simply call the registered settings when scanning.
 |
The following settings cannot be registered in [Favorite Settings]. Widths and heights in [Input Settings] and [Output Settings] On or off of the button (to lock the ratio of width to height) in [Input Settings]The magnification percentage (%) in [Output Settings] |
1
Place the document(s), and click [Preview].
2
Change the scan settings.
Select settings to register as necessary.

3
Select [Add/Delete] in [Favorite Settings].

The [Add/Delete Favorite Settings] screen is displayed.
[Add/Delete] is available when the preview image is displayed.
4
Enter a name into [Setting Name], and click [Add]  [Save].
Enter a name for the settings to register. Use a name that is easy to find in the drop-down list.

|
Calling registered Favorite SettingsDisplay a preview image, and select the registered setting in the drop-down list.  |
Registering the Brightness or Color Setting
To register only the brightness, contrast, histogram, tone curve, or threshold setting, follow the procedure below.
1
Place the document(s), and click [Preview].
2
Adjust the brightness or color. Adjusting Brightness and Color
Select settings to register as necessary.
3
Select [Add/Delete] in the drop-down list.
The [Add/Delete Tone Curve Settings] or [Add/Delete Threshold Settings] screen is displayed.
4
Enter a name into [Setting Name], and click [Add] [Save].
Enter a name for the settings to register. Use a name that is easy to find in the drop-down list.

|
Calling the registered settingDisplay a preview image, and select the registered setting in the drop-down list.  |