Sending Documents as E-mails Directly from the Machine
You can specify multiple destinations, including Cc/Bcc destinations, just like you can when sending normal e-mails.
1
Place the document(s). Placing Documents

2
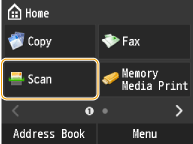
Tap <Scan>.
3
Tap <E-Mail>.

4
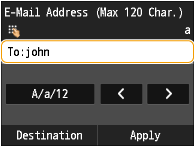
Enter the destination using the numeric keys, and tap <Apply>.
Tapping <A/a/12> toggles the input modes.
If you enter the wrong characters, press  . (Press to delete each character one by one; press and hold to delete all the input characters at once.)
To make it easier to specify destinations by using other methods, such as the Address Book, see Specifying Destinations (E-mail/Shared Folder/File Server).
5
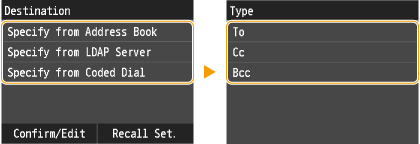
Specify multiple destinations, including Cc/Bcc destinations, as necessary.
To add a destination, tap <Destination>  tap the type of destination.
Use the Address Book or an LDAP server for <To> destinations. To specify destinations for <Cc> and <Bcc>, you need to use the Address Book and Coded Dial.
6
Specify the scanning settings as necessary.
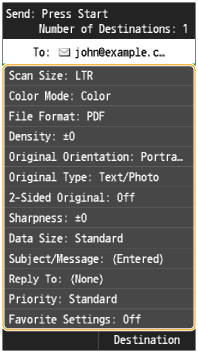

The file name of a scanned document is automatically assigned based on the following format: communication management number (four digits)_sent date and time_document number (three digits). file extension name.
Example of file names: If a one-page document is converted into a PDF file and sent on October 17, 2014 at 07:00:05 P.M.
0045_141017190005_001.pdf
You cannot specify file names yourself.
7
Specify the subject, body, reply-to address, and priority for the e-mail as necessary.
The priority is set to "Standard" by default.
The subject and the body are not set by default. Enter it as necessary. Without the body text, only scanned documents are sent.
The reply-to address is not set by default. If you want to notify the recipient of the reply-to address, specify the address from among those registered in the Address Book. If no destination is registered in the Address Book, see Registering in the Address Book.

 To specify subject/body
1 | Tap <Subject/Message>.  |
2 | Tap <Subject>. 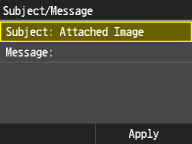 |
3 | Enter the subject using the numeric keys, and tap <Apply>. Tapping <A/a/12> toggles the input modes. 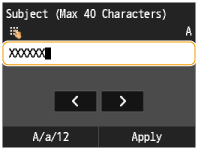 |
4 | Tap <Message>. 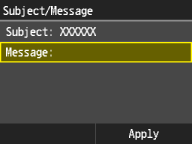 |
5 | Enter the body using the numeric keys, and tap <Apply>. Tapping <A/a/12> toggles the input modes. 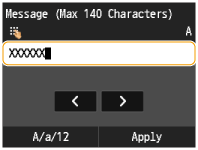 |
6 | Tap <Apply>. 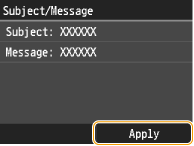 |
To specify reply-to address
1 | Tap <Reply To>. 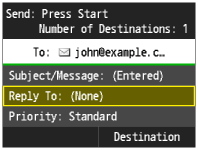 |
2 | Tap <Specify from Address Book>. 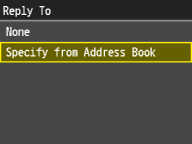 |
3 | Tap a reply-to address from the Address Book. For instructions on how to use the Address Book, see Specifying from Address Book. 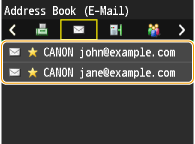 |
To specify priority
1 | Tap <Priority>. 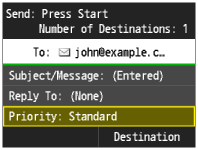 |
2 | Tap a priority level. 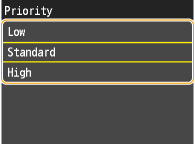 |
8
Press  to start sending.
to start sending.Scanning starts.
If you want to cancel sending, press  <Yes>.
When placing documents in the feeder in step 1
When scanning is complete, the e-mail is sent.
When placing documents on the platen glass in step 1
When scanning is complete, follow the procedures below.
1 | If there are additional pages of documents to be scanned, place the next document on the platen glass, and press .Repeat this step until you finish scanning all of the pages. When there is only one page to be scanned, proceed to the next step. |
2 | Tap <Start Sending>. The e-mail is sent. |
 |
If you always want to scan with the same settings: If you want to specify the e-mail sender name: |