Specifying LDAP Server Authentication (E-mail/Shared Folder/File Server)
To restrict sending of faxes and e-mail or saving to shared folders/file servers, set authentication by LDAP server. Combining this with department ID management allows you to implement more robust security.
1
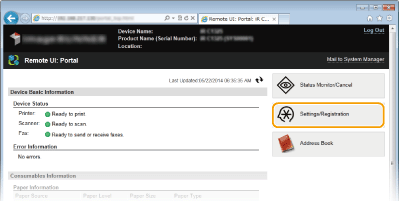
Start the Remote UI and log on in System Manager Mode. Starting Remote UI
2
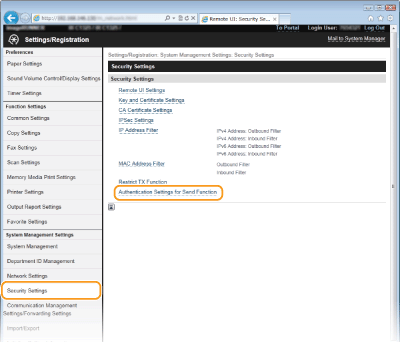
Click [Settings/Registration].
3
Click [Security Settings]  [Authentication Settings for Send Function].
4
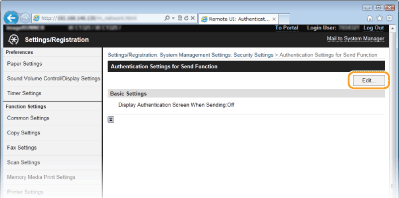
Click [Edit...].
5
Select the [Display Authentication Screen When Sending Operation Starts] check box.
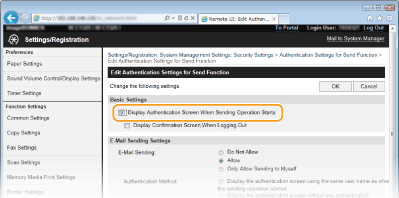
6
Specify required settings and click [OK].
Select the check box for [Display Confirmation Screen When Logging Out] to display a confirmation screen for logging out.
E-Mail Sending Settings

[E-Mail Sending]
Set whether to restrict sending of e-mail. Selecting [Only Allow Sending to Myself] allows e-mail to be sent only to an authenticated user address.
[Authentication Method]
Set this if [Allow] or [Only Allow Sending to Myself] are selected for [E-Mail Sending].
[Display the authentication screen using the same user name as when the sending operation started] | Select when authenticating for each send with the user name set on the LDAP server. |
[Display the authentication screen without any authentication information] | Select when entering the user name and password to authenticate for each send with information set on the LDAP server. |
[Use device-specific authentication information and do not display the authentication screen] | Select when authenticating with the user name and password set in e-mail settings on the machine. |
[Specify Authentication User Destination as Sender]
Select the check box to allow the authenticated user e-mail address to be set as the sender.
File Sending Settings
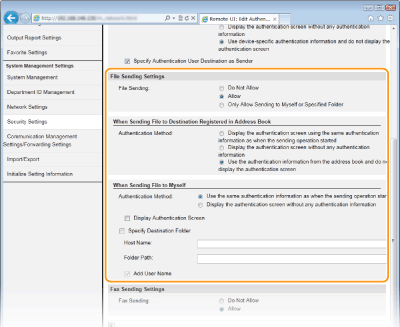
 [File Sending]
Set whether to allow saving to shared folders and file servers. Select [Only Allow Sending to Myself or Specified Folder] to allow saving of data only to your own address or a specified folder.
 [When Sending File to Destination Registered in Address Book]
Set when [Allow] is selected for [File Sending Settings] and you are sending to an address registered in the Address Book.
[Display the authentication screen using the same authentication information as when the sending operation started] | Select when authenticating for each send with the user name set on the LDAP server. |
[Display the authentication screen without any authentication information] | Select when entering the user name and password to authenticate for each send with information set on the LDAP server. |
[Use the authentication information from the address book and do not display the authentication screen] | Select when authenticating with the user name and password set in the Address Book. |
 [When Sending File to Myself]
Set when [Allow] or [Only Allow Sending to Myself] is selected for [File Sending Settings] and you are sending to a folder assigned to the user set on the LDAP server.
[Use the same authentication information as when the sending operation started] | Select when authenticating with the user name set on the LDAP server. To display an authentication screen, select the check box for [Display Authentication Screen]. |
[Display the authentication screen without any authentication information] | Select when entering the user name and password to authenticate for each send with information set on the LDAP server. |
[Specify Destination Folder]
Set when specifying an address or folder other than a folder assigned to the user set on the LDAP server.
[Host Name] | Enter a host name for the LDAP server up to 120 characters in length. |
[Folder Path] | Enter up to 120 characters. To add the user name (up to 120 characters) set on the LDAP server to the folder name, select the check box for [Add User Name]. |
Fax Sending Settings
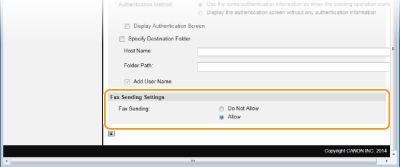
[Fax Sending]
Set whether to allow sending of faxes.