Checking the Print Results
 | Prior to a large amount of printing, you can check the print result by printing a print sample. Confirming the print results beforehand enables you to eliminate output mistakes. |
 |
<Print Sample> appears only if you set to make multiple copies and one of the following settings at the same time. Collate (Page Order) Offset Staple + Collate Booklet Front Cover Insert Sheets |
Checking the Print Result by Printing a Sample (Print Sample)
When you specified multiple numbers of copies, you can first make a copy of your whole original to check the result and then start making the rest of the copies. You can also copy only specific pages of your original.
1
Press <Access Stored Files>. <Home> Screen
2
Select a mail box, select a file you want to print and press <Print>.
3
Enter the number of copies, and specify the print settings according to your purpose and objective. Useful Print Functions
4
Press <Print Sample> on the print screen. Setting Screen and Operations for Printing Saved Files
5
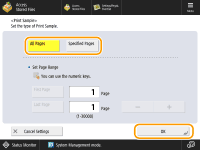
Select pages for the print sample and press <OK>.

If you want to print all of the pages, select <All Pages>.
To print specific pages, select <Specified Pages>. Enter the pages by pressing <Start Page> or <End Page>.

If you select <All Pages>
If you select <All Pages>, the machine's counter counts the sample set as a print.
If you select <Specified Pages>
Settings such as finishing and booklet are not performed.
Specify the pages based on the output page numbers.
6
Press <Start Printing>.
The print sample is printed. Check the result.
 If there is no problem with the print result
Press <Start Printing> to print the number of copies you specified. If you selected <All Pages> in step 5, the number of copies minus one is printed. If you select <Specified Pages> in step 5, the total number of copies is printed.
 If you want to change settings
Press <Change Settings> to change the settings. <Print Sample> is displayed after the settings are changed. Print a sample again.