Setting the IP Address Using the Printer's Control Panel
To set the IP address using the printer's control panel, use the following menu hierarchies.
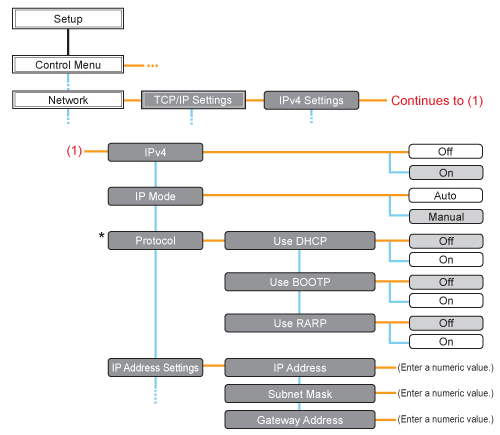
* | [Protocol] is displayed when [IP Mode] is set to [Auto]. |
 | Pressing [  ] ( ] ( Settings) displays the common Setup menu. Settings) displays the common Setup menu. indicates that the procedure is performed by pressing [ indicates that the procedure is performed by pressing [  ] or [ ] or [  ] on the control panel. ] on the control panel.  indicates that the procedure is performed by pressing [OK] on the control panel. indicates that the procedure is performed by pressing [OK] on the control panel. |
IMPORTANT |
After setting the IP addressTo enable the settings, perform a hard reset or restart the printer. For details on a hard reset, see "Canceling All the Jobs (Hard Reset)." To go back up the hierarchyPress [  ] ( ] ( Back). Back). About the control panelFor details on the control panel, see "Control Panel." |
1
Press [ ] (Settings), select [Network] using [ ] and [ ], and then press [OK].
] (Settings), select [Network] using [ ] and [ ], and then press [OK].When the message is displayed, press [OK].
| You can specify the settings when the printer is either online (the  Online indicator is on) or offline (the Online indicator is off). Online indicator is on) or offline (the Online indicator is off). |
2
Select [TCP/IP Settings] using [ ] and [ ], and then press [OK].
] and [ ], and then press [OK].3
Select [IPv4 Settings] using [ ] and [ ], and then press [OK].
] and [ ], and then press [OK].4
Set it to use [IPv4].
(1): | After selecting [IPv4] using [ ] or [ ], press [OK]. |
(2): | After selecting [On] using [ ] or [ ], press [OK]. |
5
Select the method for setting the IP address.
(1): | Select [IP Mode] using [ ] and [ ], and then press [OK]. | ||||
(2): | Select a method for setting the IP address using [ ] and [ ], and then press [OK].
|
6
Set the IP address.
If You Selected [Auto] in Step 5
1. | Select [Protocol] using [ ] and [ ], and then press [OK]. | ||||||||
2. | Select [On] for the option to be used when setting the IP address.
| ||||||||
3. | Set the IP address, the subnet mask, and the gateway address manually as needed. When setting them manually, go back up the hierarchy by pressing [ ] (Back), and then perform the procedure in "If You Selected [Manual] in Step 5."
| ||||||||
4. | Proceed to Step 7. |
 "
"If You Selected [Manual] in Step 5
1. | Select [IP Address Settings] using [ ] and [ ], and then press [OK]. | ||||||||
2. | Select [IP Address], [Subnet Mask] and [Gateway Address] using [ ] and [ ], press [OK]. | ||||||||
3. | [IP Address], [Subnet Mask] and [Gateway Address] are each set.
| ||||||||
4. | Proceed to Step 7. |
 ] and [
  ] to move the cursor to each field (an area separated by periods to enter three-digit numbers) in which you want to enter respective values of the address.
Perform a hard reset or restart the printer.
After performing a hard reset or restarting the printer, the settings are effective.
NOTE |
For details on a hard reset |