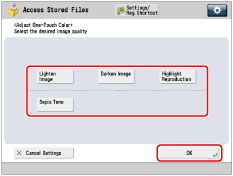
You can make prints by selecting the look of the image with just one touch of a key. The following four options are available.
Lighten Image
This setting enables you to make prints with lighter color tones by decreasing the density, while maintaining a good balance throughout.
Darken Image
This setting enables you to make prints with heavier color tones by increasing the density, while maintaining a good balance throughout.
Highlight Reproduction
This setting enables you to make prints by reproducing the highlighted areas that normally tend to appear as white more faithfully. This is achieved by increasing the density of areas that have a low density.
Sepia Tone
This setting enables you to make prints that look like old-fashioned photographs.
IMPORTANT
This mode can be used only for printing a file stored in a mail box.
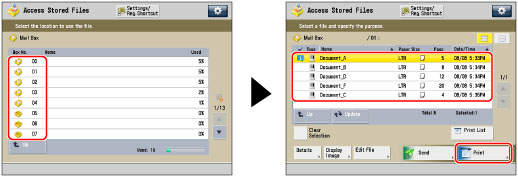
Select the desired Mail Box → select the desired file → press [Print].
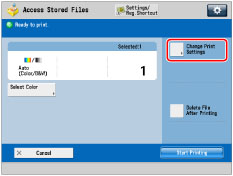
3
Press [Change Print Settings].
4
Press [Options] → [Adjust One-Touch Color].
5
Select the desired Adjust One-Touch Color feature → press [OK].
You can combine different Adjust One-Touch Color features, but the following cannot be selected together:
[Lighten Image] and [Darken Image] and [Highlight Reproduction]
NOTE
If you select [Sepia Tone], [Single Color] is displayed on the Change Print Settings screen.
6
Press [Close].
IMPORTANT
Adjust One-Touch Color mode settings are actually preset color balance settings. Therefore, if you change the Adjust One-Touch Color mode settings, any color balance settings that you may have made are also changed.
You cannot set the Sepia Tone mode to files in a mail box that have been received from a computer. If you press [Start Printing] with the Sepia Tone mode set, a message prompting you to reset the settings appears on the screen.
You cannot specify Adjust One-Touch Color mode settings when you print a CMYK format file stored in a mail box.
This site uses cookies to provide its contents and functions and improve their qualities etc. You can find out more about our use of the cookies here. If you select "Reject", only cookies necessary to provide the contents and functions of the site are recorded and stored.
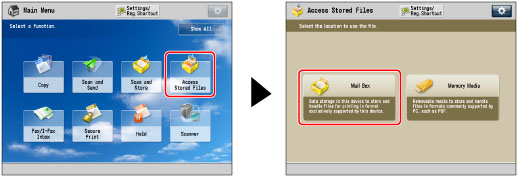
 (Main Menu) → [Access Stored Files] → [Mail Box].