FTP Server Settings
IMPORTANT |
The use of Windows Server 2008/7/Server 2008 R2/8.1/Server 2012/10 as an FTP server requires the installation of IIS. If IIS is not installed in the computer you are using, you will need to install the version of IIS for the operating system you are using before entering these settings. (See "Sending Data.") For installation procedures, see the manuals provided with your operating system. User authentication for access to FTP servers is performed using the local account database of Windows Server 2008/7/Server 2008 R2/8.1/Server 2012/10 used as the FTP server. Therefore, it is not possible to use the account of a domain user registered in Windows Server 2008/7/Server 2008 R2/8.1/Server 2012/10 to send data directly from the machine to FTP servers in other domains. |
Windows Server 2008/7/Server 2008 R2/8.1/Server 2012/10
This section describes the procedures for using the default home directory under [Default FTP Site]/[FTP Sites]. To use other settings, enter the FTP site and home directory by referring to the IIS documentation.
It is recommended that you consult the administrator for the network you are using when configuring the FTP server.
In the following procedures, items displayed on the screens for Windows 8.1 are used. Depending on your environment, the items you see on the screen may differ.
1.
Log on to Windows as a member of the group with access rights to the directory to be designated as the FTP site directory.
Depending on your environment, the access rights settings for a drive or directory may differ. For more information, see the Windows manual.
2.
Start IIS.
Windows Server 2008: From the [Start] menu, select [Control Panel]. Double-click [Administrative Tools] → [Internet Information Services (IIS) Manager].
Windows 7/Server 2008 R2/8.1: From the [Start] menu, select [Control Panel]. Click [System and Security] → [Administrative Tools] → double-click [Internet Information Services (IIS) Manager].
Windows Server 2012: Place the cursor on the top right (bottom right) of the desktop → select [Settings] → [Control Panel]. Click [System and Security] → [Administrative Tools] → double-click [Internet Information Services (IIS) Manager].
Windows 10: Place the cursor on the bottom left of the desktop and right-click → select [Windows System] → [Control Panel]. Click [Administrative Tools] → double-click [Internet Information Services (IIS) Manager].
NOTE |
Depending on the computer that you use, the operation may differ. |
3.
Set the FTP site.
If you are using Windows Server 2008:
Right-click the [FTP Site] icon → click [Properties].
In the [FTP Site Properties] dialog box, click the [Security Accounts] tab.
Deselect [Allow only anonymous connections].
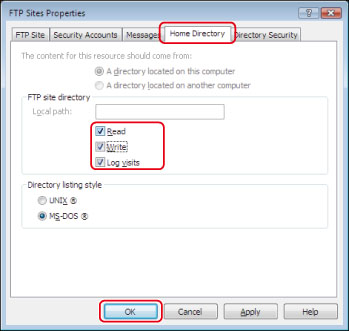
Click the [Home Directory] tab → select both [Read] and [Write] → click [OK].
If you are using Windows 7/Server 2008 R2:
Right-click the [Sites] icon → click [Add FTP Site].
Enter the appropriate site information in the [Add FTP Site] dialog box → click [Next].
Specify the binding and TLS settings respectively → click [Next].
Deselect [Anonymous] for <Authentication>.
Select both [Read] and [Write] for <Permissions> → click [Finish].
If you are using Windows 8.1/Server 2012/Windows 10:
Right-click the [Sites] icon → click [Add FTP Site].
Enter the appropriate site information in the [Add FTP Site] dialog box → click [Next].
Specify the binding and TLS settings respectively → click [Next].
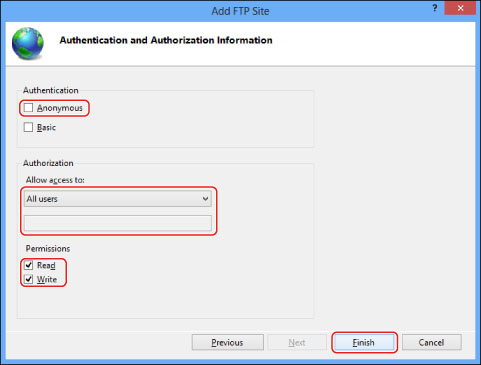
Deselect [Anonymous] for <Authentication>.
Set the user/group whom you want to give access to the FTP site in <Allow access to>.
Select both [Read] and [Write] for <Permissions> → click [Finish].
4.
Confirm the full computer name.
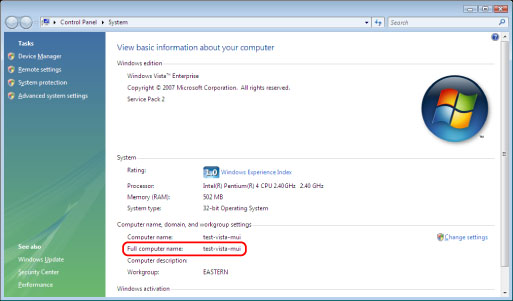
If you are using Windows Server 2008/7/Server 2008 R2:
From the [Start] menu, right-click [Computer] → select [Properties].
Confirm [Full computer name] → close the window.
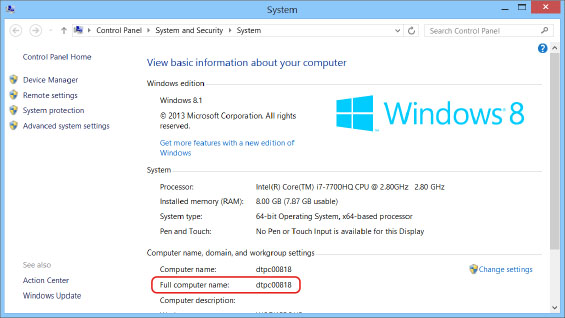
If you are using Windows 8.1/Server 2012:
Place the cursor on the top right (bottom right) of the desktop → select [Settings] → [PC info]/[Server Info].
Confirm [Full computer name] → close the window.
If you are using Windows 10:
Place the cursor on the bottom left of the desktop and right-click → select [System].
Confirm [Full computer name] → close the window.
5.
Set the user and password for accessing the FTP server.
Display the window for managing the computer.
Windows Server 2008/7/Server 2008 R2/8.1: From the [Start] menu, right-click [Computer] → select [Manage].
Windows Server 2012: Place the cursor on the bottom left of the desktop and right-click → select [Computer Management].
Windows 10: Place the cursor on the bottom left of the desktop and right-click → select [Computer Management].
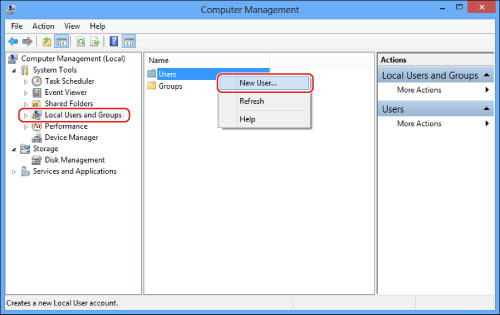
Double-click [Local Users and Groups] for [System Tools] in the [Computer Management] window.
If you are using Windows Server 2008/Server 2008 R2, double-click [Configuration] under [Server Manager].
Right-click the [Users] folder → click [New User].
In the [New User] dialog box, enter the user name in [User name] → enter the password in [Password] → re-enter the password in [Confirm Password] → click [Create].
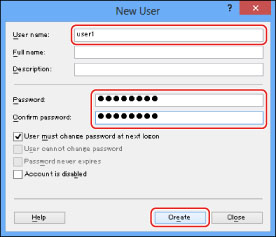
Enter a user name and a password no longer than 24 alphanumeric characters.
If you select [User must change password at next logon], any new users added must change their passwords in order to send data from the machine. (You cannot change the password from the control panel.)
NOTE |
In the Active Directory environment, the procedures for setting up users differ from the above. For more information, see the Windows manual. |
6.
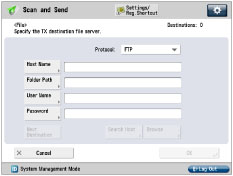
Set a recipient address using the control panel.
Sample recipient settings:
Server side settings:
[Full computer name]: | example.organization.company.com |
Create a directory named "share" in the home directory, "\lnetpub\ftproot", under [Default FTP Site]/[FTP Sites], and then set "share" as the data destination.
The machine's address settings:
<Protocol:>: | FTP |
[Host Name]: | example.organization.company.com |
[Folder Path]: | share |
[User Name]: | User name entered in step 5 |
[Password]: | Password for the above user |
IMPORTANT |
To use the full computer name, which was confirmed in step 4, as the host name for [Host Name] as shown in the above example, it is necessary to use a DNS server. (This applies even if the machine and the FTP server are in the same subnet.) If no DNS server is available, the setting for [Host Name] should be specified using the IP address of the FTP server. Up to 128 alphanumeric characters can be entered for [Host Name] on the control panel. Also, up to 255 alphanumeric characters can be entered for [Folder Path]. Specify the server settings within the character limits. If you change the language of the touch panel display, [Host Name] and [Folder Path] may not appear correctly. If you want to send to an IPv4 host using an FTP port other than port 21, set [Host Name] using the following format: <IPv4 address of FTP server>:<Port number> Example: 192.168.1.21:21000 To send to an IPv6 host, set [Host Name] using the following format: <IPv6 address>:<Port number> Example: [5aed:90a0:bc05:01d2:568a:2fc0:0001:12ee]:21000 |
UNIX/Linux
For more information on the system requirements for using a UNIX/Linux computer as an FTP server, see "Sending Data."
In some environments, detailed settings may be required in order to use FTP. For details, consult the
administrator for the network you are using.
administrator for the network you are using.
1.
Log in to a workstation as a superuser → set up the users who send documents from the machine, and their passwords.
Enter a user name and a password no longer than 24 alphanumeric characters.
2.
Create a shared directory to be used for recipient addresses, and then enable read access and write access by the users who will be sending data.
3.
Set a recipient address using the control panel.
Sample recipient settings:
Server side settings:
Host Name: | example |
Domain: | organization.company.com |
The user's home directory is /home/hsato, and /home/hsato/share is the data destination.
The machine's address settings:
<Protocol:>: | FTP |
[Host Name]: | example.organization.company.com |
[User Name]: | User name entered in step 1 |
[Password]: | Password for the above user |
Enter one of the following in [Folder Path]:
share (when using relative path)
/home/hsato/share (when using absolute path)
IMPORTANT |
To use the host name of the above example for [Host Name], it is necessary to use a DNS server. (This applies even if the machine and the FTP server are in the same subnet.) If no DNS server is available, the setting for [Host Name] should be specified using the IP address of the FTP server. Up to 128 alphanumeric characters can be entered for [Host Name] on the control panel. Also, up to 255 alphanumeric characters can be entered for [Folder Path]. Specify the server settings within the character limits. If you change the language of the touch panel display, [Host Name] and [Folder Path] may not appear correctly. If you want to send to an IPv4 host using an FTP port other than port 21, set [Host Name] using the following format: <IPv4 address of FTP server>:<Port number> Example: 192.168.1.21:21000 To send to an IPv6 host, set [Host Name] using the following format: <IPv6 address>:<Port number> Example: [5aed:90a0:bc05:01d2:568a:2fc0:0001:12ee]:21000 |
OS X 10.5 - 10.8
NOTE |
Screenshots and item names from Mac OS X 10.6/10.8 are used for the procedures common to each OS. When changing your computer's settings, it may be necessary to unlock the computer by clicking the key icon. |
1.
Log in to macOS as an administrator.
2.
Start the FTP service on macOS.
Mac OS X 10.5/10.6
From Dock or the apple menu, select [System Preferences] → [Sharing].
Select [File Sharing] → click [Options].
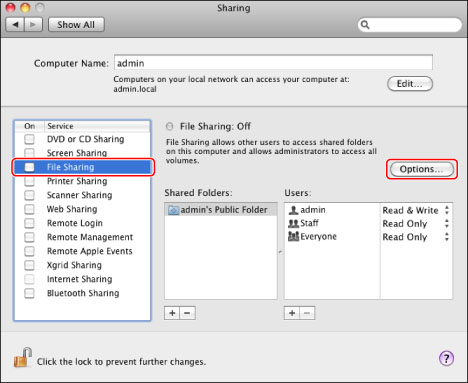
Select [Share files and folders using FTP].
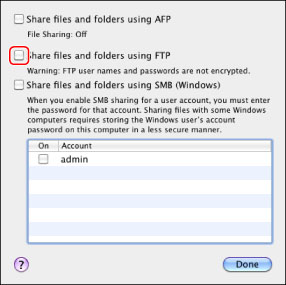
Click [Done].
Click [Show All] on the toolbar.
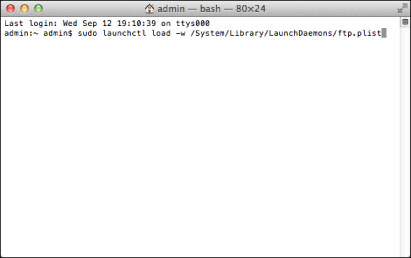
Mac OS X 10.7/OS X 10.8
Click [Go] → [Applications] → [Utilities].
Double-click and start [Terminal].
Execute the following command.
sudo launchctl load -w /System/Library/LaunchDaemons/ftp.plist
3.
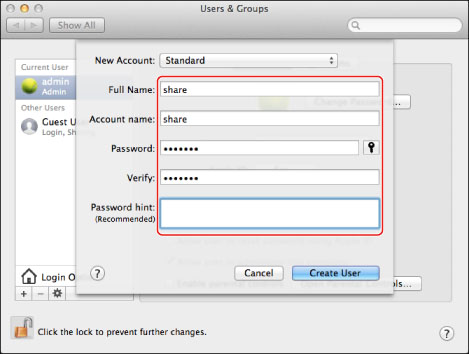
Set the user and password for sending the data.
Click [Accounts]/[Users & Groups] in the [System Preferences] window.
In the [Accounts]/[Users & Groups] window, enter the name of the user to whom you want to send data from the machine through macOS → enter the password.
4.
Create a shared folder to which files are to be sent.
Sample setting:
Create a folder named "FTP_Folder" (customizable) in [Go] - [Home] - logged in user name - [Public] - [Drop Box].
5.
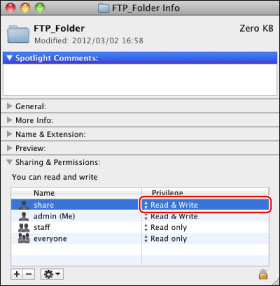
Set the access permissions for the shared folder created in step 4.
With the shared folder selected, click [Get Info] from the [File] menu.
Display [Sharing & Permissions].
Allow Read & Write for <Privilege>.
6.
Set a recipient address using the control panel.
Sample recipient settings:
Server side settings (set using the above procedure):
Create a folder named "FTP_Folder" in the [Drop Box] folder in the [Public] folder in the [Home] folder of the user named "share," and then specify the FTP_Folder as the folder to which files are sent.
The machine's address settings:
<Protocol:>: | FTP |
[Host Name]: | IP address of macOS |
[User Name]: | User name entered in step 3 |
[Password]: | Password for the above user |
Enter the following path in [Folder Path]:
/Users/share/Public/Drop Box/FTP_Folder
IMPORTANT |
Up to 255 alphanumeric characters can be entered for [Folder Path] on the control panel. If you change the language of the touch panel display, [Host Name] and [Folder Path] may not appear correctly. If you want to send to an IPv4 host using an FTP port other than port 21, set [Host Name] using the following format: <IPv4 address of FTP server>:<Port number> Example: 192.168.1.21:21000 To send to an IPv6 host, set [Host Name] using the following format: <IPv6 address>:<Port number> Example: [5aed:90a0:bc05:01d2:568a:2fc0:0001:12ee]:21000 |