Saving Scanned Data
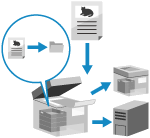
Scan the original and save the scanned data to the following locations:
Mail Box or Advanced Box on the machine
Advanced Box on another machine
Windows server
The save destination is displayed on the control panel of the machine, so you can confirm the save destination and save scanned data.
When saving scanned data to Advanced Box or Windows server, you can also create a destination folder on the control panel of the machine and change the folder name before saving the data.
When saving scanned data to Advanced Box or Windows server, you can also create a destination folder on the control panel of the machine and change the folder name before saving the data.
* For details about Mail Box or Advanced Box, see the following:
Required Preparations
Make preparations according to the store location of the scanned data. Preparing to Send and Save Scanned Data
1
Place the original. Placing Originals
If the screen for selecting the thickness of the original appears, select the thickness of the placed original.
2
On the control panel, press [Scan and Store] in the [Home] screen. [Home] Screen
The screen for selecting the type of store location is displayed.
3
Display the store location.
When Saving to Mail Box on the Machine

1
Press [Mail Box].
2
Select the Mail Box to be used as the store location.
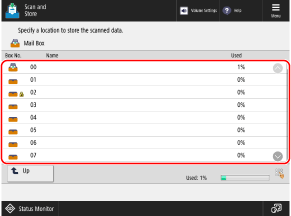
You can also directly specify the store location by using the numeric keys to enter a box number.
If the PIN input screen appears, enter the PIN set for the Mail Box, and press [OK].
You can check the icons for the status of each Mail Box.
[ ]: File is saved.
[ ]: File is not saved.
[ ]: PIN is set. Mail Box Settings
[
 ]: File is saved.
[
 ]: File is not saved.
[
 ]: PIN is set. Mail Box Settings
[Used] at the bottom right of the screen indicates the total usage of all Mail Boxes.
When Saving to Advanced Box on the Machine

1
Press [Advanced Box].
If the Advanced Box login screen appears, enter the same user name and password used to log in to the machine, and press [OK].
* If you select [Store Password], you can skip logging into Advanced Box the next time.
2
Select [Shared Space] or [Personal Space].
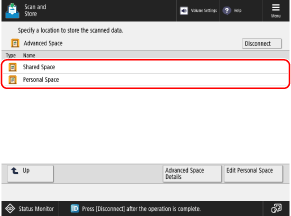
You can press [Advanced Box Details] to check details such as the location (URL) and available capacity of the Advanced Box.
You can press [Edit Personal Space] to create or delete a Personal Space or change the name of a public folder (folder on the network) in a Personal Space. Creating a Personal Space in Advanced Box
3
Display the destination folder.
You can also create a destination folder and change the folder name. [Advanced Box], [Network], and [Memory Media] File Selection Screen
When Saving to Advanced Box on Another Machine or Windows Server

1
Press [Network].
2
Select another machine or server to be used as the store location.
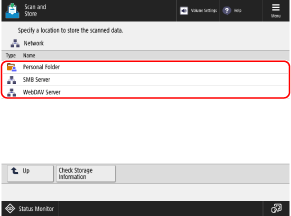
Select [Personal Folder] to directly access and store to your own login user folder (Personal Folder).
You can press [Check Storage Information], select the connection destination, and then press [Details] to check the protocol and path of the connection destination.
If a login screen appears, enter the same user name and password used to log in to the other machine or server, and press [OK].
3
Display the destination folder.
You can also create a destination folder. [Advanced Box], [Network], and [Memory Media] File Selection Screen
4
Press [Scan].
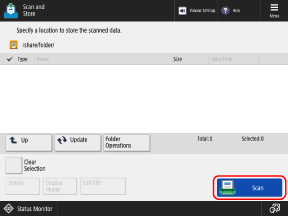
The scanning screen is displayed.
5
Configure the scan settings. Scan Settings
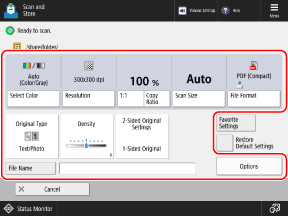
* The items that appear on the screen vary depending on the model and options.
The store location icon and hierarchy (box number and name in the case of Mail Box) are displayed at the top left of the screen.
[ ]: Mail Box on the machine
[ ]: Advanced Box on the machine
[ ]: Advanced Box on another machine or Windows server
To select a different store location, press [Cancel] at the bottom left of the screen.
[
 ]: Mail Box on the machine
[
 ]: Advanced Box on the machine
[
 ]: Advanced Box on another machine or Windows server
To select a different store location, press [Cancel] at the bottom left of the screen.
When Favorite Settings are registered, you can call these up by pressing [Favorite Settings]. Registering and Recalling Favorite Settings
To cancel changes to the settings and return to the default settings, press [Restore Default Settings].
6
Press [ Start].
 Start].
Scanning of the original starts.
To cancel scanning, press [Cancel]  [Yes]. Canceling Scanning
 [Yes]. Canceling Scanning
When scanning of the original is completed, the scanned data is saved. When saving to a location other than Mail Box, you can use [ Status Monitor] to check the save status and log. Checking the Send or Save Status and Log of Scanned Data
 Status Monitor] to check the save status and log. Checking the Send or Save Status and Log of Scanned Data
When [Press the [Start] key to scan the next original.] Is Displayed

When an original is placed on the platen glass and is scanned or scanning is performed using Job Build, the screen for scanning additional originals is displayed.
1
To continue scanning originals, place the next original, and press [ Start].
 Start].
The next original is scanned, and the same screen is displayed.
Repeat this process until scanning of all originals is completed.
Repeat this process until scanning of all originals is completed.
When placing originals on the feeder to scan, remove the scanned original (original ejected to the original output tray) before placing the next original.
When Changing the Scan Settings for Each Original
On the screen with the displayed message, press [Change Settings]. You can change the following settings:
[Select Color]*1
[Scan Size]*2
[2-Sided Original]
[Density]*1
[Original Type]
For example, when scanning a 2-sided original after scanning a 1-sided original, press [Change Settings], and set [2-Sided Original].
*1This cannot be changed if N on 1 is set when saving to Mail Box.
*2This cannot be changed when saving to Mail Box.
2
Press [Start Storing].
The scanned data is saved.
IMPORTANT
When Performing Operations while Logged in to Advanced Box or Windows server
When you have completed operations, be sure to log out by pressing [Disconnect].
Save Period of Scanned Data Saved to Mail Box
Scanned data saved to Mail Box will be deleted automatically after a fixed period has elapsed.
* You can change the save period (time until the data is deleted) and prevent it from being deleted automatically, as needed. Mail Box Settings
NOTE
When Multiple Originals Are Fed during Scanning and Operations Are Canceled (Detect Multiple Sheet Feed)
A message is displayed on the screen. Remove the jammed original while following the instructions in the message. Paper and Staple Jams
When the jammed original is removed, the screen for resuming operations is displayed.
If multi sheet feeding was detected incorrectly, press [Do Not Detect Multi. Sheet Feed] to resume scanning.
When the jammed original is removed, the screen for resuming operations is displayed.
If multi sheet feeding was detected incorrectly, press [Do Not Detect Multi. Sheet Feed] to resume scanning.
To prevent detection of multi sheet feeding, configure either of the following settings:
On the scan screen, press [Options]  [Detect Feeder Multi Sheet Fd.] each time you scan, to cancel detection of multi sheet feeding.
 [Detect Feeder Multi Sheet Fd.] each time you scan, to cancel detection of multi sheet feeding.
Change the default settings to prevent detection of multi sheet feeding. [Set Detection of Feeder Multi. Sheet Feed as Default]
* Depending on the model, the optional document feeder double feeding detection kit may be required in order to use the multiple sheet feed detection function. 


Checking and Editing Scanned Data before Saving
You can display a preview screen to check the contents and organize the pages before saving scanned data. You can also edit pages in more detail when saving scanned data to Mail Box. Checking and Editing Scanned Data before Sending or Saving
Enhancing the Security of Scanned Data (Location Other than Mail Box)
You can enhance the security of scanned data by encrypting the PDF file or adding a digital signature to the PDF or XPS file. Enhancing the Security of Scanned Data