Scanning the Test Page and Guide Sheet to Adjust the Print Position
Print and scan the test page to adjust the print position. If the print position is shifted on the front and back sides of the paper when 2-sided printing or 2-sided copying is performed, scan the guide sheet and test page to adjust the print position.
* You cannot adjust the image printed on Long Sheet paper. In addition, you may not be able to correctly adjust images on textured or Color paper. In this case, measure the shift amount of the image, and adjust the print position. Adjusting the Print Position by Entering Measured Values
Step 1: Registering the Paper Type
Register the paper type for which you want to adjust the print position as a custom paper type. Registering Frequently Used Paper Types
* You can skip this step if the paper is already registered. Proceed to Step 2.
Step 2: Scanning the Test Page and Guide Sheet to Adjust the Print Position
Use the control panel to perform adjustment. You cannot perform adjustment using Remote UI from a computer.
For C5100 Series, Administrator or DeviceAdmin privileges are required.
For C5100 Series, Administrator or DeviceAdmin privileges are required.
Required Preparations
Load the paper to be adjusted.
* Use up to 10 sheets of paper for printing the test page.
* Use up to 10 sheets of paper for printing the test page.
For the guide sheet, load paper that meets the conditions below.
Paper size: A3 or 11" x 17"
Finish: Uncoated, 1-Sided Coated, or 2-Sided Coated
Type: None (normal)
Basis weight: Paper with weight of 80 g/m2 (21 lb bond) or more that can be printed on both sides (use of paper with weight of 200 g/m2 (74.0 lb cover) or more is recommended)
1
Log in to the machine as an administrator (for C5100 Series). Logging In to the Machine
2
On the control panel, press [ Settings/Registration] in the [Home] screen or other screen. [Home] Screen
 Settings/Registration] in the [Home] screen or other screen. [Home] Screen
The [Settings/Registration] screen is displayed.
3
Press [Preferences]  [Paper Settings]
  [Paper Type Management Settings].
 [Paper Settings]
  [Paper Type Management Settings].
The [Paper Type Management Settings] screen is displayed.
4
Select the custom paper to be adjusted, and press [Details/Edit].
The [Details/Edit] screen is displayed.
5
Press [Change] for [Adjust Image Position].
The screen for selecting the adjustment method is displayed.
6
Press [Use Scanner].
7
Perform adjustment of the print position.
When Scanning the Test Page from the Feeder to Adjust the Print Position

1
Select [Feeder] for [Location for Scanning Test Page], set the number of sheets to output, and then press [Next].
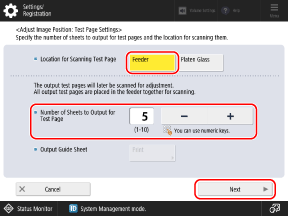
Scanning the multiple sheets of test pages for adjustment may increase calibration accuracy.
2
Select the paper source loaded with the custom paper to be adjusted, and press [Start Printing].
The guide sheet is printed.
3
Follow the instructions on the screen to place the test page in the feeder.
4
Press [Start Scanning].
The test page is scanned and adjustment is performed.
When the print position adjustment is complete, [Adjustment is complete.] is displayed.
When the print position adjustment is complete, [Adjustment is complete.] is displayed.
When the Print Position Adjustment Fails
Depending on the paper or usage environment, adjustment of the print position may fail. If this occurs, check the following:
Adjustment may not be performed correctly if you are using curled paper for the test page. Flatten the edges of the test page to remove any curls.
If the print position adjustment fails when you use plain paper, use the guide sheet to adjust the print position.
When Scanning the Guide Sheet from the Platen Glass to Adjust the Print Position

1
Select [Platen Glass] for [Location for Scanning Test Page], and press [Print] for [Output Guide Sheet].
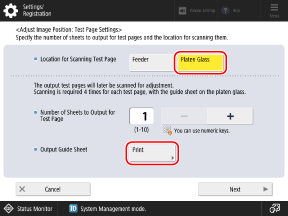
2
Select the paper source loaded with the paper to be used for the guide sheet, and press [Start Printing].
The guide sheet is printed.
3
Enter the number of copies of the test page to be printed, and press [Next].
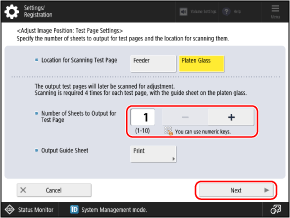
Scanning the multiple sheets of test pages for adjustment may increase calibration accuracy.
4
Select the paper source loaded with the custom paper to be adjusted, and press [Start Printing].
The test page(s) is printed.
5
Place the guide sheet on the platen glass.
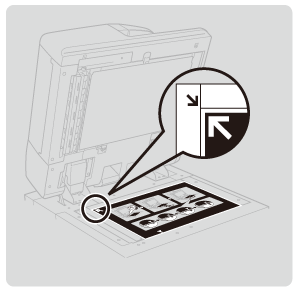
Place the guide sheet so that the arrow on the guide sheet is aligned with the arrow on the platen glass.
6
Place the test page so that the  (blue) mark is aligned with the mark on the guide sheet, and gently close the feeder.
 (blue) mark is aligned with the mark on the guide sheet, and gently close the feeder.
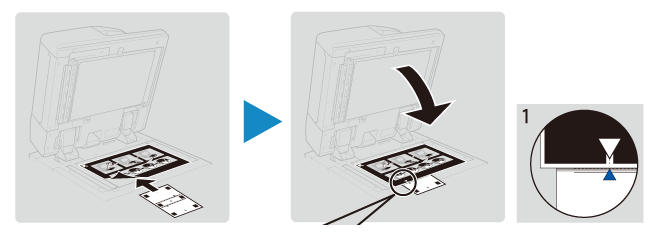
Make sure that the guide sheet does not move when you close the feeder.
7
Press [Start Scanning].
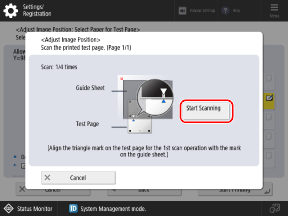
If [Correctly place the test page on the platen glass.] is displayed,the edges of the test page may be improperly folded or a transfer defect may have occurred.
8
Repeat Steps 6 and 7 for the  (yellow),
  (green), and
  (red) marks, in that order.
 (yellow),
  (green), and
  (red) marks, in that order.
Turn the test page upside down or turn it over, depending on where each mark is located.
9
Repeat Step 6 to 8 for the number of test pages printed in Step 3.
8
Press [Close]  [OK].
[OK].
 [OK].
[OK].NOTE
You can also adjust the image position more precisely after performing the adjustment described above. Adjusting the Print Position by Entering Measured Values