Using a Cloud Mail Server with OAuth 2.0
Configure the settings to use Microsoft's cloud service, Microsoft Exchange Online, or Google's cloud service, Google Workspace, with the OAuth 2.0 authorization framework.
Configuring the OAuth 2.0 Authentication (Microsoft) Settings
Configure this setting using Remote UI from a computer. You cannot use the control panel to configure the setting.
Administrator or NetworkAdmin privileges are required.
Administrator or NetworkAdmin privileges are required.
Required Preparations
Check that the date and time are set correctly on the machine. Setting the Date and Time
* If you change the date and time settings after configuring the OAuth 2.0 authentication settings, reconfigure the OAuth 2.0 authentication settings.
Log in to Remote UI as an administrator. Starting Remote UI
2
On the Portal page of Remote UI, click [Settings/Registration]. Remote UI Portal Page
3
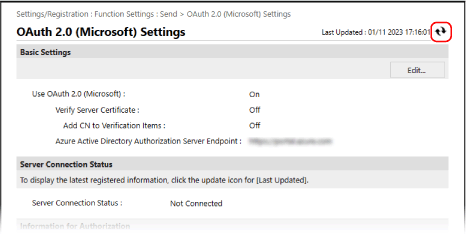
Click [Send]  [OAuth 2.0 (Microsoft) Settings].
The [OAuth 2.0 (Microsoft) Settings] screen is displayed.
4
In [Basic Settings], click [Edit].
The [Edit Basic Settings] screen is displayed.
5
Select the [Use OAuth 2.0 (Microsoft)] checkbox.
6
Select whether to verify the certificate when performing TLS encrypted communication with the server.
To verify the certificate, select the [Verify Server Certificate] checkbox.
To add a Common Name (CN) to the verification items, select the [Add CN to Verification Items] checkbox.
7
In [Microsoft Entra ID Authorization Server Endpoint], enter the following URL.
https://login.microsoftonline.com/<Tenant name>/oauth2/v2.0 |
Enter "common," consumers," or "organizations" for <Tenant name>, according to the usage environment of the machine.
8
Click [OK].
The [OAuth 2.0 (Microsoft) Settings] screen is displayed again.
9
Wait for several seconds, and then click [ ].
].
10
Check that [Successfully Connected] is displayed for [Server Connection Status].
11
Click the link displayed next to [Microsoft Entra ID Authorization Server Endpoint], and authorize the server according to the instructions on the screen.
Follow the instructions in [Message] and enter the user code displayed in [User Code].
Authorization is performed within the time frame indicated in [User Code Expires In].
12
Wait for several minutes, and then click [].
13
Check that [Active] is displayed for [Token Status].
14
Log out from Remote UI.
NOTE
If you change the settings to stop using OAuth 2.0, and then want to start using OAuth 2.0 again, reconfigure the OAuth 2.0 authentication settings from Step 1.
Configuring the OAuth 2.0 Authentication (Google) Settings
Required Preparations
Check that the date and time are set correctly on the machine. Setting the Date and Time
* If you change the date and time settings after configuring the OAuth 2.0 authentication settings, reconfigure the OAuth 2.0 authentication settings.
Step 1: Configuring the Authentication Client Settings in Google Workspace
Follow the procedure below to configure the authentication client settings.
The setting method may be changed due to service updates or other reasons. For details, see the manual for Google Cloud.
The setting method may be changed due to service updates or other reasons. For details, see the manual for Google Cloud.
1
Log in to Google Cloud with a Google Workspace administrator account, and create a new project.
For details on how to create a project, see the manual for Google Cloud.
2
Enable the Gmail API service.
1
Display the created project, and select [APIs & Services].
The [APIs & Services] screen is displayed.
2
Click [Enabled APIs & services] [Gmail API].
3
Configure the settings on the OAuth consent screen.
1
On the [APIs & Services] screen, click [OAuth consent screen].
The [OAuth consent screen] screen is displayed.
2
Select [Internal], and click [CREATE].
The [Edit app registration] screen is displayed.
3
Configure [App name], [User support email], and [Developer contact information].
Enter a name in [App name] and the information in [User support email] and [Developer contact information].
4
Click [SAVE AND CONTINUE].
5
Click [ADD OR REMOVE SCOPES].
6
Select the checkbox for the Gmail API (https://mail.google.com/), and click [UPDATE].
7
Check the settings, and click [SAVE AND CONTINUE].
4
Configure the access authentication information.
1
On the [APIs & Services] screen, click [Credentials].
The [Credentials] screen is displayed.
2
In [CREATE CREDENTIALS], click [Oauth client ID].
The [Create OAuth client ID] screen is displayed.
3
Select [Desktop app] in [Application type], and enter a name for the OAuth 2.0 client in [Name].
4
Click [CREATE].
The [Client ID] and [Client secret] are generated.
Step 2: Configuring the OAuth 2.0 (Google) Settings on the Machine
Configure this setting using Remote UI from a computer. You cannot use the control panel to configure the setting.
Administrator privileges are required.
Administrator privileges are required.
1
Log in to Remote UI as an administrator. Starting Remote UI
2
On the Portal page of Remote UI, click [Settings/Registration]. Remote UI Portal Page
3
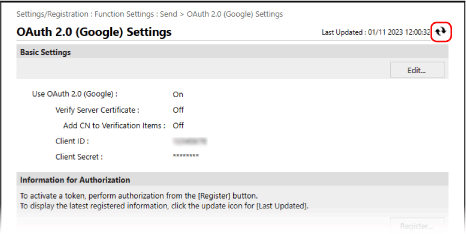
Click [Send] [OAuth 2.0 (Google) Settings].
The [OAuth 2.0 (Google) Settings] screen is displayed.
4
In [Basic Settings], click [Edit].
The [Edit Basic Settings] screen is displayed.
5
Select the [Use OAuth 2.0 (Google)] checkbox.
6
Select whether to verify the certificate when performing TLS encrypted communication with the server.
To verify the certificate, select the [Verify Server Certificate] checkbox.
To add a Common Name (CN) to the verification items, select the [Add CN to Verification Items] checkbox.
7
Enter [Client ID] and [Client Secret], and click [OK].
The [OAuth 2.0 (Google) Settings] screen is displayed again.
Enter the client ID and client secret obtained from Google Workspace. For details, see the Google Workspace website.
8
Wait for several seconds, and then click [].
9
In [Information for Authorization], click [Register].
The [Register Information for Authorization] screen is displayed.
10
Click the link displayed next to [URL for Google Authorization Server], and authorize the server according to the instructions on the screen.
Enter the authorization code part of the URL displayed on the error screen at the time of authorization into [Authorization Code].
https://xxxxxxxxxx&code=<authorization code>&scope=xxxxxxxxxx |
11
Click [OK].
The [OAuth 2.0 (Google) Settings] screen is displayed again.
12
Wait for several minutes, and then click [].
13
Check that [Active] is displayed for [Token Status].
14
Log out from Remote UI.
NOTE
If you change the settings to stop using OAuth 2.0, and then want to start using OAuth 2.0 again, reconfigure the settings in the "Step 2: Configuring the OAuth 2.0 (Google) Settings on the Machine" procedure. Step 2: Configuring the OAuth 2.0 (Google) Settings on the Machine