Previewing a Document on the Machine Before Printing (Hold) (For C7100 Series and C5100 Series)
Hold is a function to temporarily save the document (print data) sent from a computer to the machine in the memory of the machine, instead of printing it straight away.
The document on hold can be printed after reviewing the details of the document on the control panel or printing a sample to check the print result so that you can avoid unwanted printing.
If printing is not performed after a set period of time, the document data on hold is deleted automatically from the memory, and you can no longer print the data.
NOTE
The storage space for the Hold function is shared with the Mail Box. For details on the storage capacity, see the specifications of the Mail Box.
Mail BoxStep 1: Sending a Document from a Computer and Put It on Hold
You can set the Hold function in the print settings of the driver and send a document to be put on hold to the machine.
When Using Windows
1
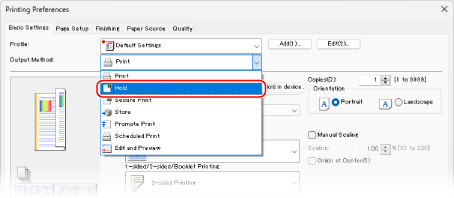
Display the [Printing preferences] screen of the printer driver.
Printing2
For [Output Method], select [Hold].
The [Information] screen is displayed.
3
Click [Yes].
The [Hold Details] screen is displayed.
4
Set the name of the document to be put on hold and click [OK].
The [Printing Preferences] screen is displayed again.
If you want to set the same name as the file name on the computer, select [Use File Name].
If you want to a name different from the file name, select [Enter Name], and enter a new name.
5
Configure the other print settings, as needed.
You can adjust the image quality and configure 2-sided printing and other settings to suit your document and purpose. For details, click [Help] on the [Printing Preferences] screen to display help.
6
Click [OK], and click [Print] or [OK].
When Using macOS
1
Display the printing dialog box, and select the printer driver of the machine.
Printing2
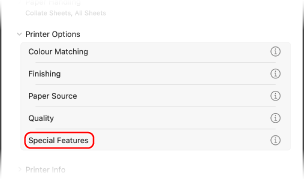
Click [Printer Options]

[Special Features].
3
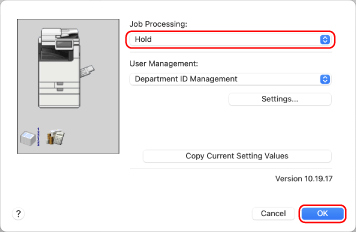
For [Job Processing], select [Hold], and click [OK].
The printing dialog box is displayed again.
4
Configure the other print settings, as needed.
You can adjust the image quality and configure 2-sided printing and other settings to suit your document and purpose. For more information, click [

] in the printing dialog box to display help.
5
Click [Print].
The [Name Settings] screen is displayed.
6
Enter the name of the document to be put on hold and click [OK].
Step 2: Reviewing and Printing a Document on Hold
You can print a document on hold after reviewing the details of the document or printing a sample to check the print result. You can also delete a document on hold if you no longer need it.
1
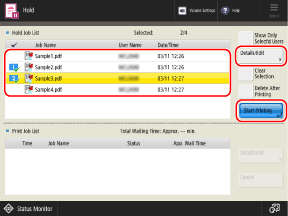
On the control panel, press [Hold] in the [Home] screen.
[Home] ScreenThe Hold screen is displayed.
2
Check and print the document(s) on hold that you need.
Hold Screen (For C7100 Series and C5100 Series)When Checking the Details of a Document

1
Select the document to check and press [Details/Edit]

[Preview].
A preview screen is displayed.
2
After you finish checking the details of the document, press [OK].
When Printing a Sample of a Document

1
Select the document to print a sample, and press [Details/Edit]

[Print Sample].
2
Set the number of copies and the range of pages to print, as needed.
Depending on the document, you cannot set the range of pages to print.
3
Press [Start Printing].
Sample printing starts and the [Print Job List] screen is displayed.
4
Press [Close].
When Printing Documents

1
Select the document(s) to print.
You can select and print up to 100 documents at a time.
* When multiple documents are selected, the documents are printed in the order they were selected (order of checkbox numbers).
2
Set whether to delete the documents after printing.
To automatically delete the documents from the machine after they are printed, press [Delete After Printing] to select it.
3
Press [Start Printing].
Printing starts and the [Print Job List] screen is displayed.
* You can also use the [Print Job List] screen to view the print job status.
4
Press [Close].
When Deleting Documents
Select the document(s) you want to delete, and press [Details/Edit]

[Delete]

[Yes].
* You can select and delete up to 100 documents at a time.
 [Delete]
  [Yes].

 [Special Features].


 [Preview].
 [Print Sample].
 Status Monitor] to view the print job status and log. Viewing the Print Job Status and Log
 [Delete]
  [Yes].