Sharing Destinations in a Group (User Group)
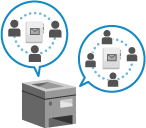
You can register a group (user group) with whom to share destinations, and share a user group address list among specific users, such as within the same department.
One user group address list can be made public to only one user group.
One user group address list can be made public to only one user group.
Procedure for Sharing Destinations
To share destinations, follow the procedure below:
Step 1 | Register the users with whom you want to share destinations to the local device (this machine). * You can skip this step when using the external server authentication: Proceed to Step 2. * If user groups have been registered, you can specify the user group to which a user belongs in [User Group Association] when you register new user information or edit it. [Add User] and [Edit User Information] Screen |
Step 2 | Select the users who belong to the group and register a user group. |
Step 3 | Make the user group address list public to the user group. |
Registering a User Group
Select the users who belong to the group and register a user group.
Use Remote UI from a computer to register the user group. You cannot use the control panel to register a user group.
Administrator privileges are required.
Administrator privileges are required.
1
Log in to Remote UI as an administrator. Starting Remote UI
2
On the Portal page of Remote UI, click [Settings/Registration]. Remote UI Portal Page
3
Click [User Management]  [Authentication Management] [User Group Management].
The [User Group Management] screen is displayed.
4
Register the user group.
When the Local Device Authentication Is Used
1
Click [Add Group (Local Device Users)].
The [Add Group (Local Device Users)] screen is displayed.
2
Configure the user group.
[Group ID]
Enter a separate ID to be assigned to the user group.
[User Group Name]
Enter the user group display name.
[User to Register to User Group]
Specify the users who belong to this group. Select the users to add to the group in the list under [Local Device Users], and click [Add >>] to add the users to the list under [Local Device Users].
3
Click [Add].
The user group is registered.
When the External Server Authentication Is Used
1
Click [Add Group (Other Users)].
The [Add Group (Other Users)] screen is displayed.
2
Configure the user group.
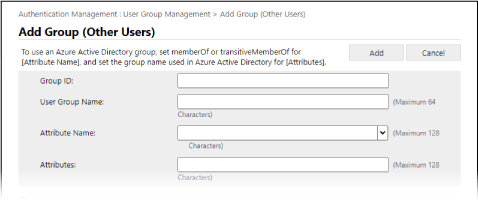
[Group ID]
Enter a separate ID to be assigned to the user group.
[User Group Name]
Enter the user group display name.
[Attribute Name]
Enter the attribute name (company name, department, position, etc.) to set for the user group from among the attribute names registered in the authentication server.
[Attributes]
Enter the attribute value to associate with the user group. All users with matching attribute values belong to that group.
3
Click [Add].
The user group is registered.
5
Log out from Remote UI.
NOTE
You can configure the settings to automatically change the name of the user group address list when the user group name is changed during user authentication.
Administrator or DeviceAdmin privileges are required to configure the settings.
Administrator or DeviceAdmin privileges are required to configure the settings.
Log in to Remote UI as an administrator click [Settings/Registration] [Set Destination] [Personal Address List/User Group Address List Settings] select the [Apply User Group Name Change to User Group Address List Name] checkbox.
You can configure the settings to use the Department ID as a user group when using Department ID Management.
Administrator privileges are required to configure the settings.
Administrator privileges are required to configure the settings.
Log in to Remote UI as an administrator click [Settings/Registration] [User Management] [Authentication Management] [Basic Settings] [Edit] in [User Group Management Settings] under [Other Settings], select the [Use department ID as user group] checkbox.
Configuring the Public Destination of a User Group Address List
You can make the address list of a user group public to a registered user group. Users can use an address list made public to the user group to which they belong.
A user group address list can be made public to only one user group. In addition, if a user group address list is already set to be made public to a user group, that user group cannot be set as the public view destination for another user group address list.
A user group address list can be made public to only one user group. In addition, if a user group address list is already set to be made public to a user group, that user group cannot be set as the public view destination for another user group address list.
Configure this setting using Remote UI from a computer. You cannot use the control panel to configure the setting.
Administrator privileges are required.
Administrator privileges are required.
1
Log in to Remote UI as an administrator. Starting Remote UI
2
On the Portal page of Remote UI, click [Address Book]. Remote UI Portal Page
The [Address Lists] screen is displayed.
3
Click the user group address list to be made public from the address lists.
4
Click [Public View Settings].
The [Address List Public View Settings] screen is displayed.
5
Select the [Make Public] checkbox, and select the user group to which the address list is made public.

6
Click [OK].
The settings are applied.
7
Log out from Remote UI.