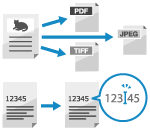
To enable searching of characters in an original as text, press [OCR (Text Searchable)] to select it.
For details, see the following:
File and Division Settings

Set the file format and division settings of the scanned data and the scanned data file name.
This extracts text information from the original and creates a text-searchable file.
This extracts text information from the original and creates a text-searchable file.
Configuring the File Format and Division Settings
Select the scanned data format from JPEG, TIFF, PDF, XPS, or OOXML according to your purpose and environment.
You can compress data and outline text and line drawings. You can also combine originals with multiple pages into one file or create separate files for each page.
You can compress data and outline text and line drawings. You can also combine originals with multiple pages into one file or create separate files for each page.
* You cannot configure this setting when saving scanned data to Mail Box.
1
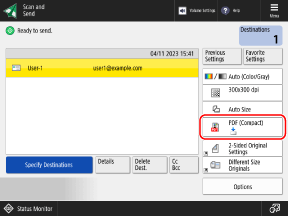
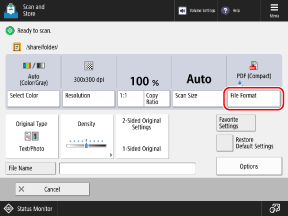
On the scan screen, press the file format setting button. Scan Screen


The [File Format] screen is displayed.
Select the file format.
[JPEG]
This file format is suitable for originals with photos. You can divide an original with multiple pages into separate files for each page.
[TIFF]
This file format is suitable for originals with images. Originals are scanned in black and white.
[TIFF/JPEG (Auto)]
The setting is set to TIFF or JPEG automatically depending on the color setting when scanning. Selecting a Color
When the color setting is [Black & White]: TIFF
When the color setting is other than [Black & White]: JPEG
In the case of TIFF and JPEG, you can divide an original with multiple pages into separate files for each page.
[PDF]
This file format is suitable for documents. You can display the document in the same way on any computer regardless of the operating system.
[XPS]
A file format used since Windows Vista. You can display the document in the same way on any computer operating Windows.
[OOXML]
The file format (Office Open XML) of Microsoft Office documents standardized by the International Organization for Standardization. This file format can be edited with Word or PowerPoint. Select whether to use Word or PowerPoint format.
3
Configure additional PDF, XPS, or OOXML features, as needed.
You can configure additional features when PDF, XPS, or OOXML is selected in Step 2.
When Configuring Additional PDF Features

Reducing the Data Size
Press [Compact] to select it.
If there are few colors used in the original, press [Limited Color] to select it.
If there are few colors used in the original, press [Limited Color] to select it.
Enabling Recognition of Text in an Original
Press [OCR (Prioritize Speed)], [OCR (Text Searchable)], or [OCR (Prioritize Precision)] to select one.
For details, see the following:
Enhancing Security
Press [Encrypt], [Add Digital Signatures], or [Add Device Signature] to select one.
For details, see the following:
For details, see the following:
Outlining Text and Line Drawings
Press [Trace & Smooth] to select it.
Creates a PDF file with sharp text and line drawings. You can also process outline data on a PDF file using Adobe Illustrator.
Creates a PDF file with sharp text and line drawings. You can also process outline data on a PDF file using Adobe Illustrator.
Creating a PDF File for Long-term Storage
Press [Format to PDF/A] to select it.
Creates a PDF file that conforms to PDF/A-b1 to guarantee that the PDF display does not change depending on the device or browsing software to ensure long-term storage.
Creates a PDF file that conforms to PDF/A-b1 to guarantee that the PDF display does not change depending on the device or browsing software to ensure long-term storage.
When Configuring Additional XPS Features

Reducing the Data Size
Press [Compact] to select it.
Enabling Recognition of Text in an Original 


Press [OCR (Text Searchable)] to select it.
For details, see the following:
For details, see the following:
Enhancing Security
Press [Add Digital Signatures] or [Add Device Signature] to select one.
For details, see the following:
For details, see the following:
When Configuring Additional OOXML Features

4
Configure the division setting, as needed.
To divide an original with multiple pages into separate files for each page instead of having them as one file, press [Divide into Pages] to select it.
To scan from [Scan and Send], specify how many pages to divide the original into, and press [OK].
To scan from [Scan and Send], specify how many pages to divide the original into, and press [OK].
5
Press [OK].
The scan screen is displayed again.
NOTE
The Effect of the File Format on Select Color, Resolution, and Ratio
When PDF (compact or outline), XPS (compact), or OOXML is selected, the following setting restrictions apply:
Color selection: other than [Black & White]
Resolution: [300x300 dpi]
* When selecting OOXML in PowerPoint format, you can also set this to [600x600 dpi].
Ratio: [100%] or [Auto]
When Creating an Outlined PDF File
You cannot configure this setting when the original size is set to [Long Original].
Depending on the original, characters and line drawings may not be correctly identified.
Depending on your version of Adobe Illustrator, the text and background may appear misaligned or text and line drawings may not be displayed when opening an outlined PDF file.
Setting the File Name
By default, scanned data is sent and saved with the following file name:
When sending an e-mail

 Job No.
 Page No.
When sending scanned data to a destination other than an e-mail address or when saving scanned data

 Send/save date and time (in this example, "10/30/2023, 12:34:56 PM")
* When the file format setting is set to [Divide into Pages]

This page number is added to the end of the file name. (When sending, a five-digit number is used, and when storing, a three-digit number is used.)
Example:
20231030123456_00001.pdf
20231030123456_001.pdf
20231030123456_00001.pdf
20231030123456_001.pdf
You can specify a custom file name indicating the contents, or configure the settings to create a file name by extracting the characters at the beginning of the original.
1
On the scan screen, press [File Name] or [Options]  [File Name]. Scan Screen
 [File Name]. Scan Screen
The [File Name] screen is displayed.
2
Set the file name.
To scan from [Scan and Send], press [File Name], enter a custom file name, and press [OK].
Scanned data is sent or saved with the following file name:
When sending an e-mail


 Set file name
 Page number
When sending to a destination other than an e-mail address


 Set file name
 Send/save date and time (in this example, "10/30/2023, 12:34:56 PM")
When saving scanned data


 Set file name
* If a file with the same name exists in the save location when saving scanned data to a location other than Mail Box, a number ("(1)" to "(9)") is added to the end of the file name.
Example:
Sample(1).pdf
Sample(1).pdf
If the total number of characters used for the set file name and used to indicate the file location (path) exceeds 256 single-byte characters, the file may not be sent or saved with the set file name.
If you enter characters not allowed by the operating system of the sending destination, such as "\," "/," ":," "*," "?," "<," ">," or "|," when sending the file to a file server, etc., the file may not be sent.
You cannot use the characters "\," "/," ":," "*," "?," "<," ">," or "|" in the file name when saving scanned data. In addition, you cannot use a period or space at the beginning or end of a file name.
When Creating a File Name by Extracting the Characters at the Beginning of the Original (Only When Sending Scanned Data)

Press [Auto (OCR)] to select the checkbox.
This setting is applied only when you use a text-searchable file format for the scanned data. Creating a Text-Searchable File (OCR Processing)
You cannot configure this setting and send a file when PDF file encryption is set at the same time.
You can change the number of characters extracted as a file name. [OCR (Text Searchable) Settings]
If you entered characters in [File Name], the characters extracted from the original are added to the end of those characters.
* Characters in the file name that exceed the character limit will be deleted.
The file name when [Auto (OCR)] is enabled is not applied to the following:
Send status displayed in the status display at the bottom of the screen [Home] Screen
TX report Printing a TX Report
TX log when a sending error occurs Checking the Send or Save Status and Log of Scanned Data
To Prevent the Date/Time and Page Number from Being Automatically Added (Only When Sending Scanned Data)

Press [Remove Date/Job No. from File Name] to select the checkbox.
To overwrite a file when a file with the same name exists in the send destination, press [Overwrite File with Same Name] to select the checkbox.
To overwrite a file when a file with the same name exists in the send destination, press [Overwrite File with Same Name] to select the checkbox.
* If a file with the same name exists in the send destination and the [Overwrite File with Same Name] checkbox is cleared, a four-digit number is added to the end of the file name.
Example:
Sample(0001).pdf
Sample(0001).pdf
3
Press [OK] or [OK]  [Close].
 [Close].
The scan screen is displayed again.
NOTE
Editing a File Name Registered in "Favorite Settings" in [Scan and Send]
When "Favorite Settings" are registered with a file name set, you can use the following procedure to edit only the file name setting registered in "Favorite Settings."
Log in to Remote UI  [Settings/Registration]
  [Send]
  [Favorite Settings]
  [Edit]
  edit the file name
  [OK].
[OK].
 [Settings/Registration]
  [Send]
  [Favorite Settings]
  [Edit]
  edit the file name
  [OK].
[OK].* You cannot use the control panel to edit only the file name setting. To change the file name setting, register "Favorite Settings" again. Registering and Recalling Favorite Settings
Creating a Text-Searchable File (OCR Processing)
Optical Character Recognition (OCR) is a technology that recognizes characters in the original and extracts text information.
Configure the settings to perform OCR processing when scanning the original to create a text-searchable file.
Configure the settings to perform OCR processing when scanning the original to create a text-searchable file.
Text-searchable file formats:
PDF (searchable PDF)
OOXML
XPS 


* You cannot configure this setting when saving scanned data to Mail Box.
1
On the scan screen, press the file format setting button. Scan Screen


The [File Format] screen is displayed.
Select the file format.
To create a PDF file, press [PDF].
To create a Word-format OOXML file, press [OOXML]  [Word].
 [Word].
To create a PowerPoint-format OOXML file, press [OOXML]  [PowerPoint].
 [PowerPoint].
To create a XPS file, press [XPS]. 


3
Press [OCR (Prioritize Speed)], [OCR (Text Searchable)] or [OCR (Prioritize Precision)].
If you selected [PDF] or [XPS] in Step 2, this can be set in combination with [Compact] or other additional functions.
* [Trace & Smooth] and [Limited Color] cannot be set in combination with [OCR (Prioritize Precision)].
* The image quality level setting is disabled when [OCR (Prioritize Precision)] is used in combination with [Compact]. [Image Quality Level for Limited Color/Compact]
The image quality may be different from PDF files created using [OCR (Prioritize Speed)] in combination with [Compact].
The image quality may be different from PDF files created using [OCR (Prioritize Speed)] in combination with [Compact].
Selecting the OCR processing language according to the language of the original.
If you selected [PDF] or [XPS] in Step 2, select the language from the [OCR Language] pull-down menu.
When [OOXML]  [Word] is selected in Step 2, press [Change], select the language, and press [OK].
 [Word] is selected in Step 2, press [Change], select the language, and press [OK].
When [OOXML]  [PowerPoint] is selected in Step 2, select the language, and press [OK].
 [PowerPoint] is selected in Step 2, select the language, and press [OK].
5
Press [OK].
The scan screen is displayed again.
NOTE
The Effect of OCR Processing on Original Size and Ratio
When OCR processing is set, the following setting restrictions apply:
Original size: other than [Long Original]
Ratio: [100%] or [Auto]
Auto Detection of Original Orientation
By default, the orientation of the original is detected automatically according to the orientation of text detected when the file is created. [OCR (Text Searchable) Settings]
Deleting the Background Image (Only for Word-format OOXML Files)
You can configure the setting to delete the image recognized as the background when creating a file. Deleting unneeded images makes it easier to edit Word files. [Include Background Images in Word File]
When OCR Processing Is Not Performed Correctly
Check whether the language settings in Step 4 match the language used in the original.
Check whether the original being used is suitable for OCR processing. Text Is Not OCR Processed Correctly